Google Analytics
Google Analytics Integration Setup Guide
Section titled “Google Analytics Integration Setup Guide”This guide will walk you through connecting your Google Analytics 4 (GA4) property to Chartivo to enable web analytics, user behavior insights, and traffic metrics tracking.
Prerequisites
Section titled “Prerequisites”Before you begin, ensure you have:
- An active Google Analytics 4 property
- A Google Cloud Platform (GCP) project
- Administrator access to your Google Analytics property
Note: If you already set up Google Search Console integration, you can reuse the same GCP project and service account. Skip to Step 7 if you want to use an existing service account.
Part 1: Google Cloud Setup
Section titled “Part 1: Google Cloud Setup”Step 1: Access Google Cloud Console
Section titled “Step 1: Access Google Cloud Console”- Open your browser and navigate to https://console.cloud.google.com
- Log in with your Google account (use the same account that has access to your GA4 property)
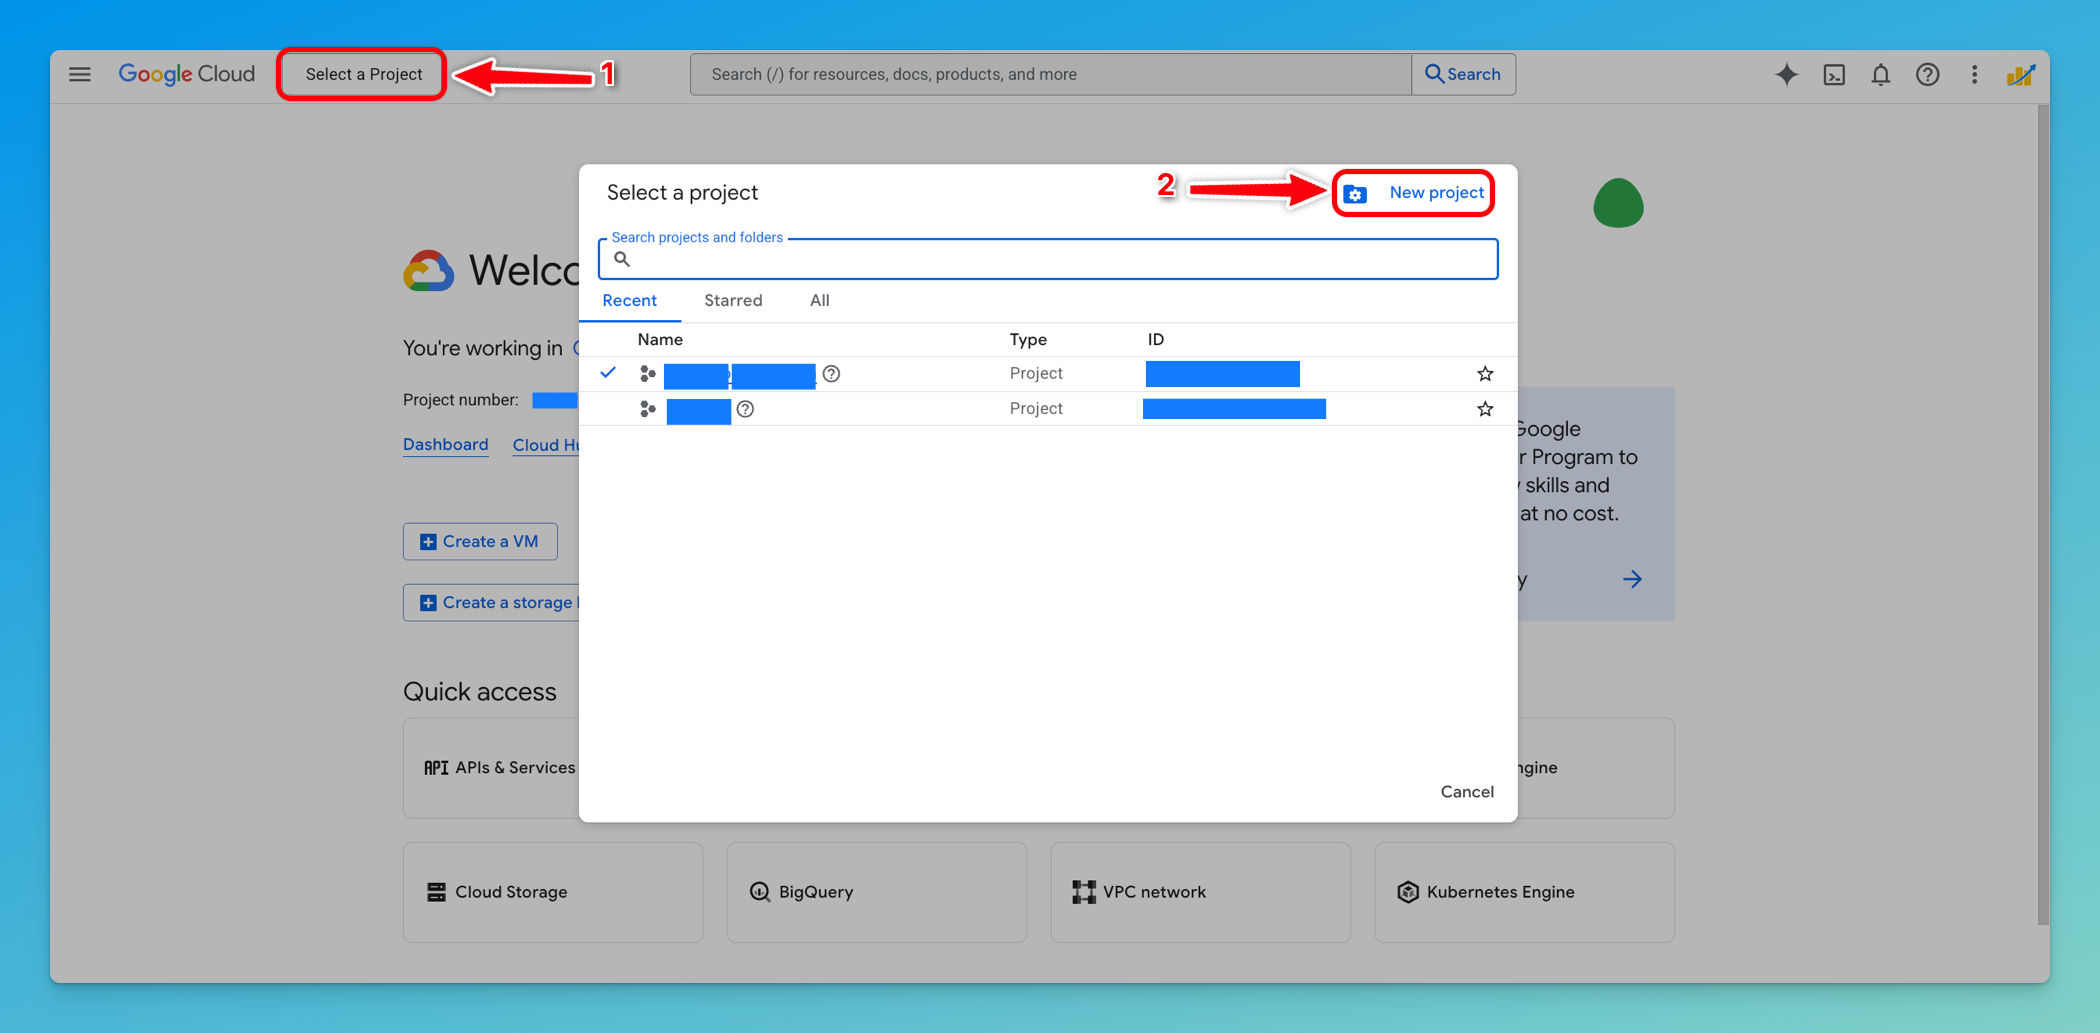
- If you don’t have a GCP project yet, create one by clicking Select a project → New Project
Step 2: Create or Select a Project
Section titled “Step 2: Create or Select a Project”- In the project selector dropdown, either:
-
Select an existing project that you want to use for this integration, OR
-
Click New Project to create a new one
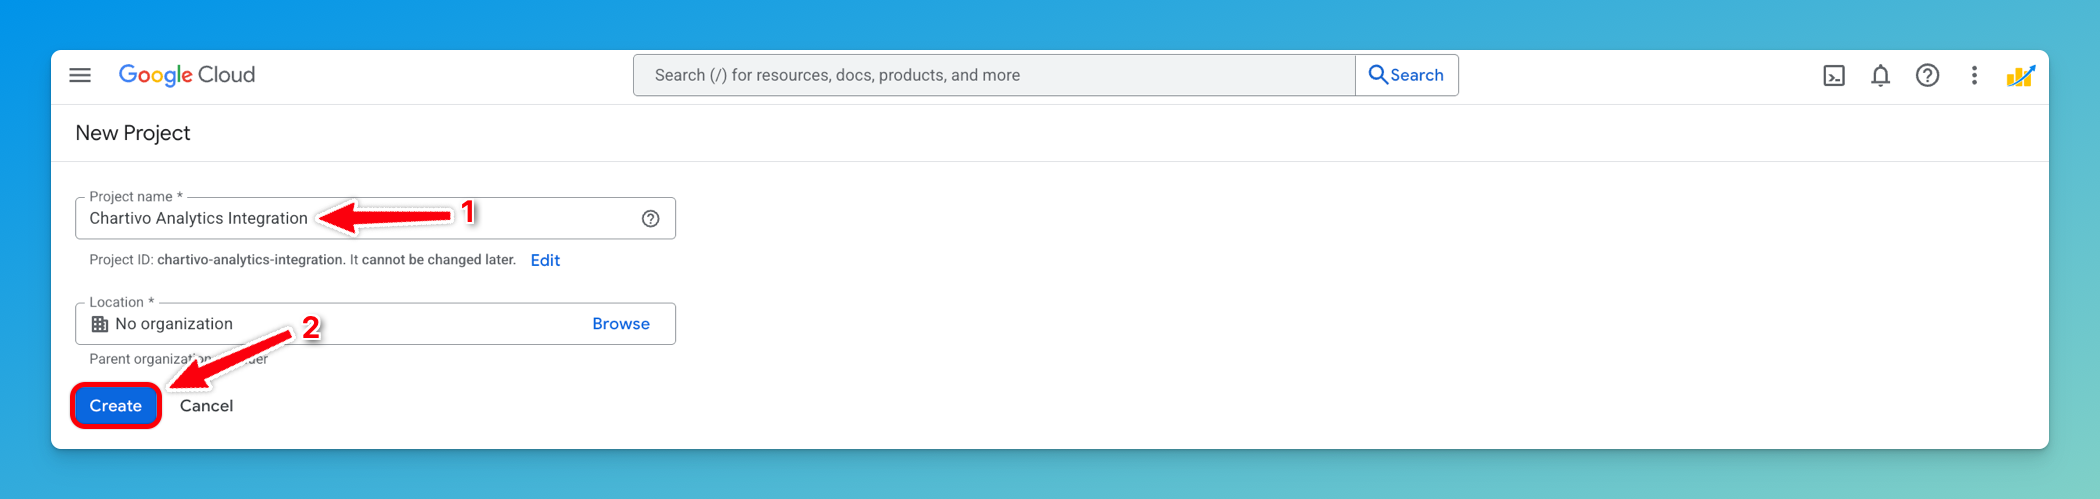
- If creating a new project:
- Enter a project name (e.g., “Chartivo Analytics Integration”)
- Click Create
- Wait for the project to be created (usually takes 10-30 seconds)
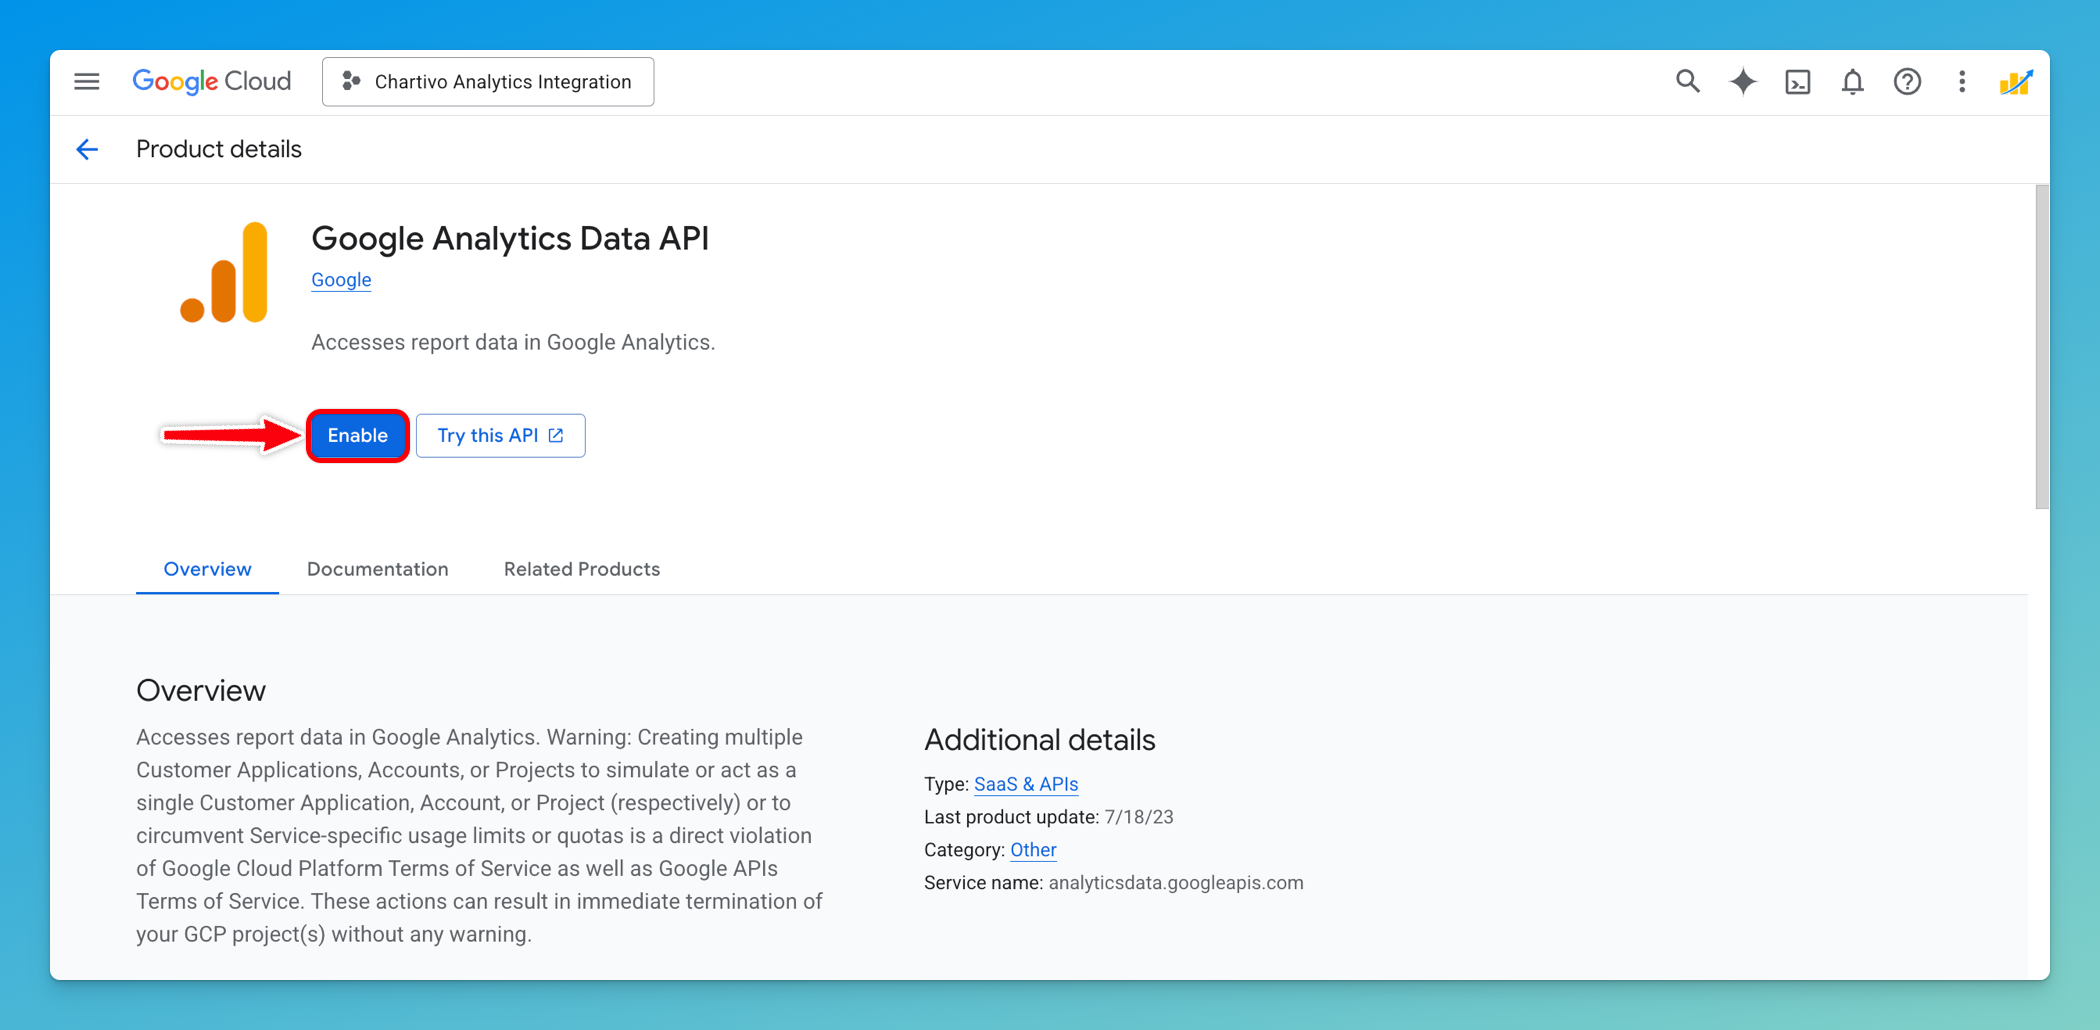
Step 3: Enable Google Analytics Data API
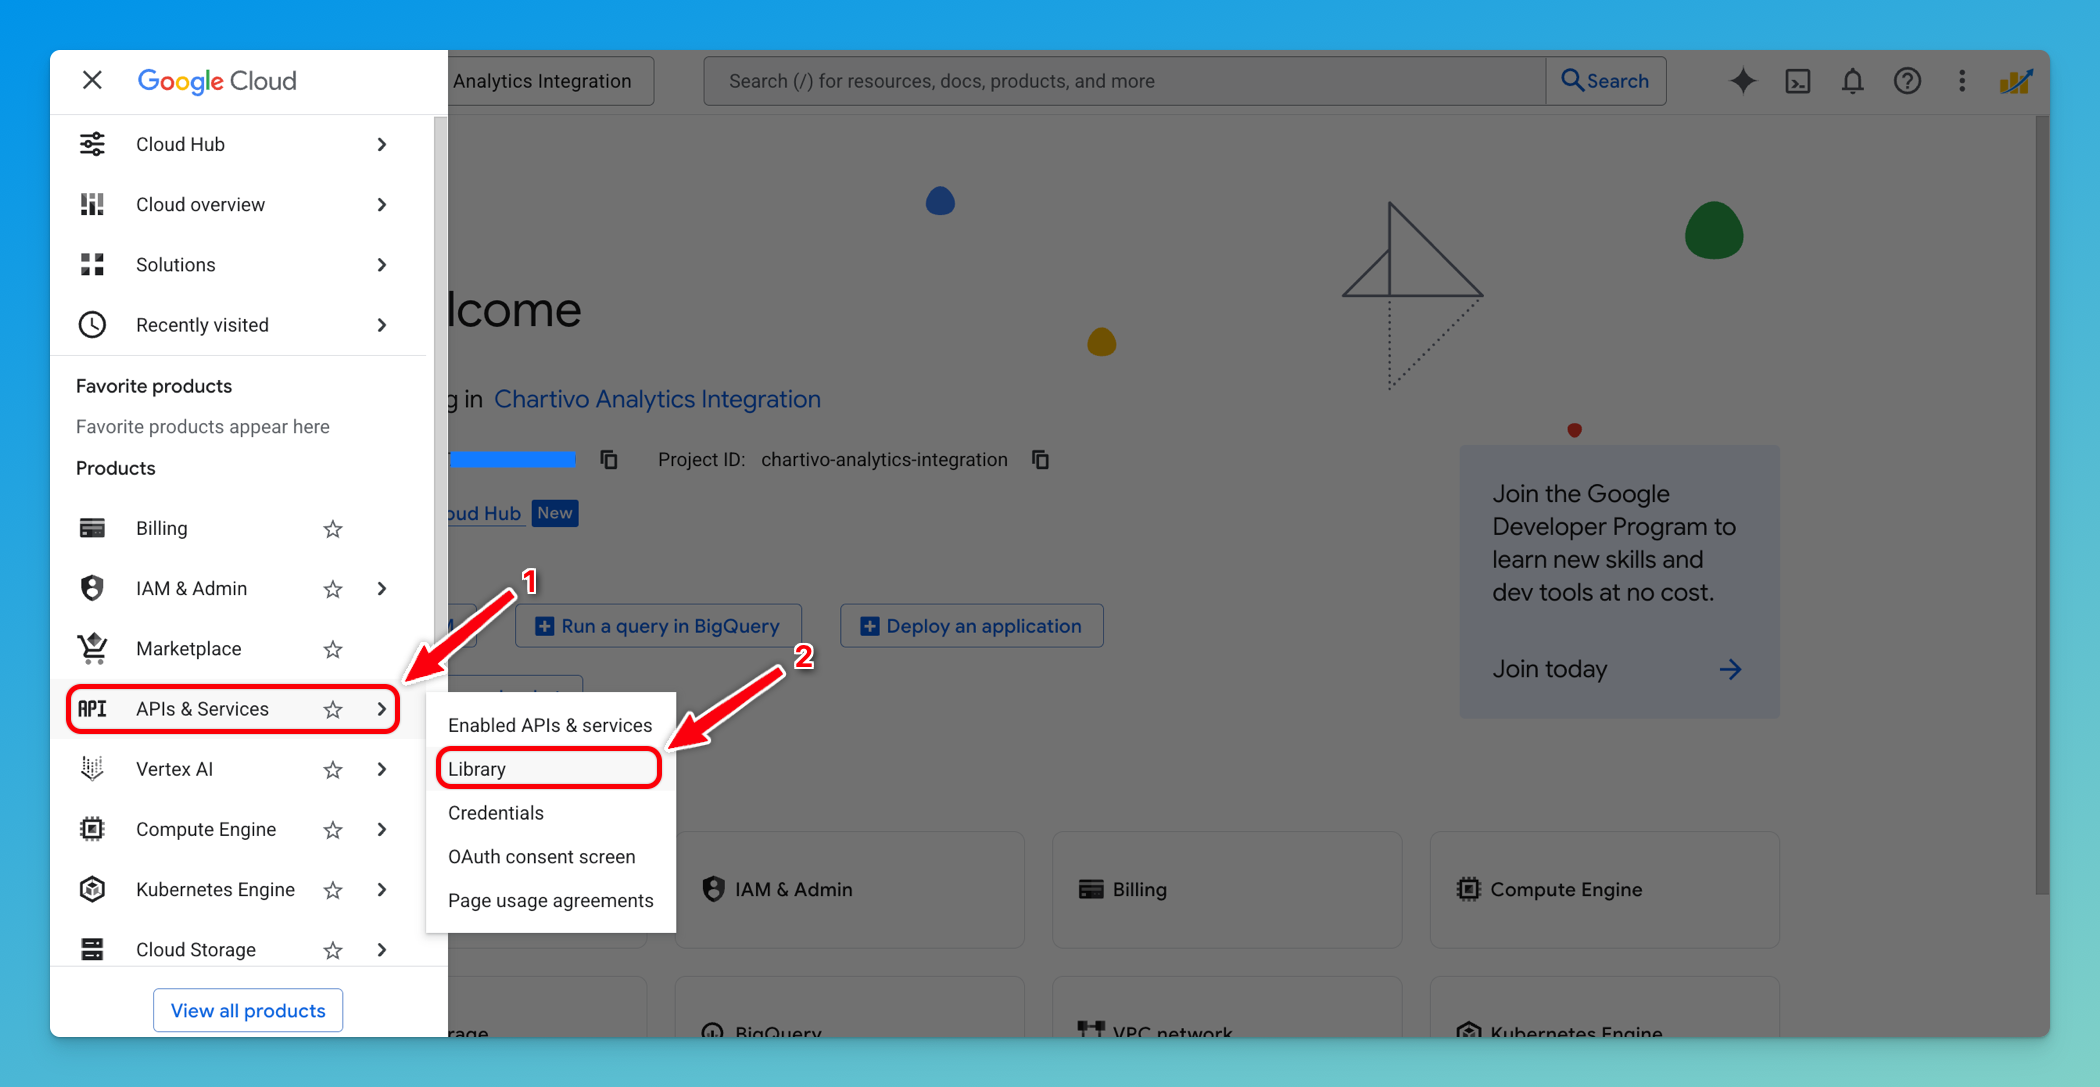
Section titled “Step 3: Enable Google Analytics Data API”-
In the Google Cloud Console, open the navigation menu (☰ hamburger icon)
-
Navigate to APIs & Services → Library
-
In the API Library search bar, type: Google Analytics Data API
-
Click on Google Analytics Data API from the search results
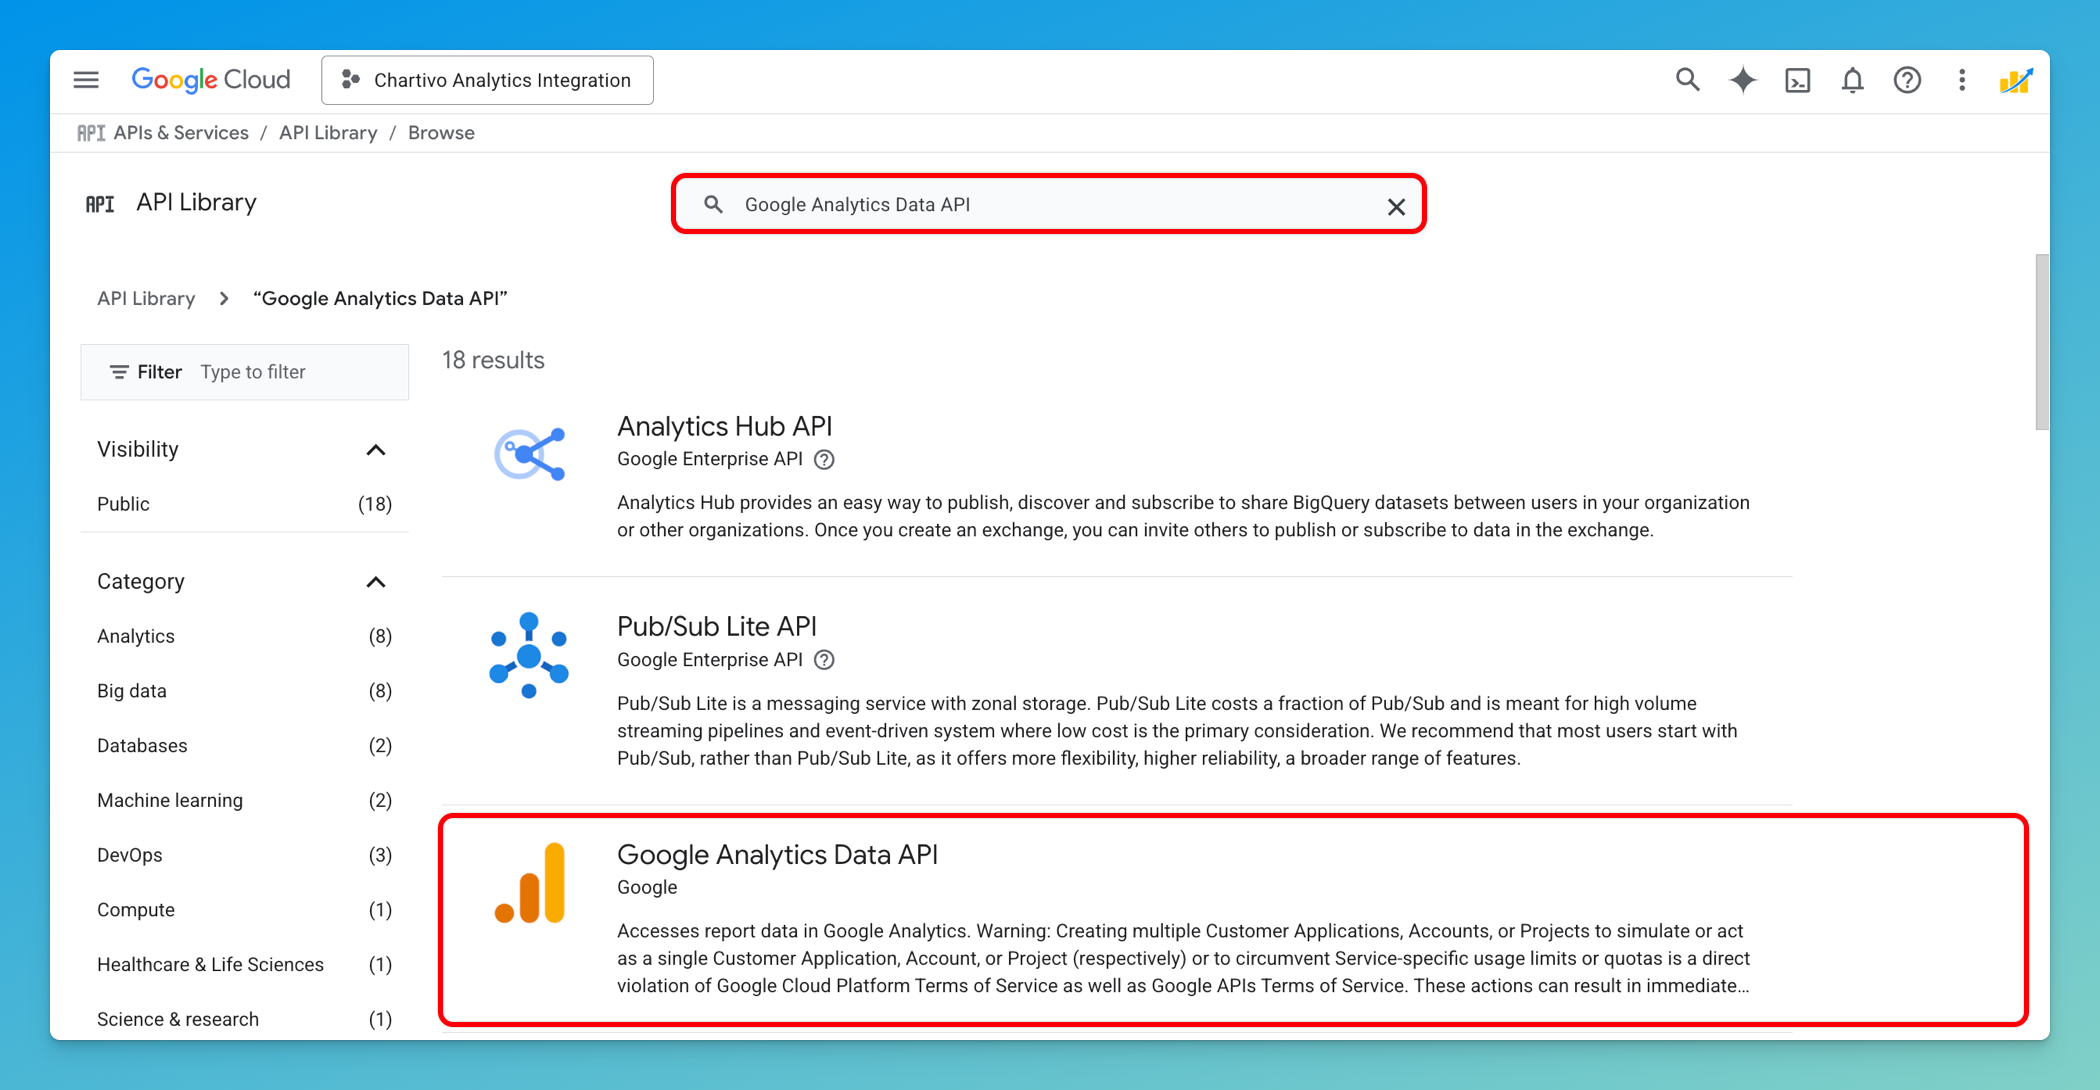
-
Click the Enable button
Step 4: Create a Service Account
Section titled “Step 4: Create a Service Account”-
In the navigation menu, go to APIs & Services → Credentials
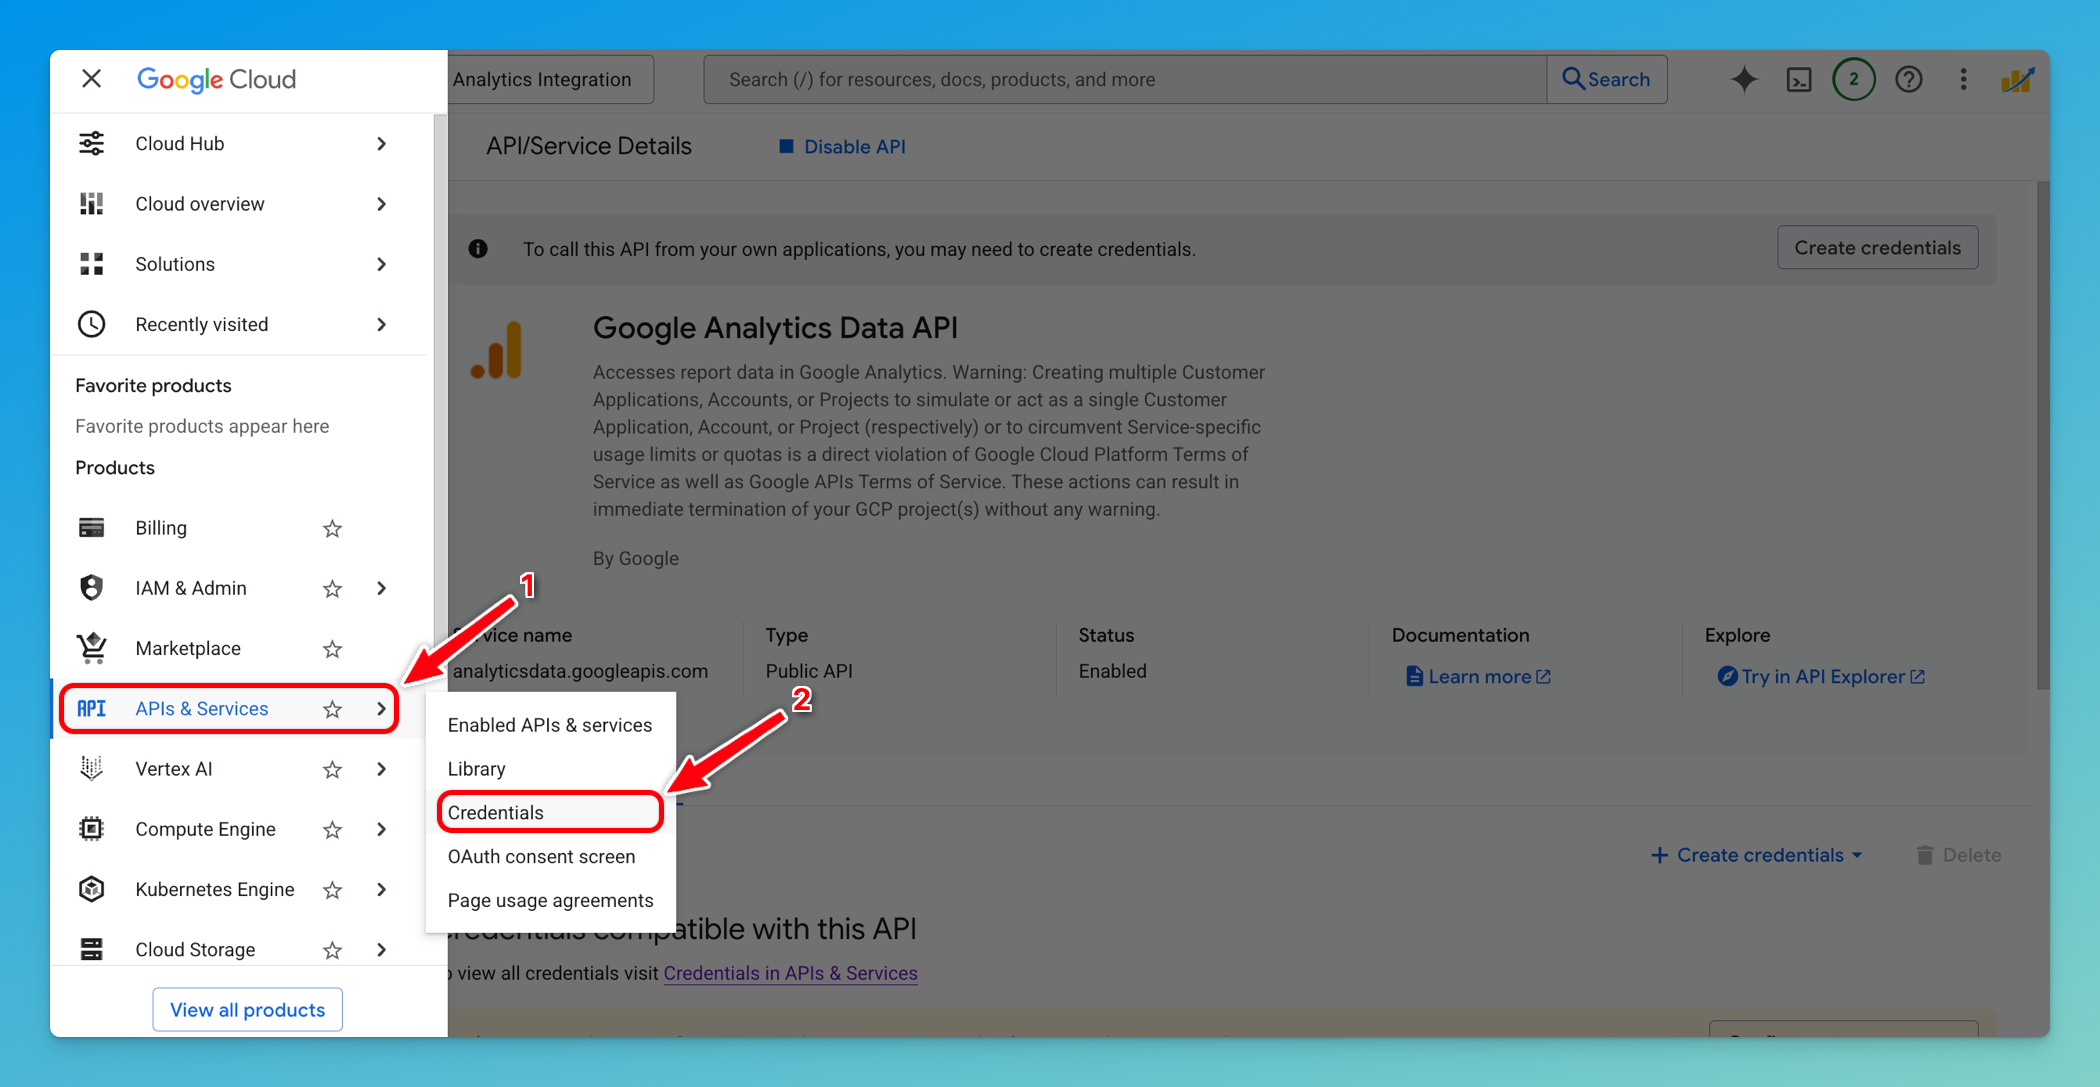
-
Click + Create Credentials at the top
-
Select Service Account from the dropdown menu
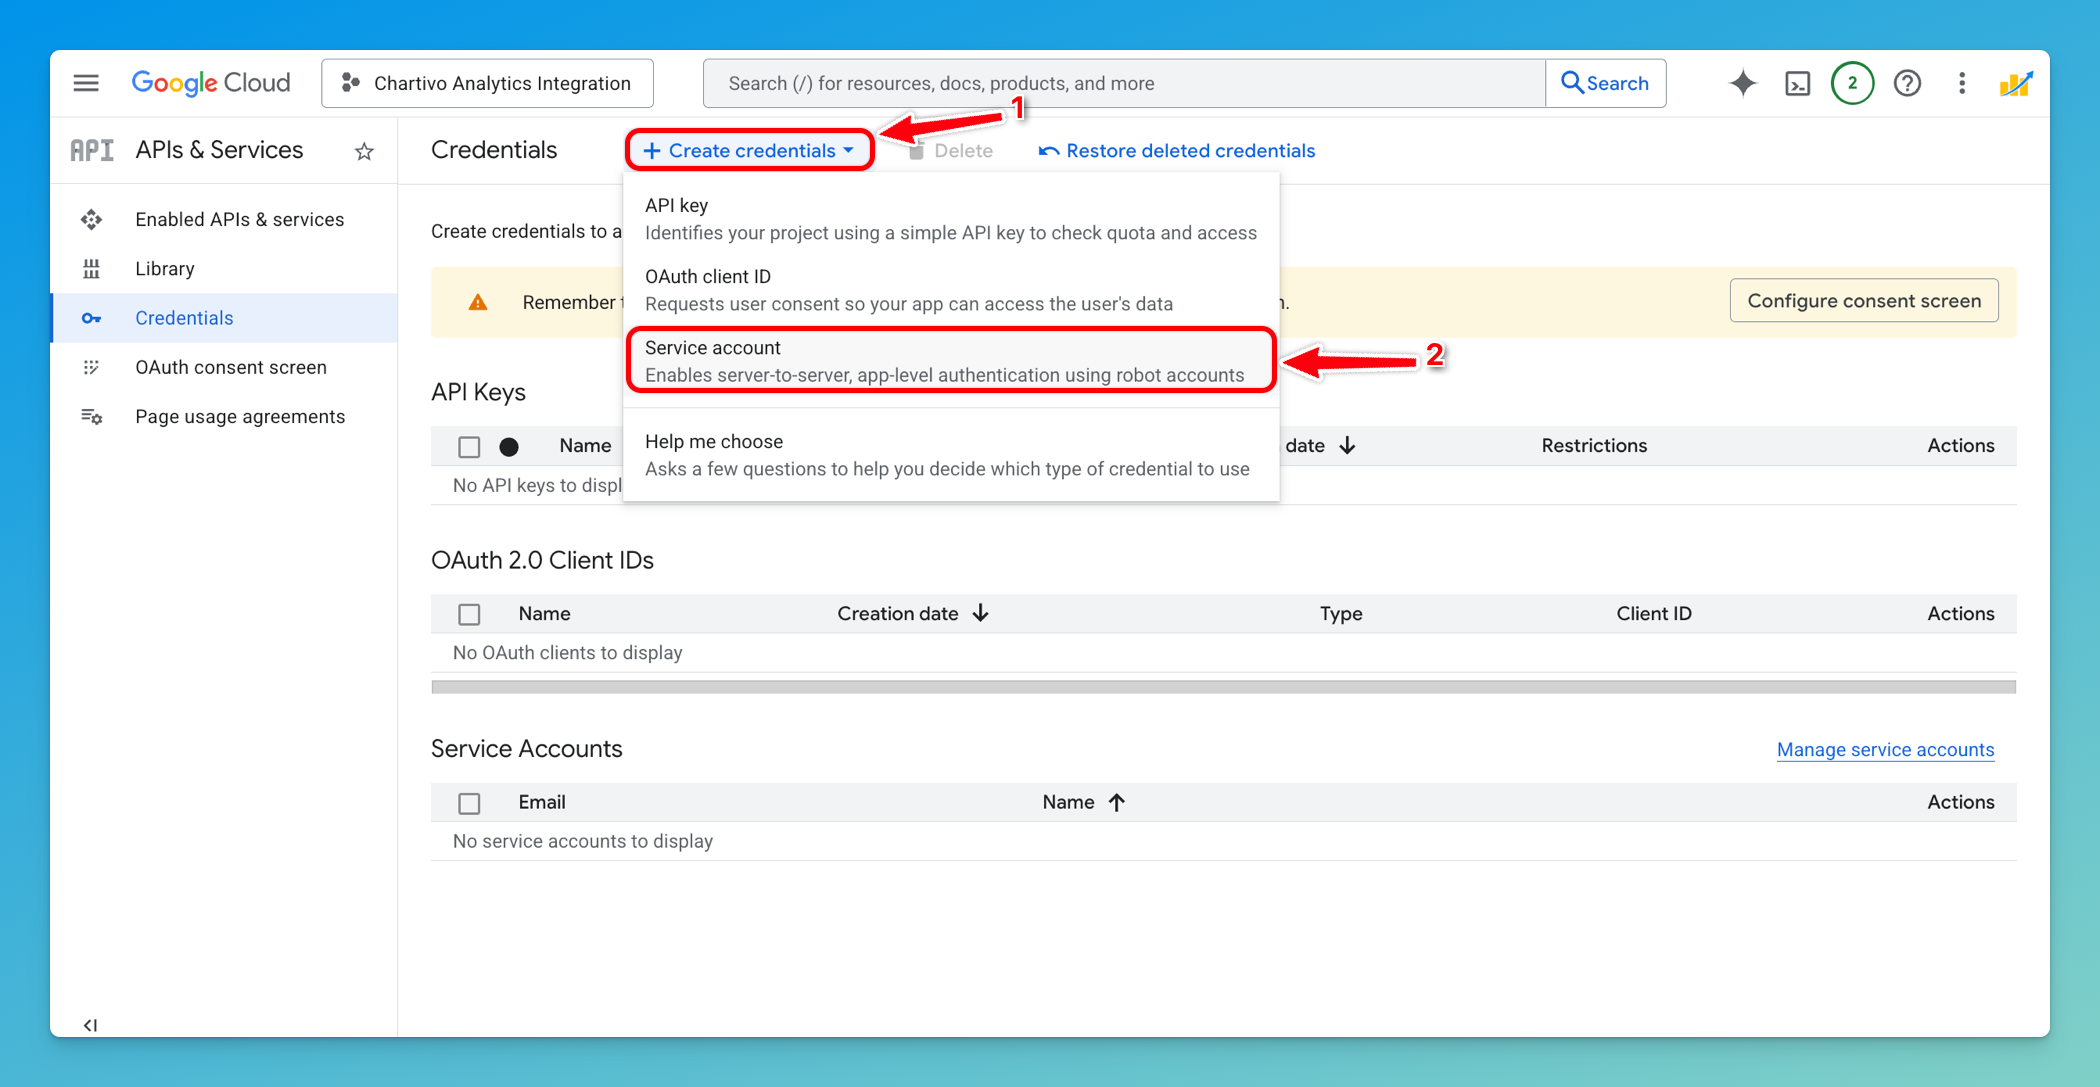
-
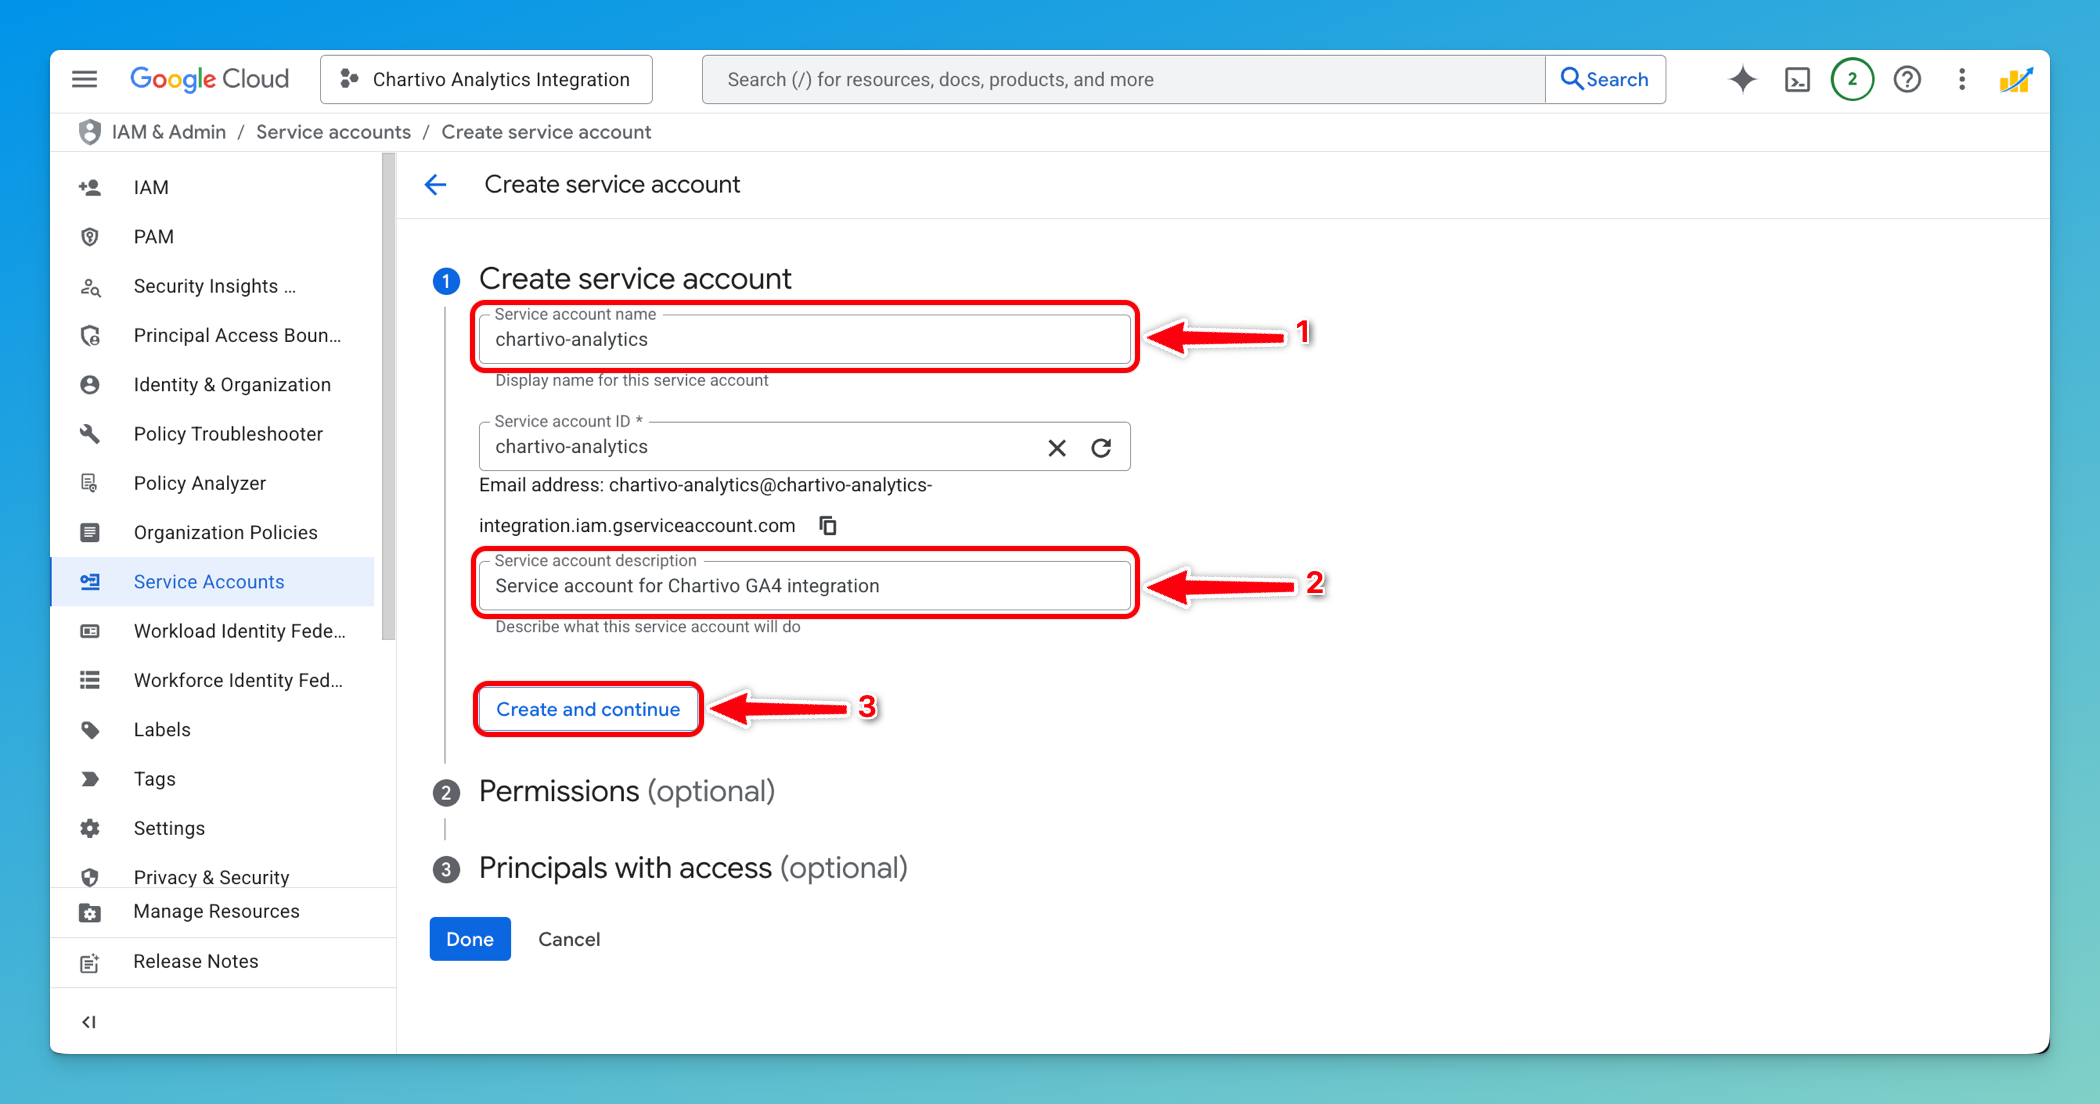
Fill in the service account details:
- Service account name:
chartivo-analytics(or your preferred name) - Service account ID: Will auto-populate based on the name
- Description:
Service account for Chartivo GA4 integration(optional)
- Service account name:
-
Click Create and Continue
Tip: If you already created a service account for Google Search Console, you can reuse it. Skip to Step 7 and use the existing service account email.
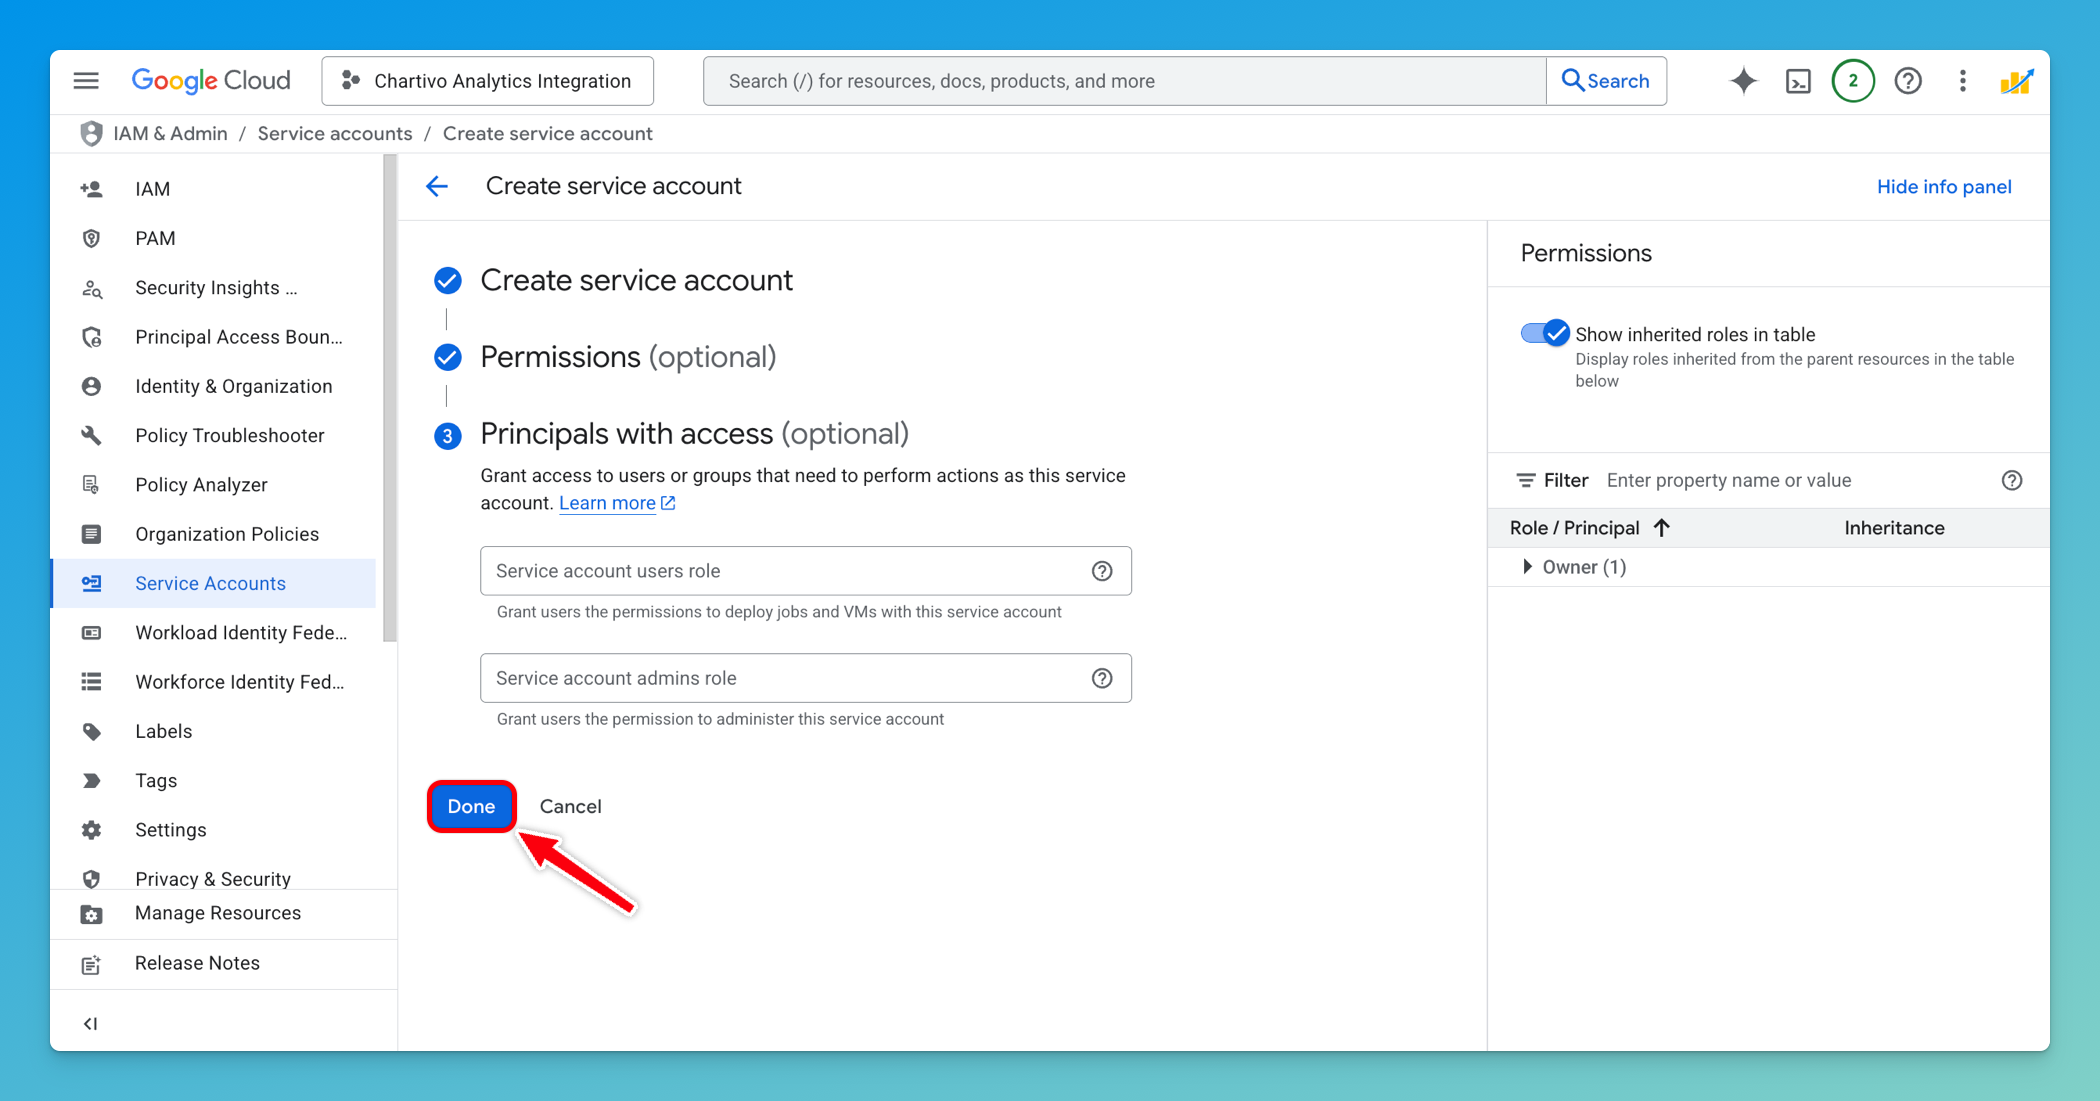
Step 5: Grant Service Account Permissions (Optional)
Section titled “Step 5: Grant Service Account Permissions (Optional)”- On the Grant this service account access to project screen:
- You can skip this step by clicking Continue (no project-level roles are required)
- On the Grant users access to this service account screen:
-
You can skip this step by clicking Done
-
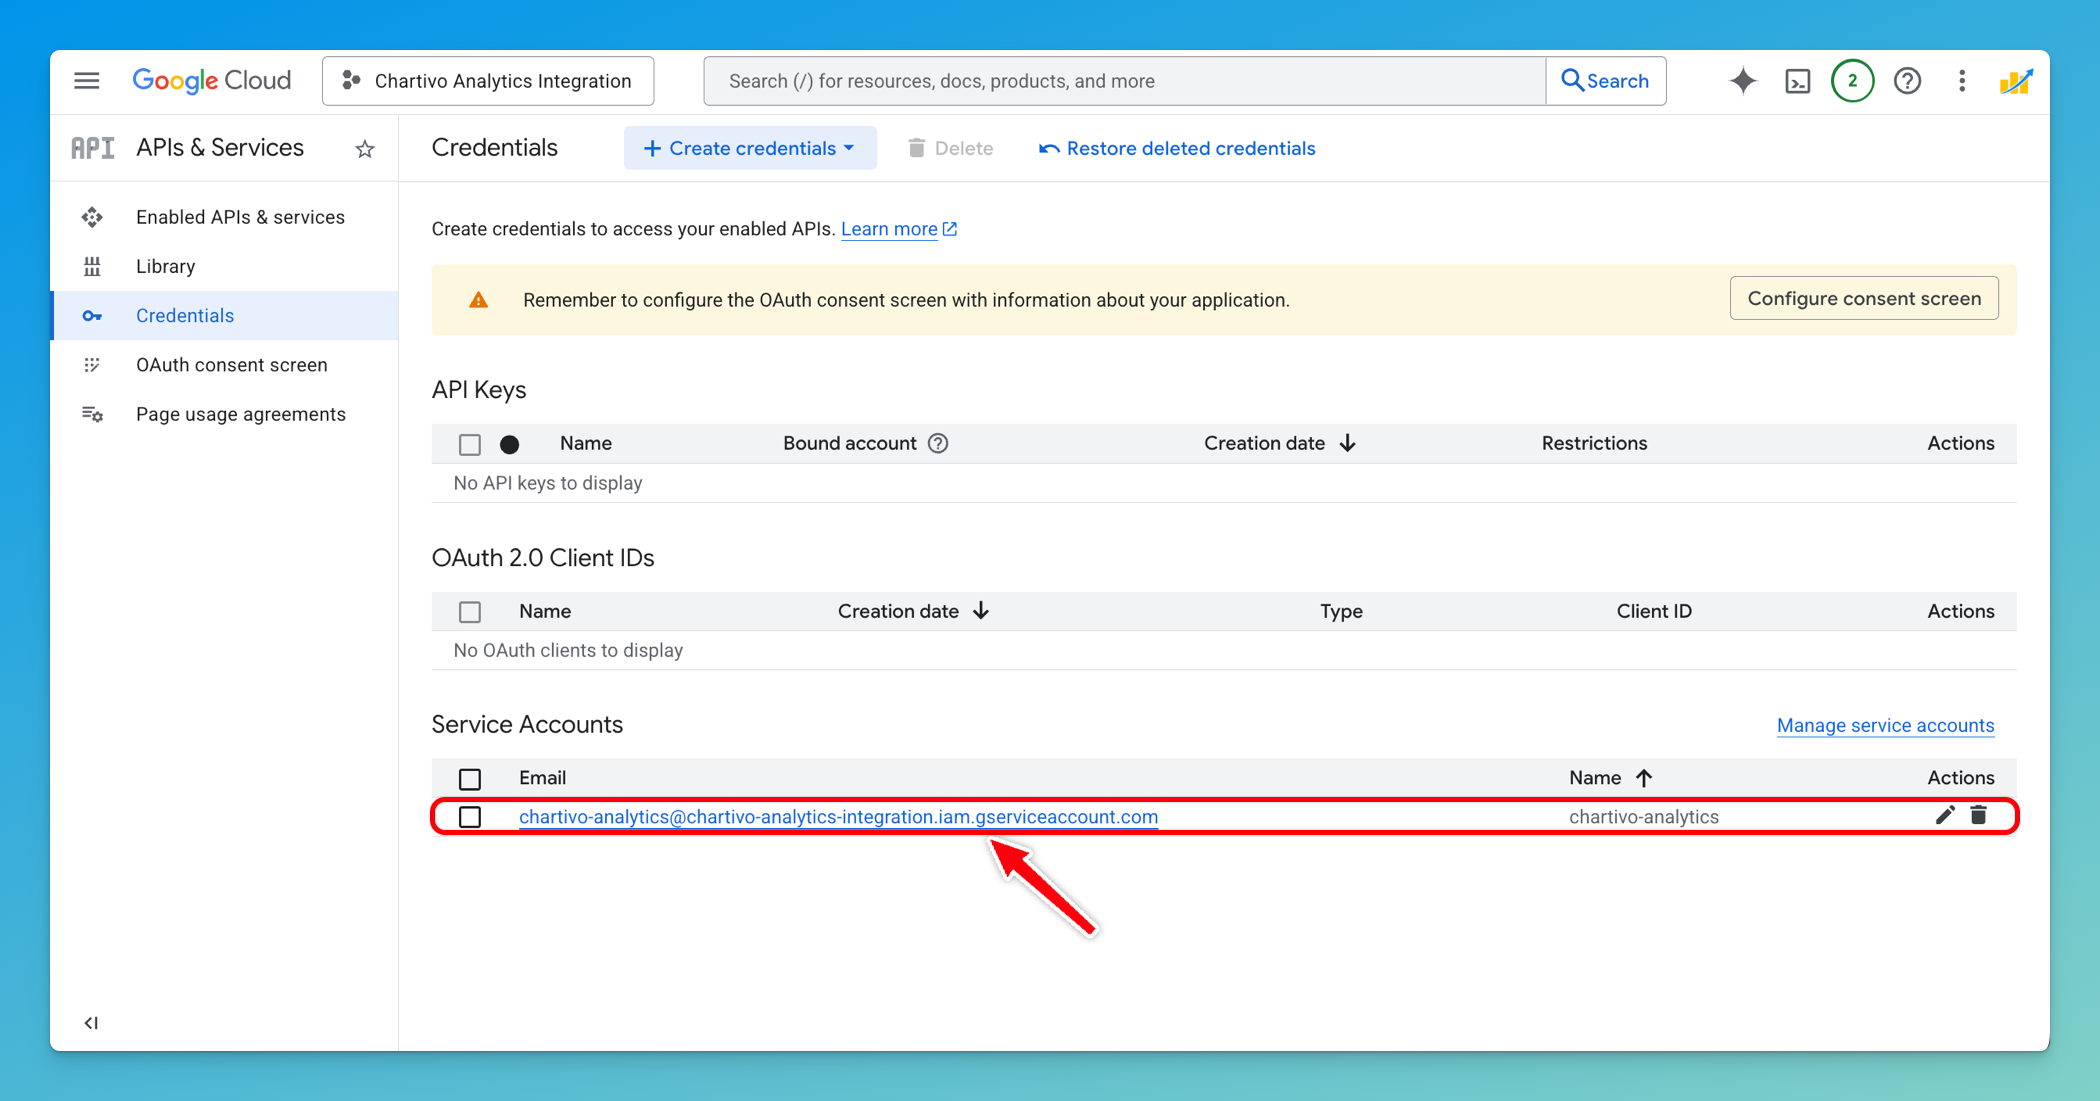
Step 6: Create and Download Service Account Key
Section titled “Step 6: Create and Download Service Account Key”-
You’ll be returned to the Credentials page
-
Under Service Accounts, find the service account you just created
-
Click on the service account email address to open its details
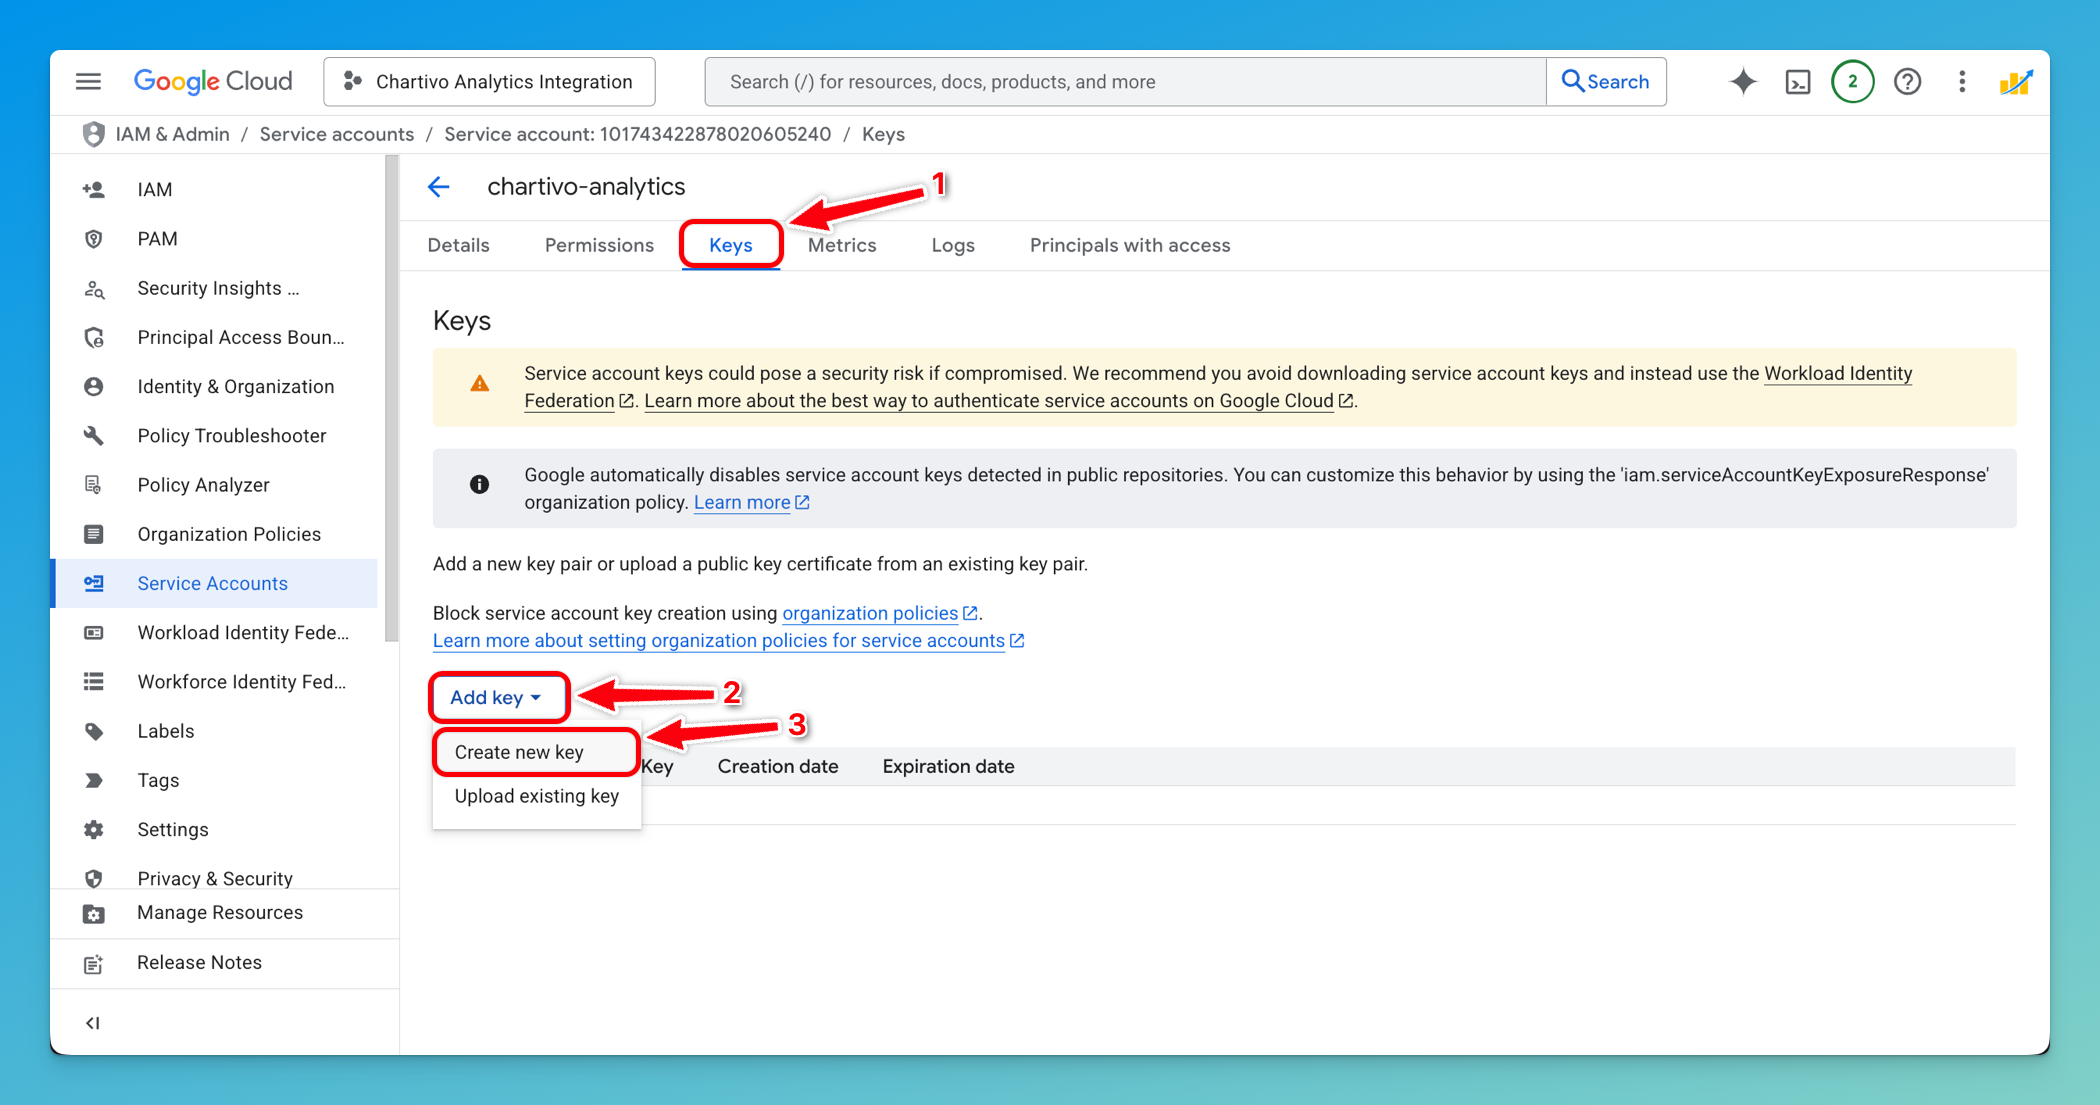
-
Navigate to the Keys tab
-
Click Add Key → Create new key
-
Select JSON as the key type
-
Click Create
-
The JSON key file will automatically download to your computer
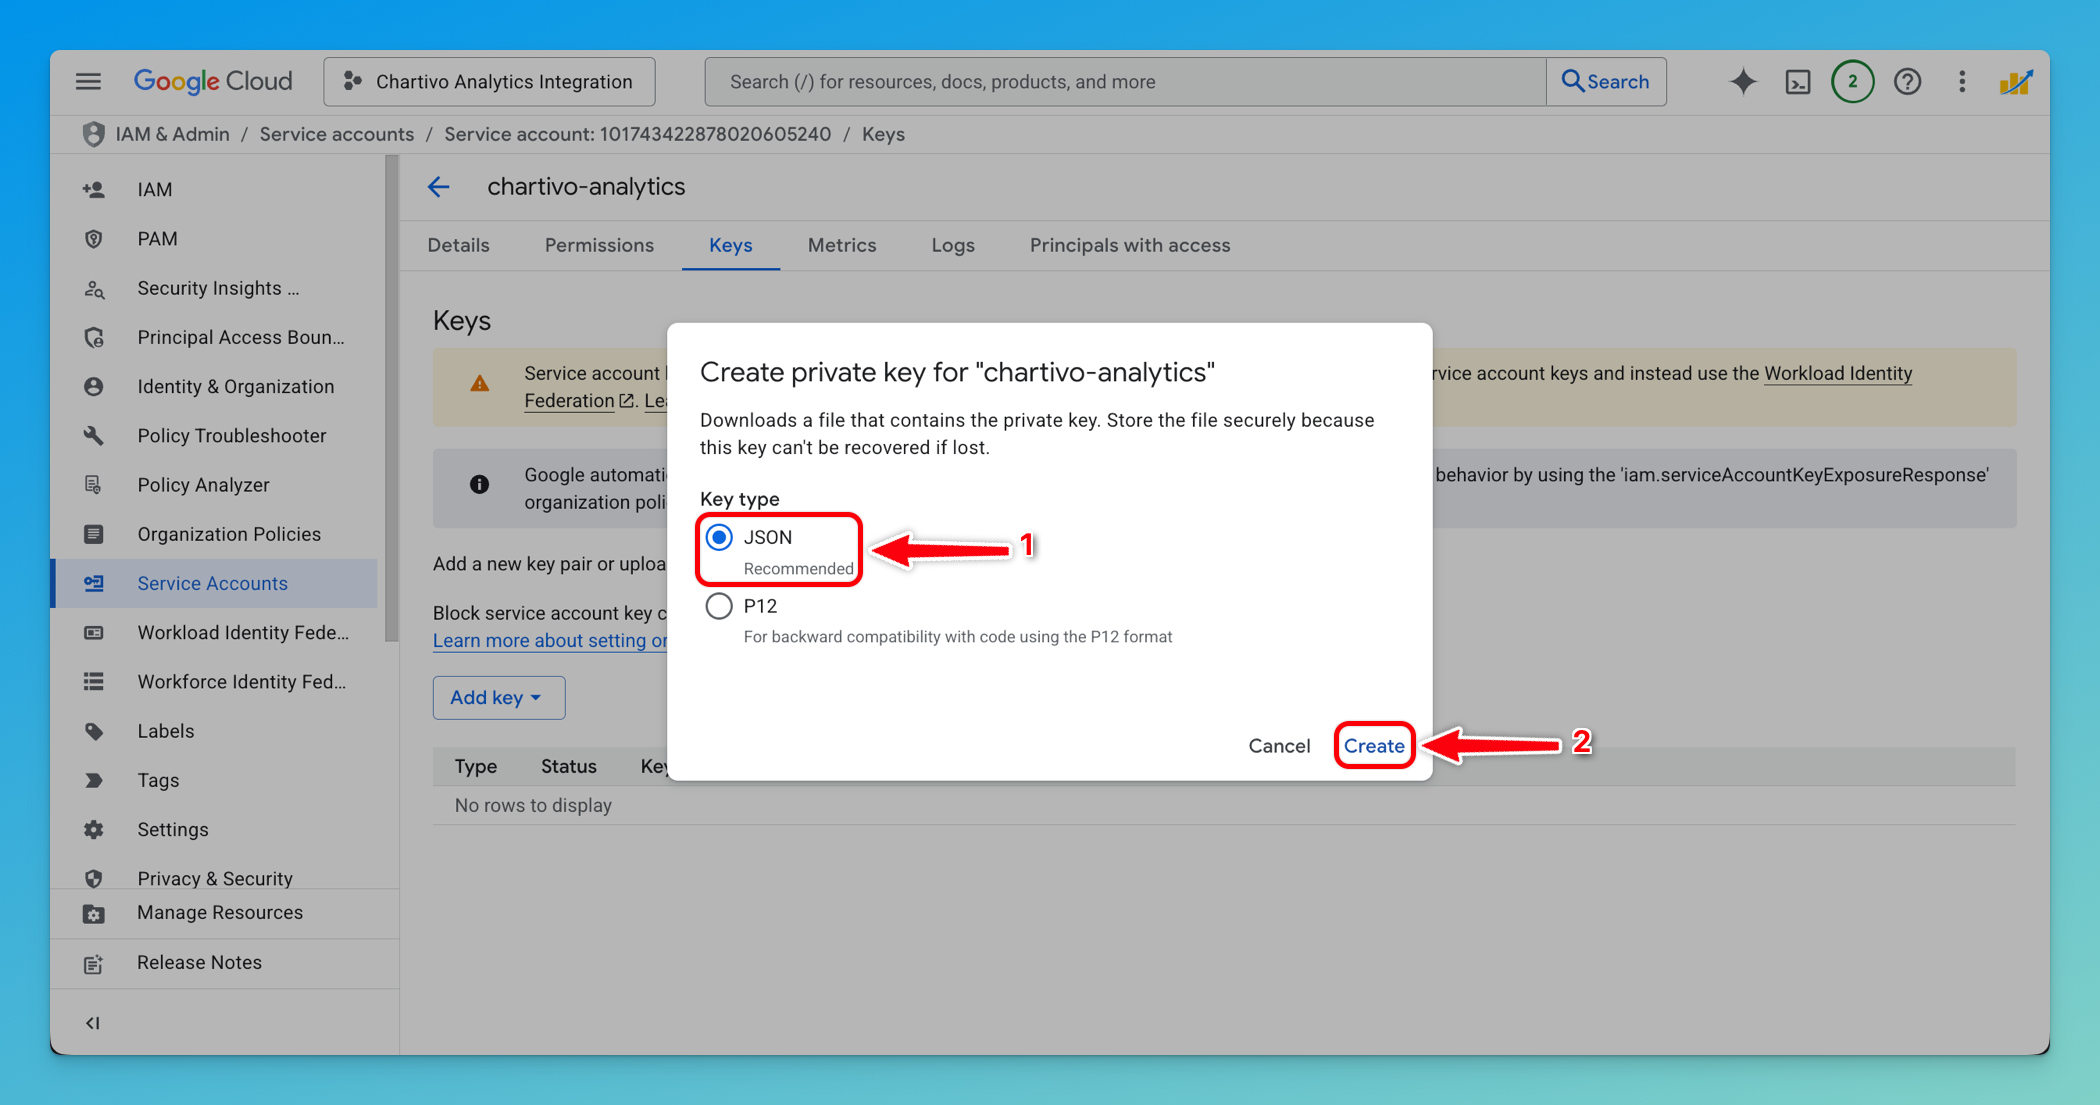
-
Important: Save this file securely - you’ll need it for Chartivo configuration
⚠️ Security Warning: This JSON file contains private credentials. Never commit it to version control or share it publicly.
Part 2: Google Analytics Setup
Section titled “Part 2: Google Analytics Setup”Step 7: Find Your GA4 Property ID
Section titled “Step 7: Find Your GA4 Property ID”-
Open a new browser tab and navigate to https://analytics.google.com
-
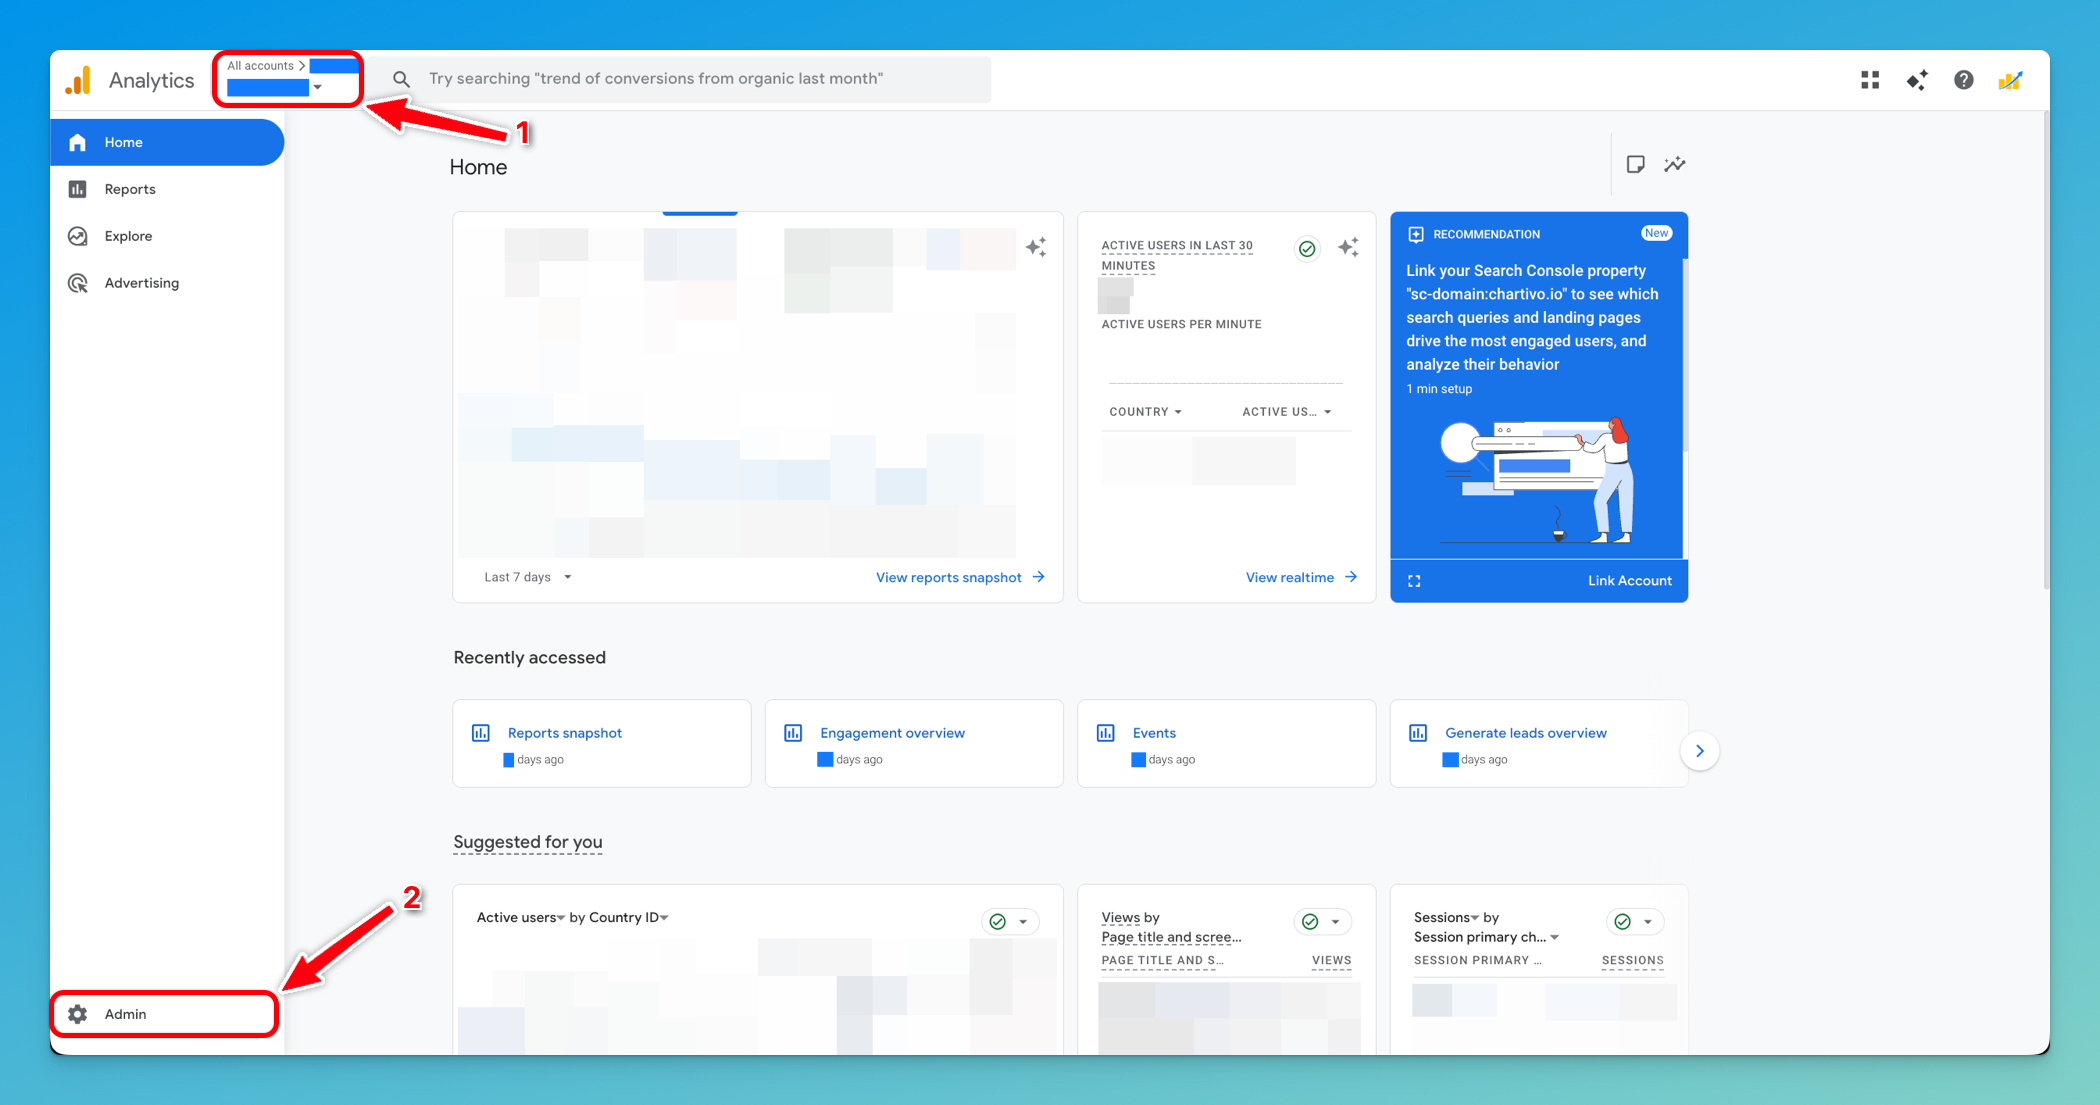
Select your GA4 property from the property selector (top left)
-
Click on Admin (gear icon) in the bottom left sidebar
-
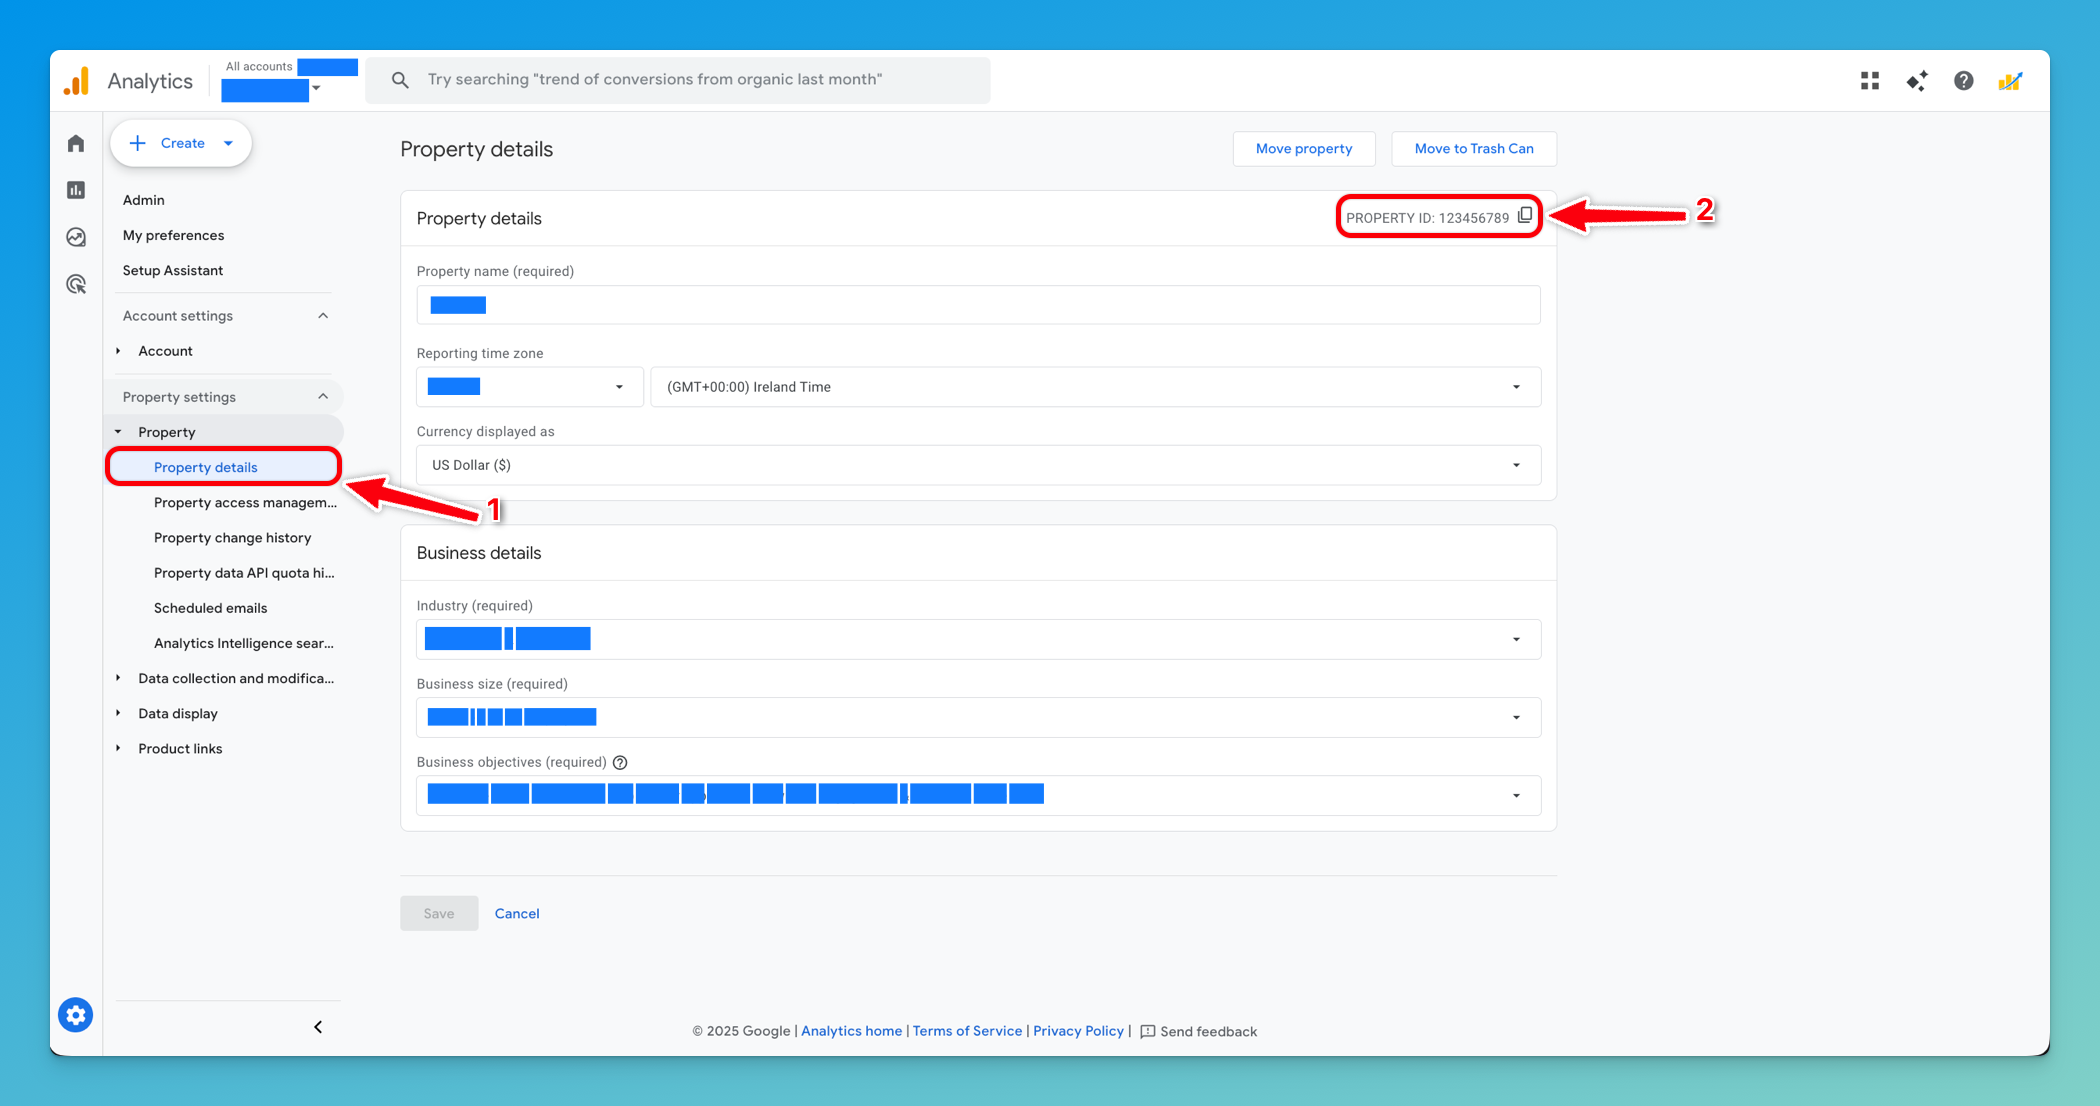
In the Property column (middle column), click Property then Property details under Property settings
-
Your Property ID will be displayed near the top of the page
- Format: A numeric value like
123456789
- Format: A numeric value like
-
Copy this Property ID (you’ll need it for Chartivo)
Step 8: Grant Service Account Access to GA4
Section titled “Step 8: Grant Service Account Access to GA4”Now you need to give your service account permission to read data from your GA4 property.
-
Still in the Admin section, ensure you’re viewing the correct property
-
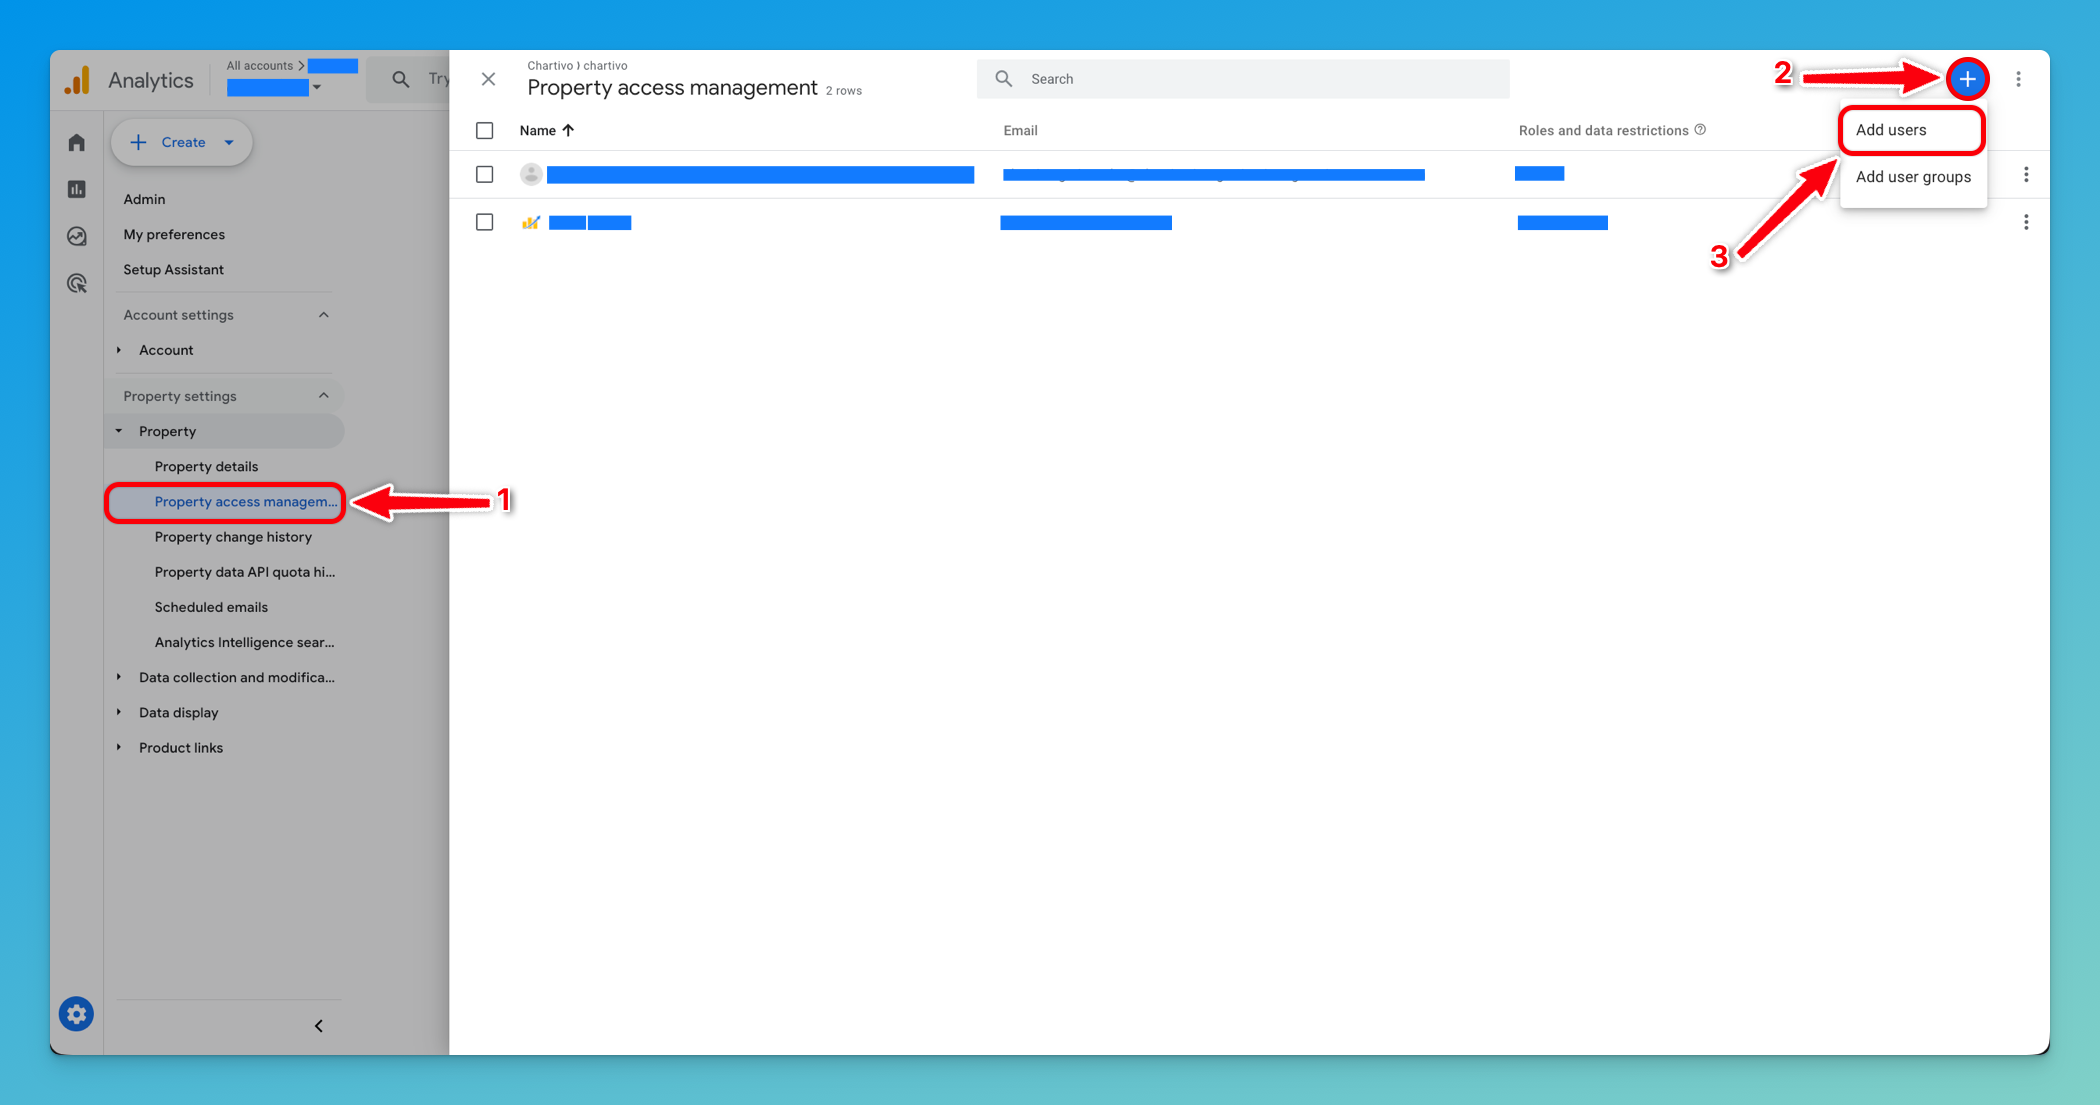
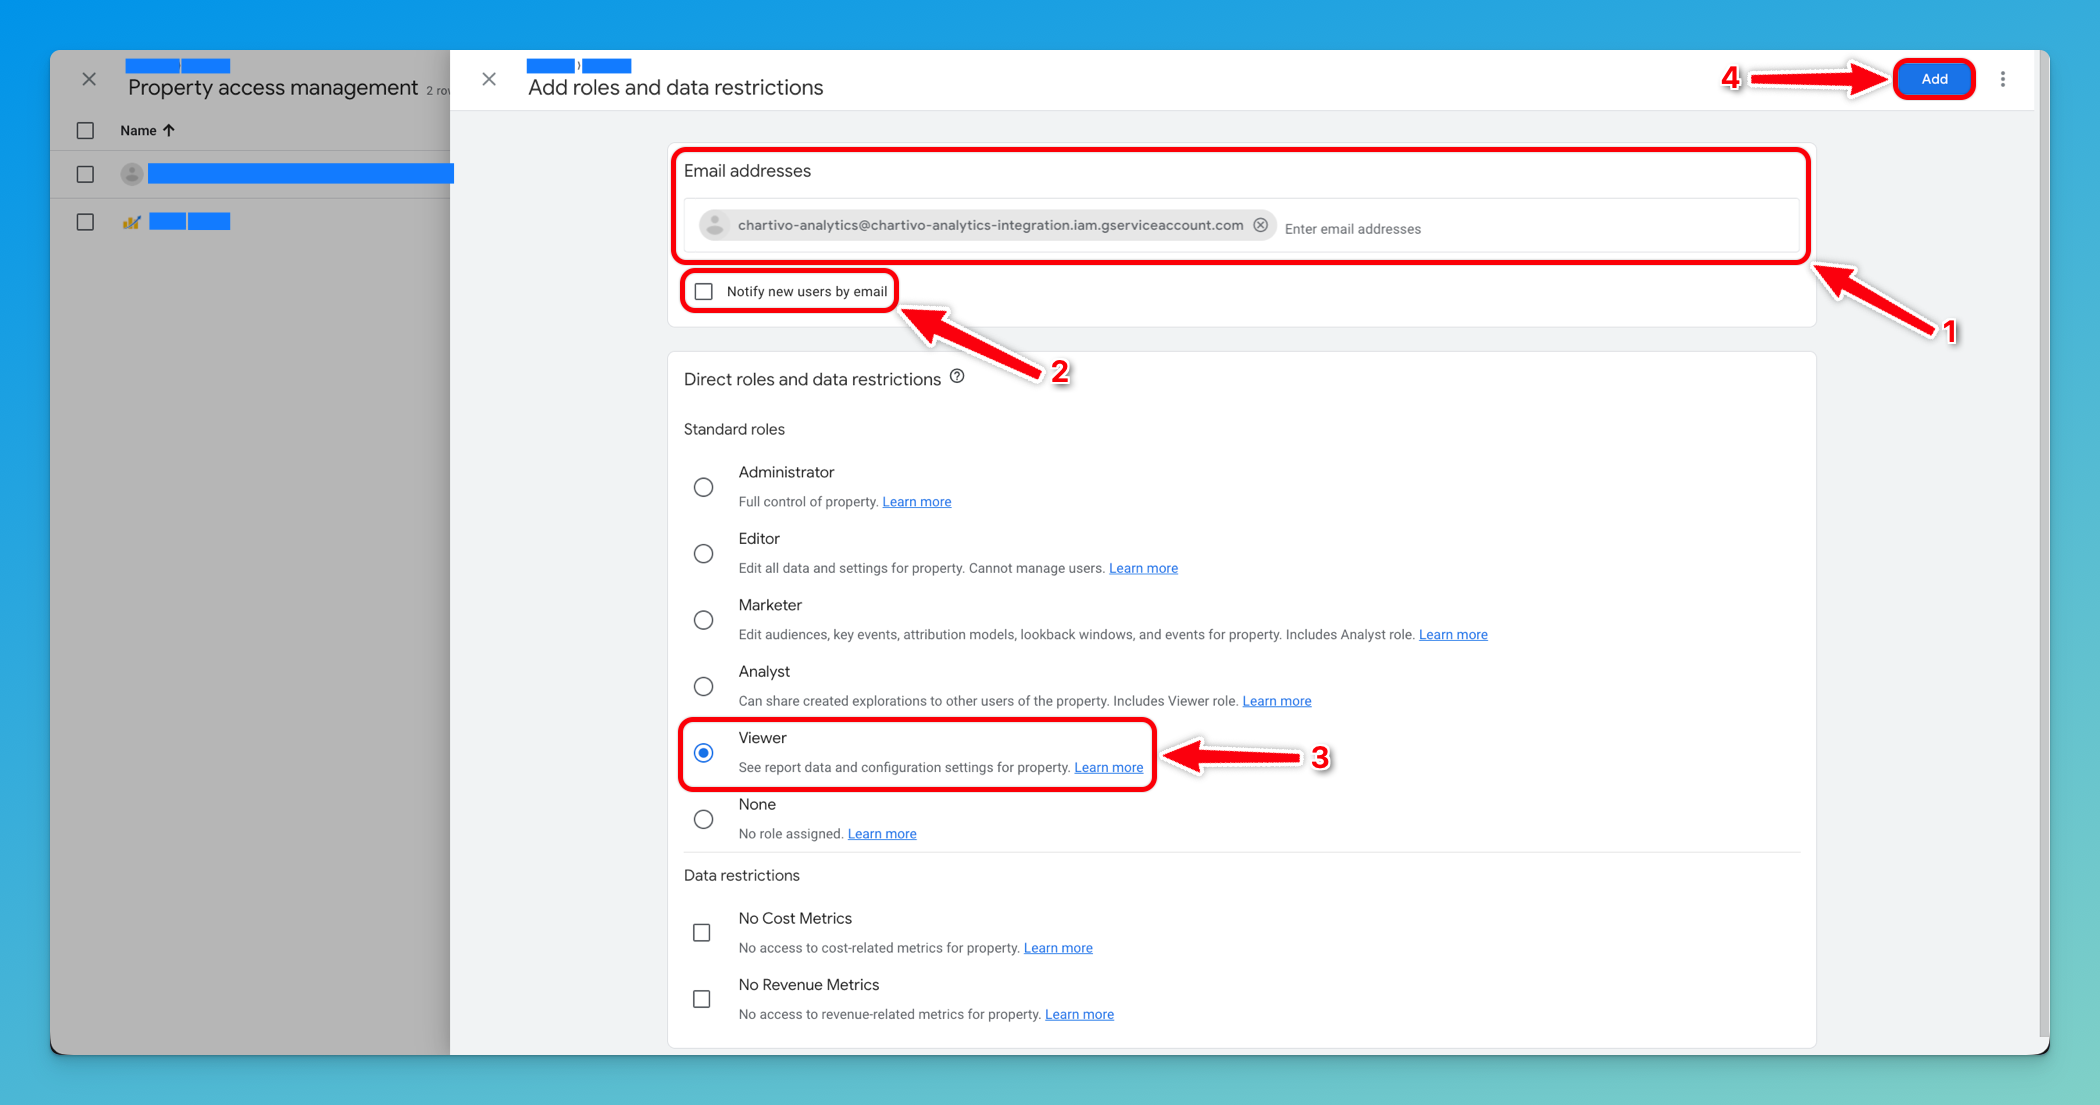
In the Property column, click Property Access Management
-
Click the + (plus) button in the top right to add a user
-
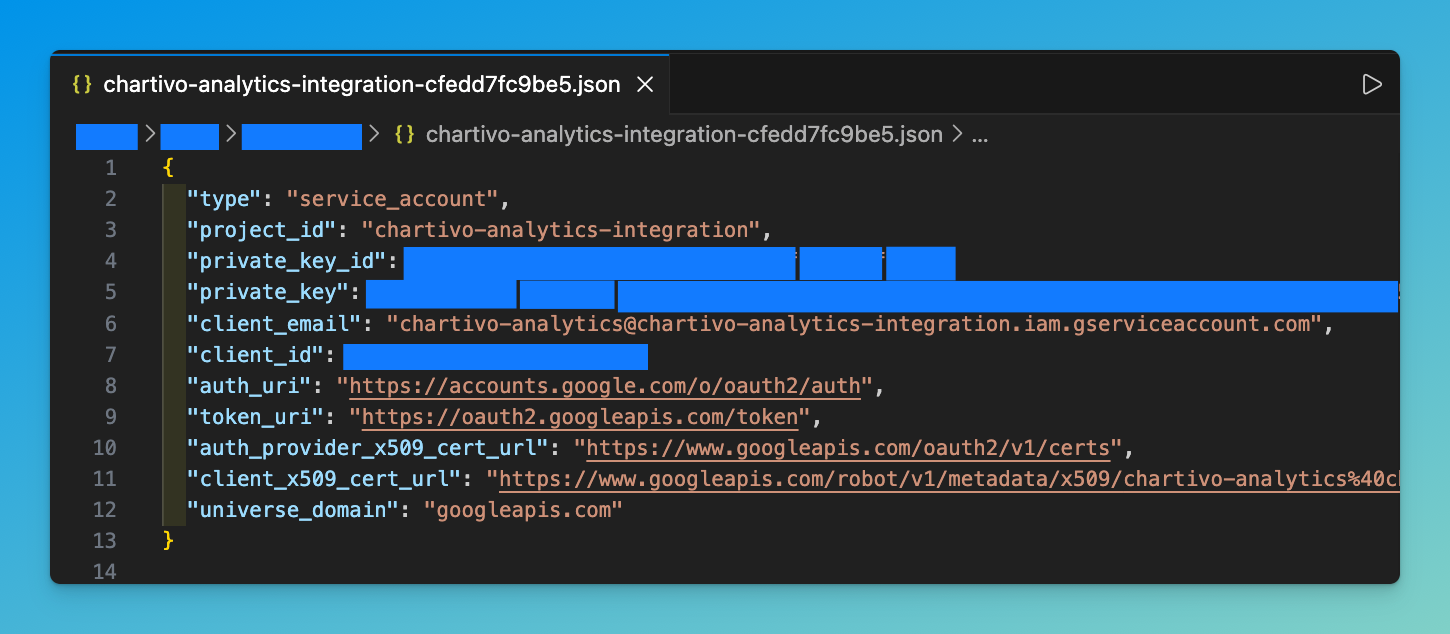
In the email address field, paste your service account email address
- This is found in the JSON file you downloaded (look for
"client_email") - Format:
chartivo-analytics@your-project.iam.gserviceaccount.com
- This is found in the JSON file you downloaded (look for
-
Under Role, select Viewer (this gives read-only access)
-
Uncheck Notify new users by email (service accounts don’t receive emails)
-
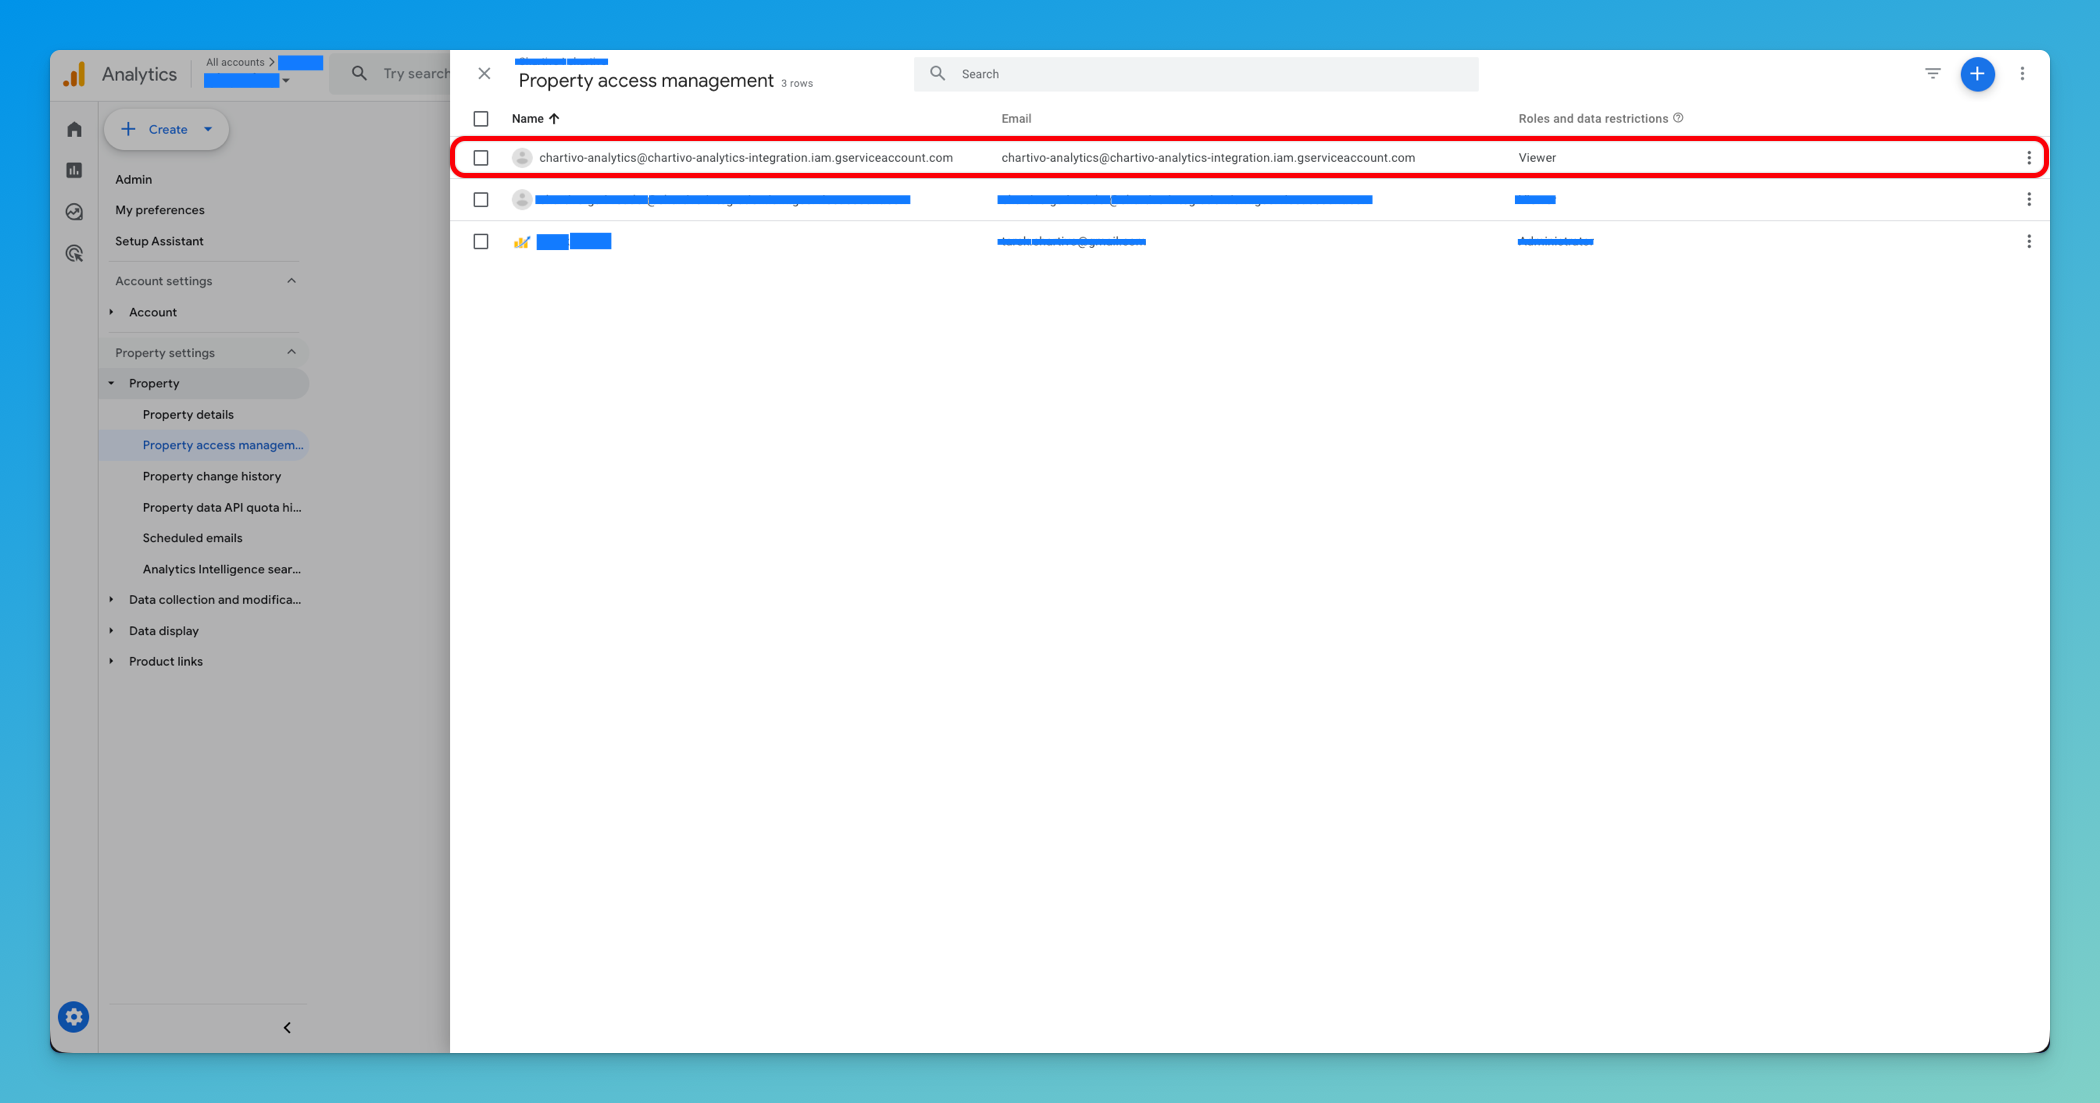
Click Add
Part 3: Chartivo Configuration
Section titled “Part 3: Chartivo Configuration”Step 9: Access Chartivo Integrations Page
Section titled “Step 9: Access Chartivo Integrations Page”-
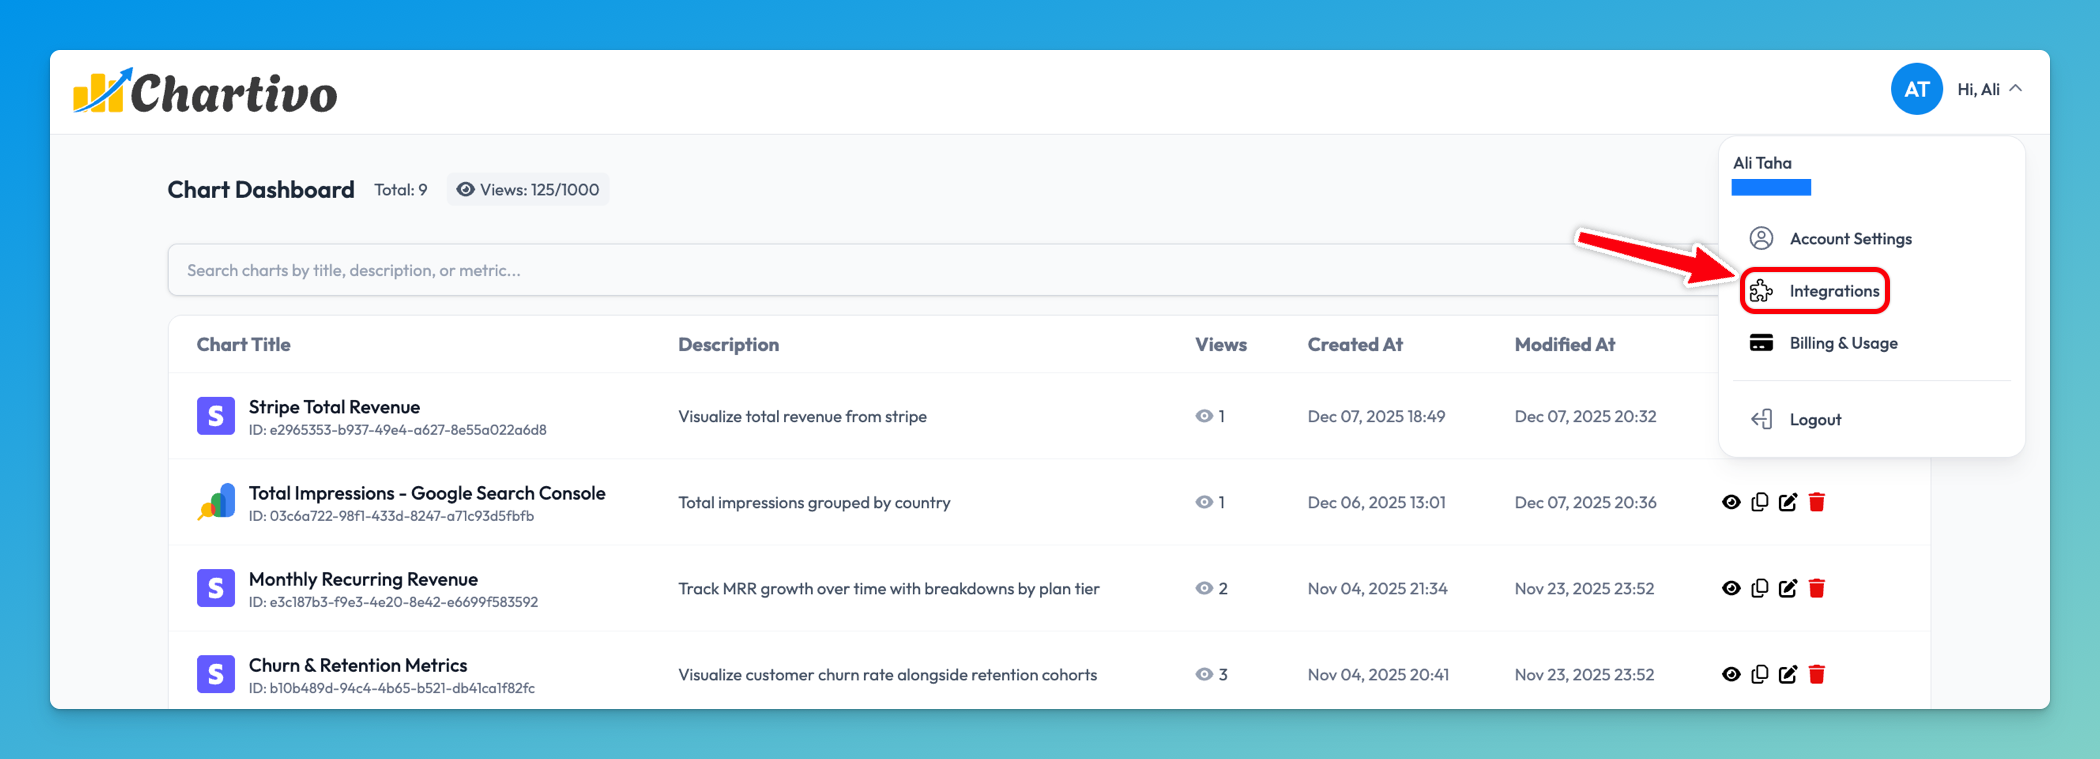
Log in to your Chartivo account
-
Navigate to the Integrations page from your dashboard
-
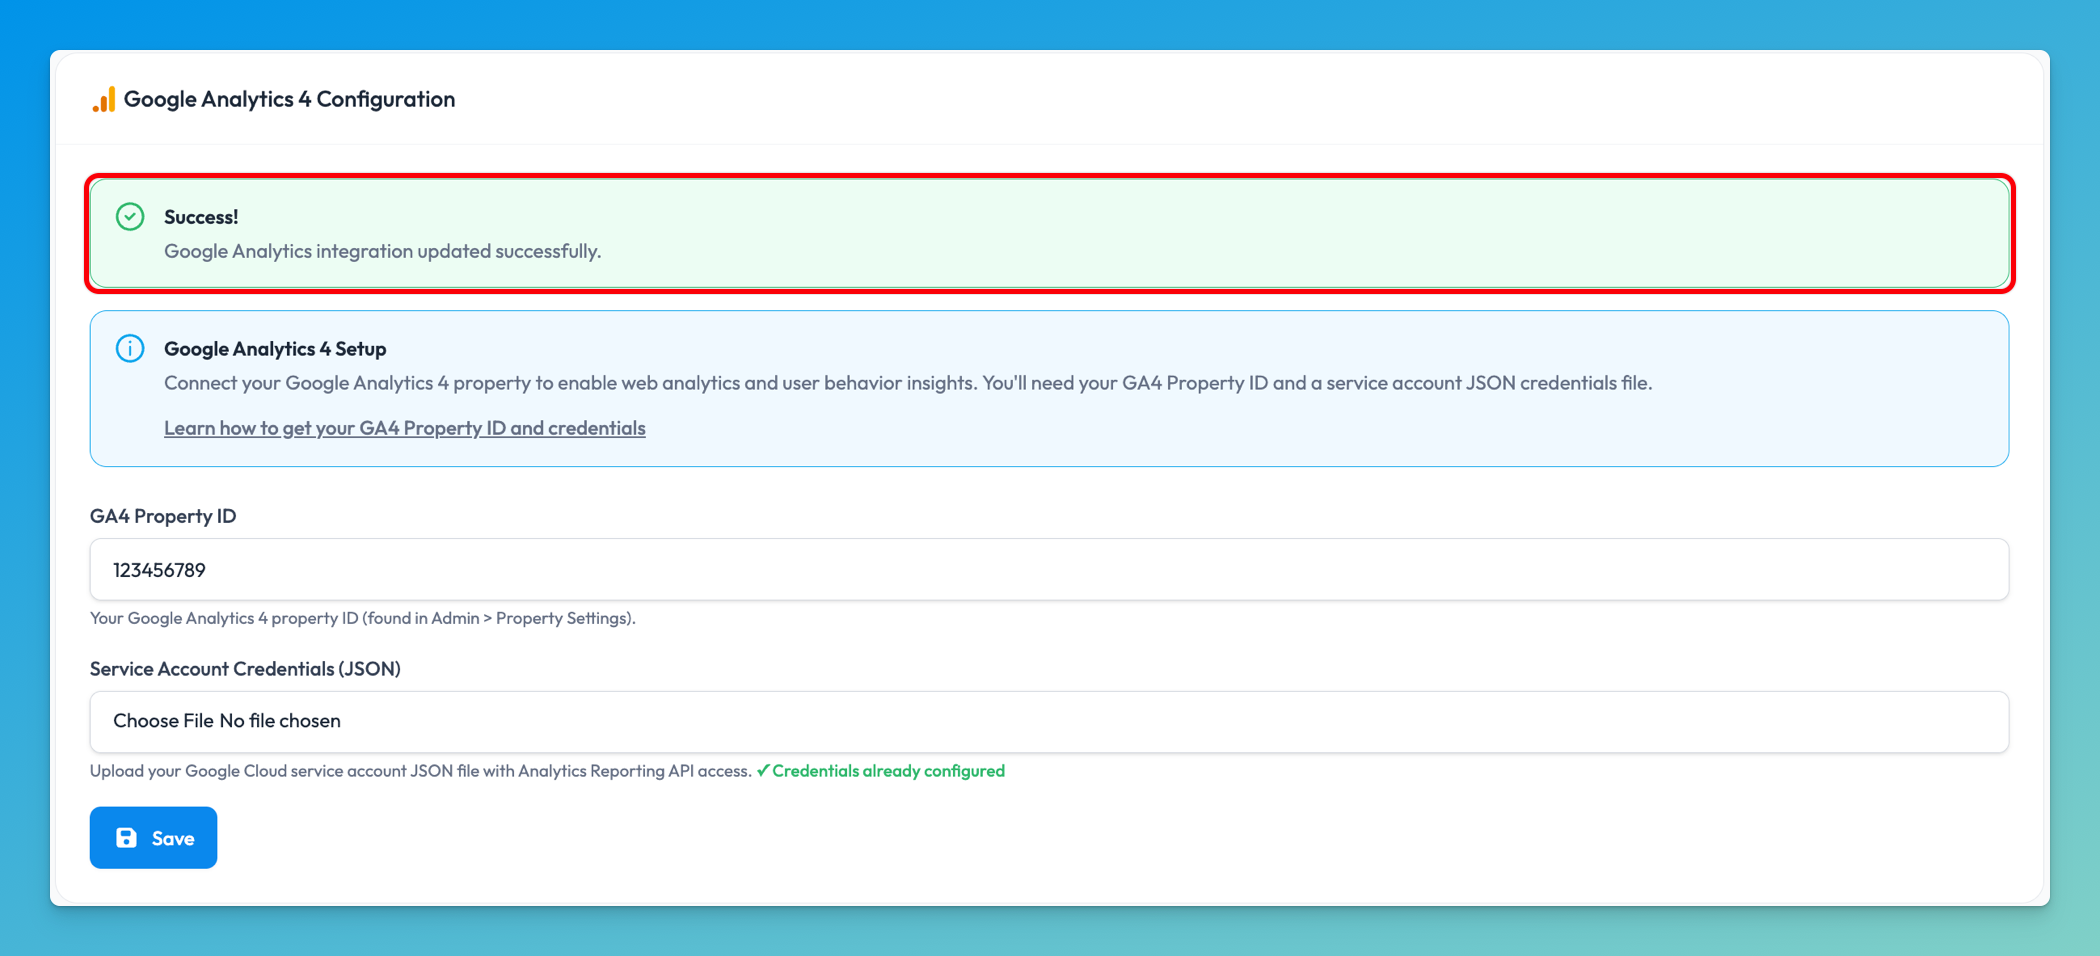
Locate the Google Analytics 4 Configuration card

Step 10: Enter Your GA4 Property ID
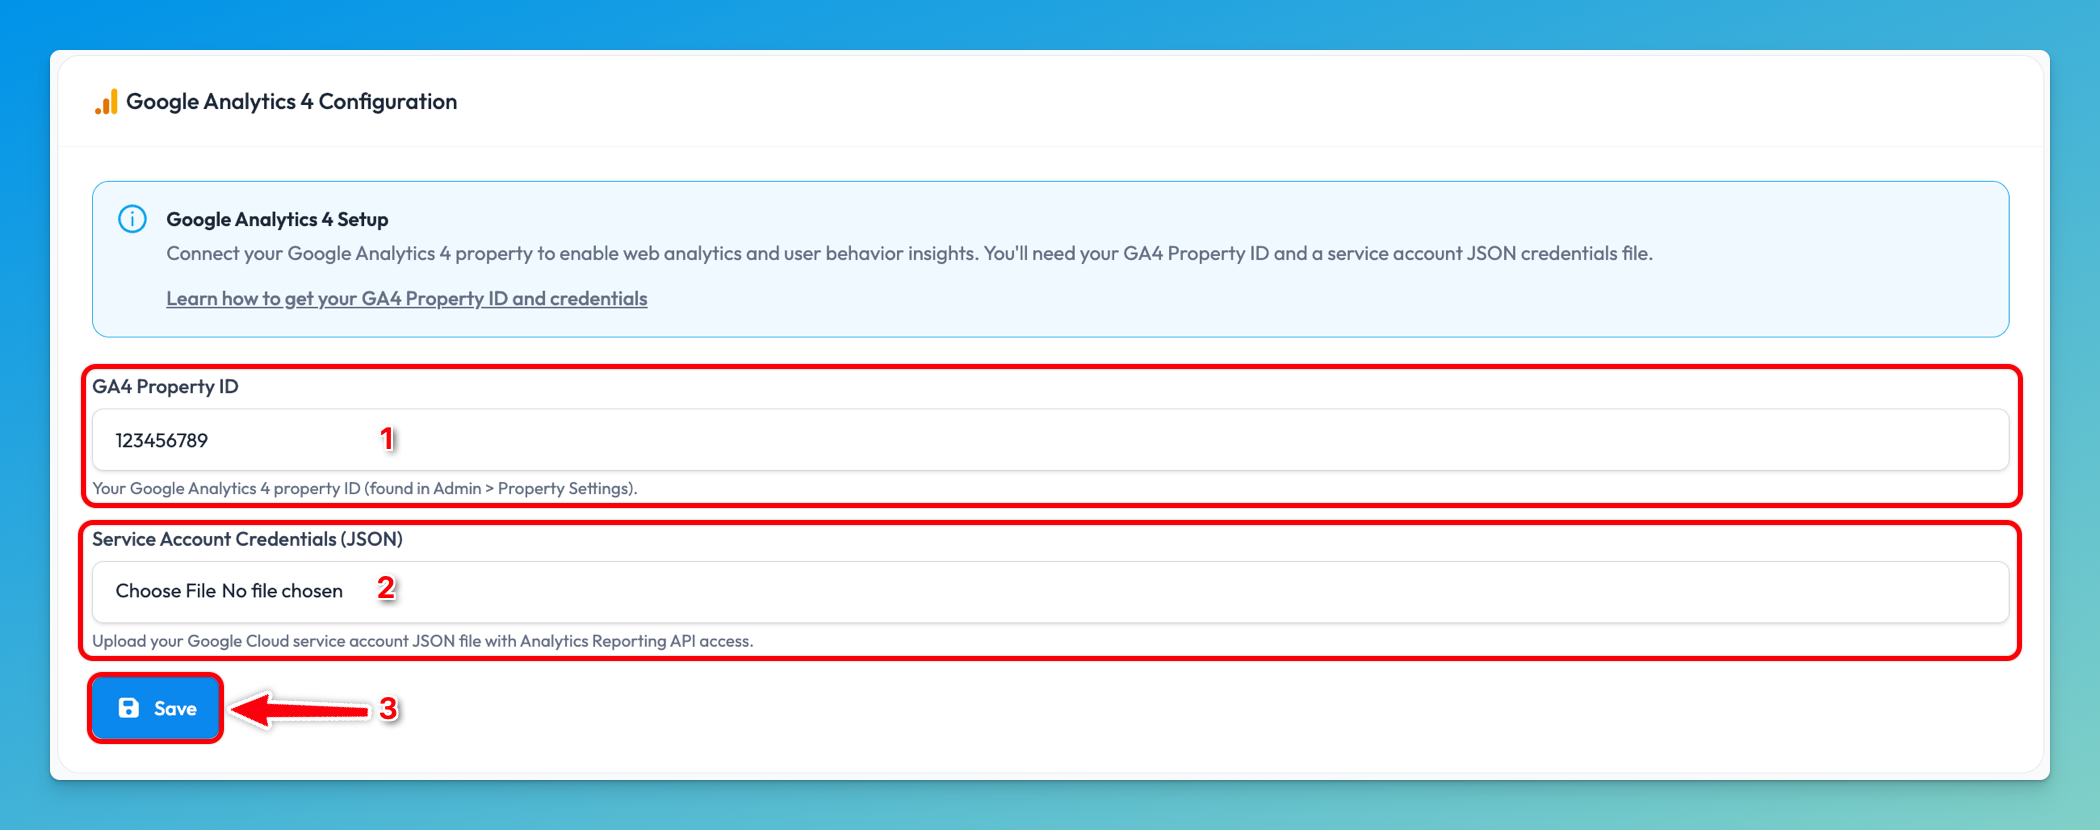
Section titled “Step 10: Enter Your GA4 Property ID”- In the Google Analytics 4 Configuration section, find the GA4 Property ID field
- Paste the Property ID you copied from Step 7
- Enter only the numeric value (e.g.,
123456789)
- Enter only the numeric value (e.g.,
Step 11: Upload Service Account Credentials
Section titled “Step 11: Upload Service Account Credentials”- Click the Choose File button under Service Account Credentials (JSON)
- Navigate to where you saved the JSON key file from Step 6
- Select the JSON file (filename format:
your-project-xxxxx.json) - The filename should appear next to the button after selection
Step 12: Save Your Configuration
Section titled “Step 12: Save Your Configuration”- Review your entered information:
- Property ID is correct
- JSON credentials file is selected
- Click the Save button at the bottom of the form
- Wait for the save operation to complete (usually 2-5 seconds)
Step 13: Verify Successful Configuration
Section titled “Step 13: Verify Successful Configuration”After saving, you should see a success message displayed as a green banner. The message will confirm: “Google Analytics integration created successfully” (for new integrations) or “Google Analytics integration updated successfully” (for updates). If you already had a configuration, you’ll also see a green checkmark (✓) indicating “Credentials already configured” below the file upload field.
Step 14: Test Your Integration
Section titled “Step 14: Test Your Integration”-
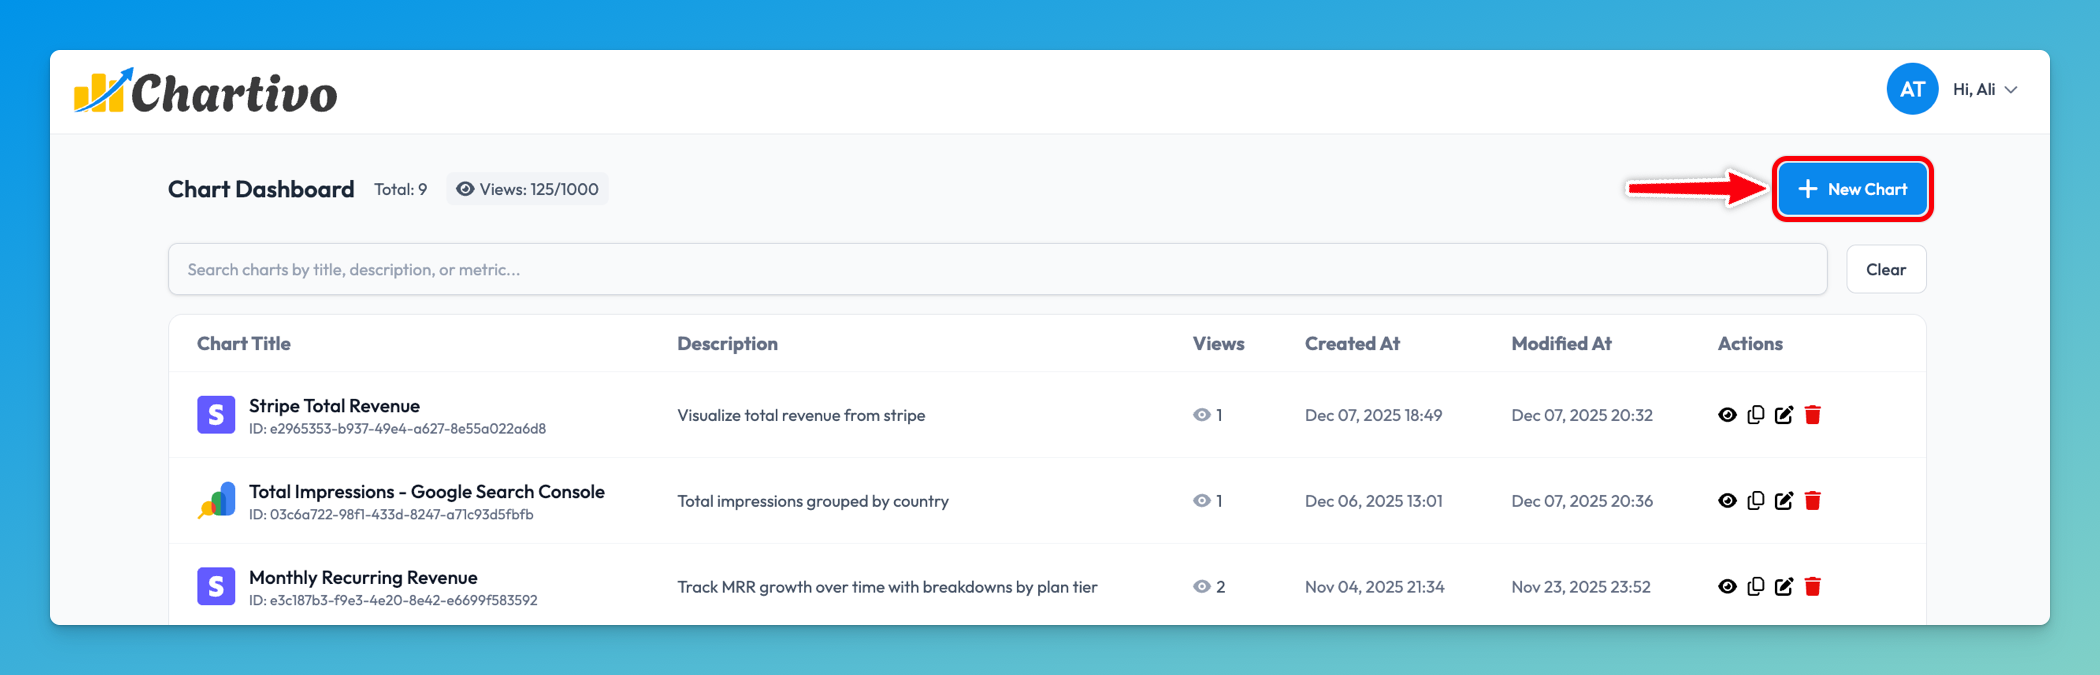
Navigate to the Homepage
-
Click New Chart
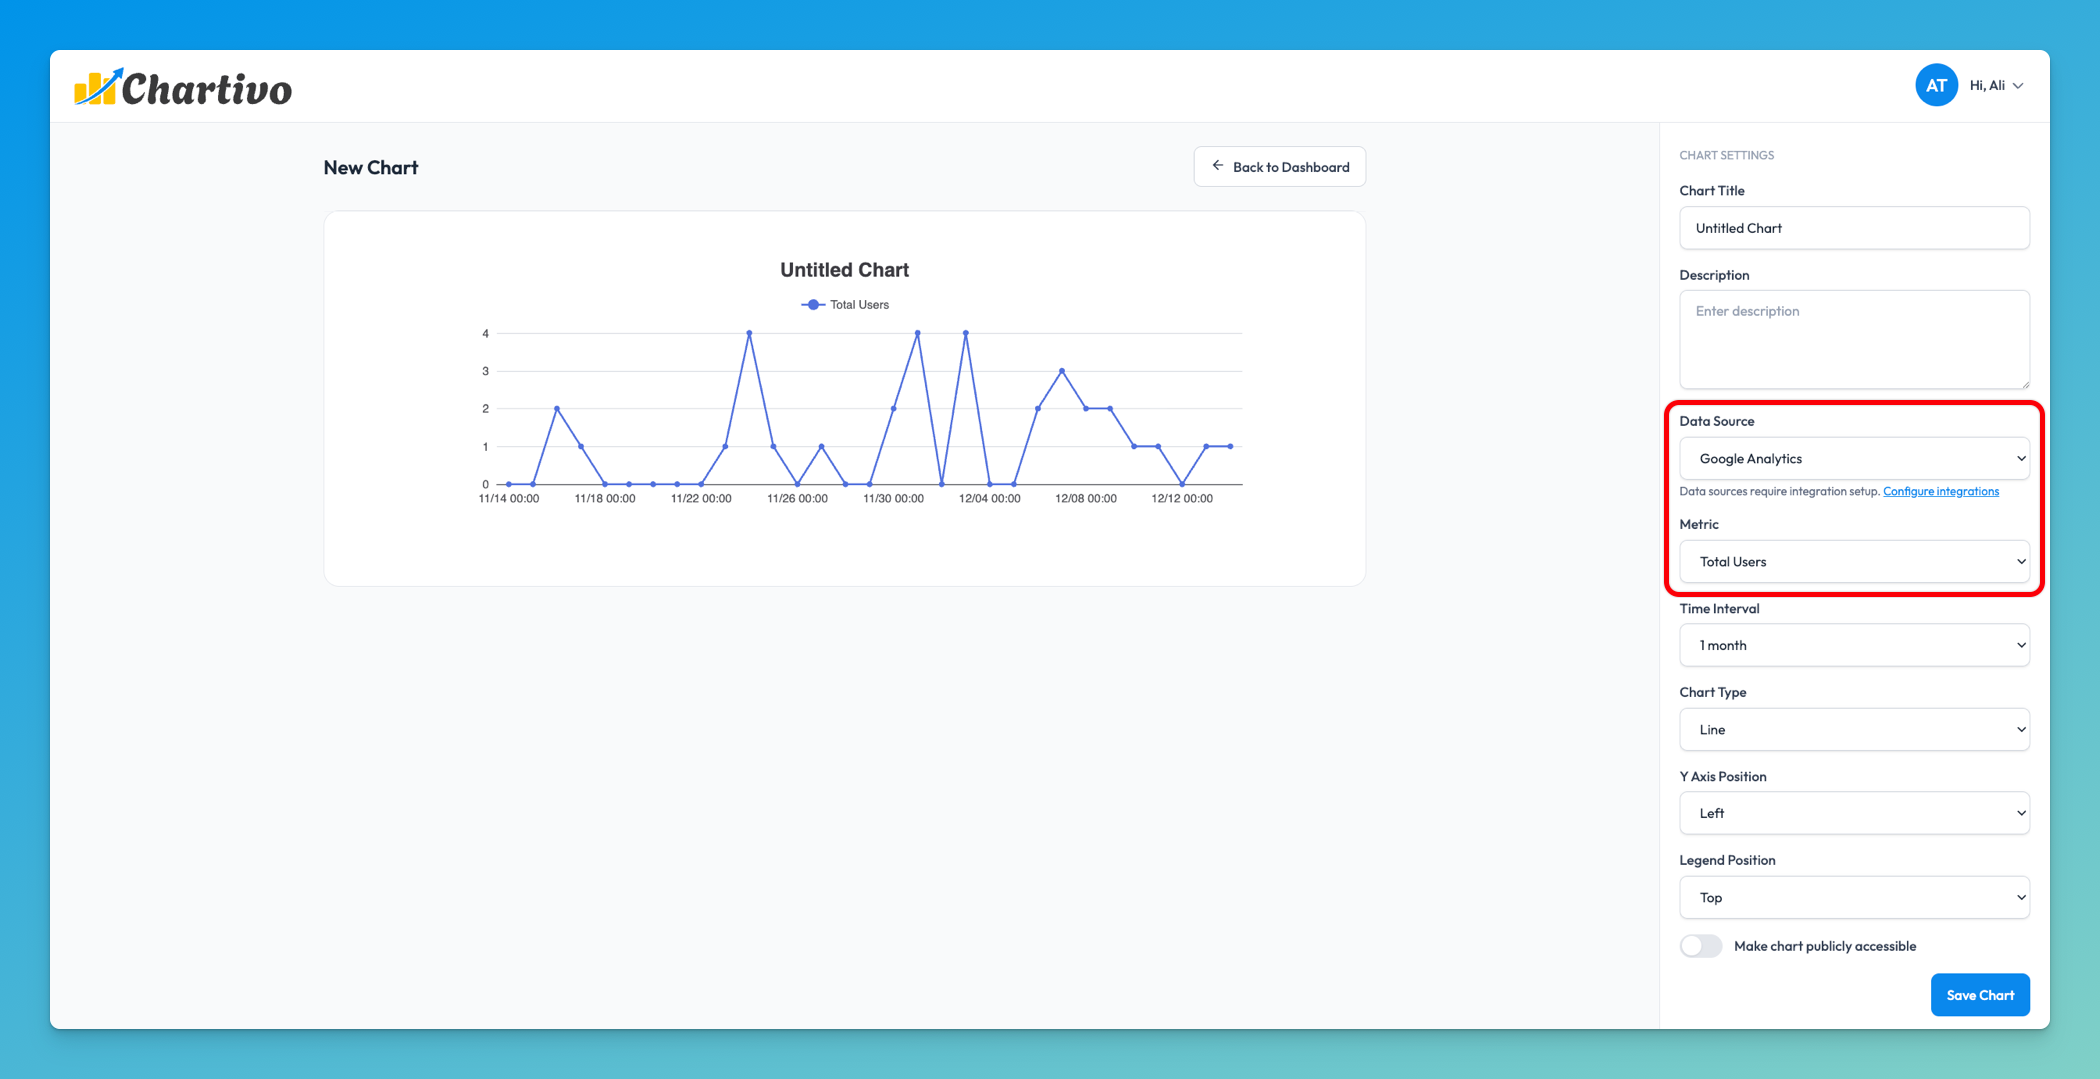
-
Select Google Analytics as your data source
-
You should now see available GA4 metrics such as:
- Sessions
- Total Users
- New Users
- Bounce Rate
- Average Session Duration
- And more…
-
Select a metric and date range to verify data is loading correctly
Troubleshooting
Section titled “Troubleshooting”Error: “Property ID is required”
Section titled “Error: “Property ID is required””- Ensure you entered the Property ID in the first field
- Verify the Property ID contains only numbers (no letters or “properties/” prefix)
Error: “Service account credentials file is required for new integration”
Section titled “Error: “Service account credentials file is required for new integration””- Make sure you selected the JSON file using the file picker
- Verify the file is actually a
.jsonfile (not.txtor other format) - Re-download the key file from Google Cloud Console if needed
Error: “Failed to save Google Analytics integration”
Section titled “Error: “Failed to save Google Analytics integration””- Check that the JSON file is valid (open it in a text editor - it should contain
client_email,private_key, etc.) - Verify your service account has been granted Viewer access to the GA4 property (Step 8)
- Ensure the Google Analytics Data API is enabled in your GCP project (Step 3)
No Data Appearing in Charts
Section titled “No Data Appearing in Charts”- Wait 24-48 hours after setting up GA4 for the first time (initial data collection period)
- Verify your GA4 property is collecting data (check in Google Analytics directly)
- Confirm the Property ID matches exactly
- Check that the service account has Viewer role on the property
- Ensure your selected date range contains data
Error: “Access denied” or “Permission denied”
Section titled “Error: “Access denied” or “Permission denied””- Double-check that you completed Step 8 (granting service account access)
- Verify the service account email in the JSON file matches what you added in GA4
- Ensure you selected Viewer role (not just “No role”)
- Wait a few minutes for permissions to propagate after adding the service account
Updating Your Configuration
Section titled “Updating Your Configuration”If you need to change your Property ID or update credentials:
- Return to the Integrations page in Chartivo
- Modify the GA4 Property ID field (if needed)
- Upload a new credentials file (if needed) - this is optional if updating only the Property ID
- Click Save
- You’ll see a confirmation: “Google Analytics integration updated successfully”
Security Information
Section titled “Security Information”Chartivo encrypts your service account credentials JSON before storing it in our database. Your credentials are only decrypted when making authorized API calls to Google Analytics on your behalf. We never expose your unencrypted credentials in logs, user interfaces, or error messages.
The service account follows the principle of least privilege - it only has read-only (Viewer) access to your GA4 data and cannot modify your analytics configuration or data.
Understanding Service Accounts
Section titled “Understanding Service Accounts”What is a service account?
Section titled “What is a service account?”A service account is a special type of Google account that represents an application (like Chartivo) rather than a person. It allows Chartivo to access your Google Analytics data programmatically without requiring you to share your personal Google credentials.
Why JSON credentials?
Section titled “Why JSON credentials?”The JSON file contains cryptographic keys that prove Chartivo’s identity to Google. This is more secure than using passwords and can be easily revoked if needed.
How to revoke access
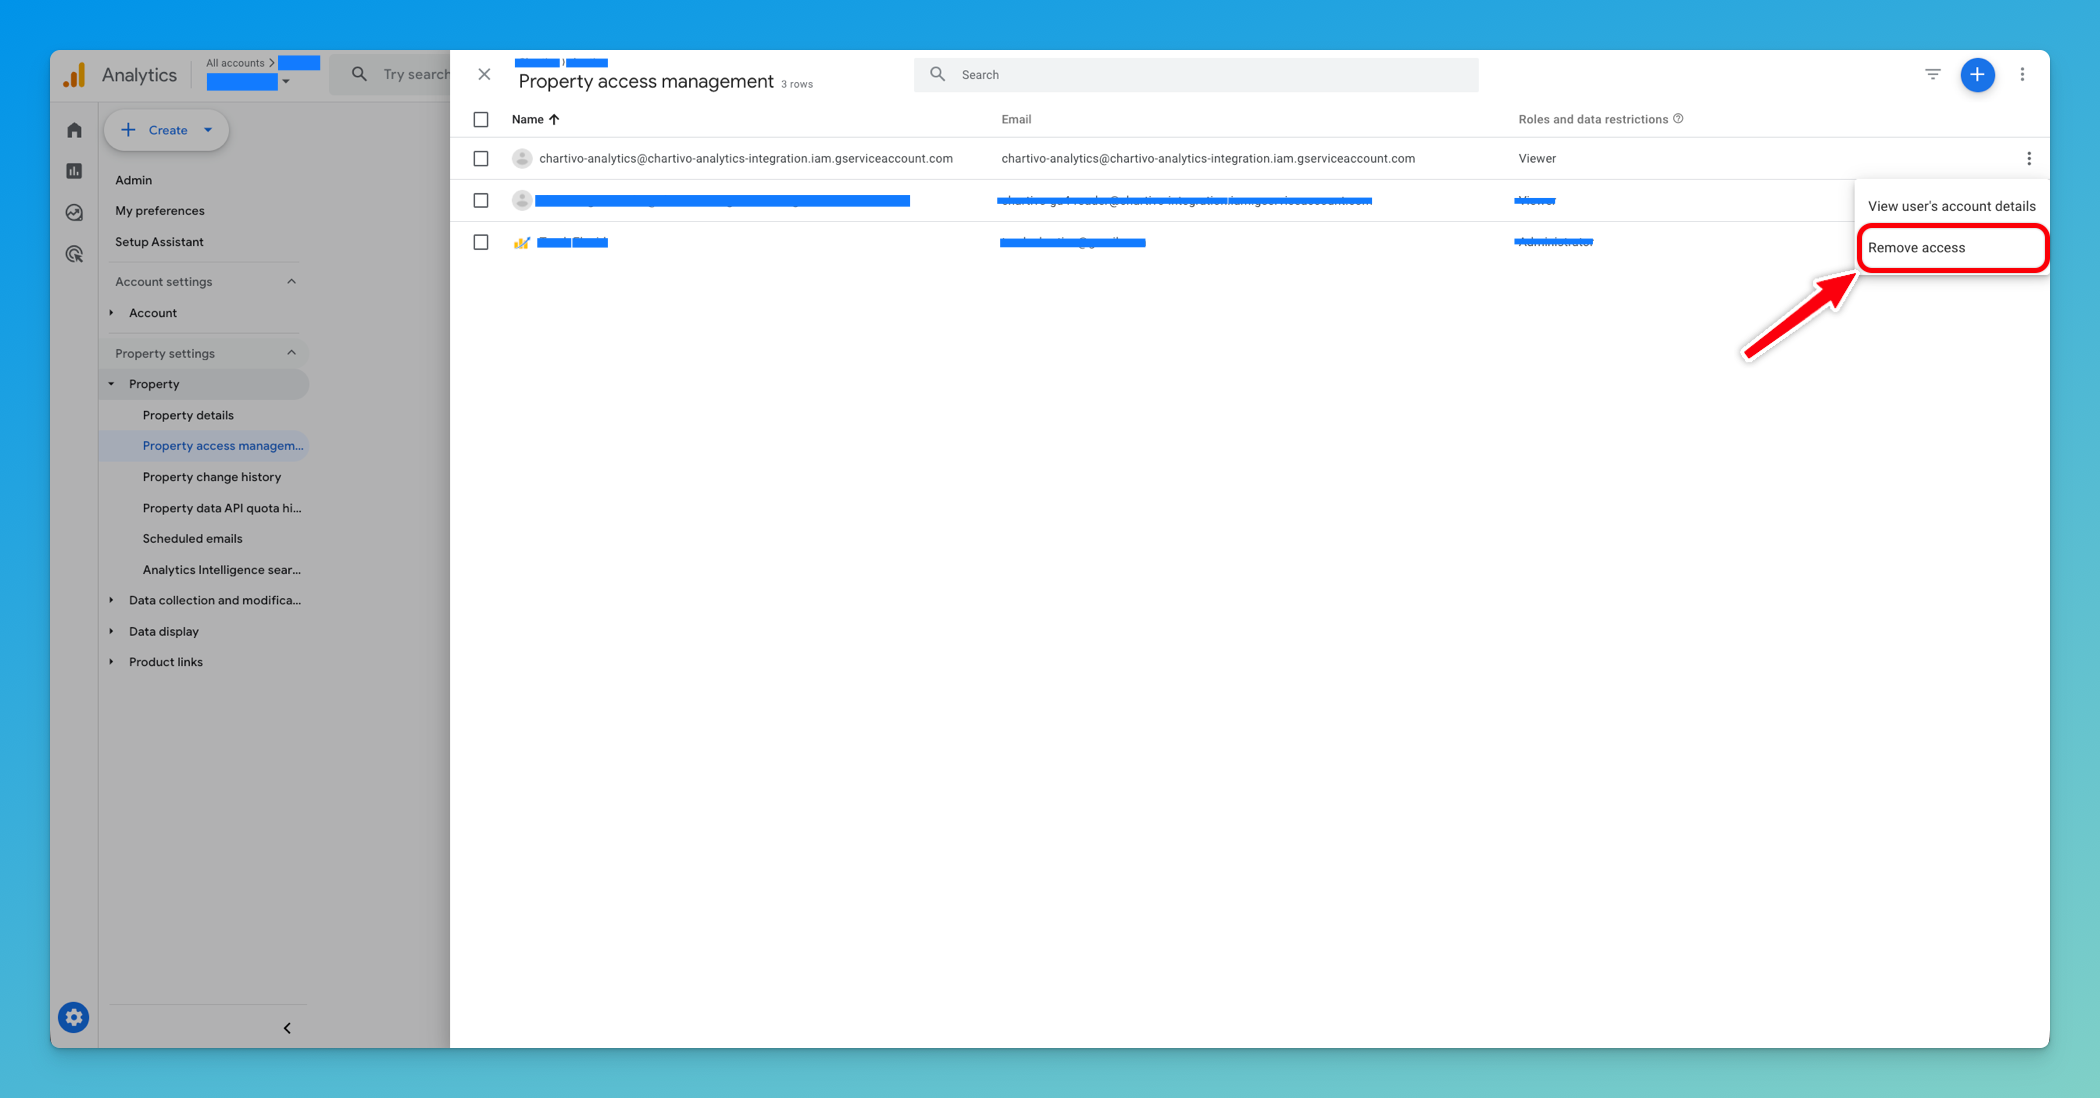
Section titled “How to revoke access”If you ever need to revoke Chartivo’s access to your GA4 data:
-
Go to Google Analytics → Admin → Property Access Management
-
Find the service account email
-
Click the three dots (⋮) and select “Remove access”
Need Help?
Section titled “Need Help?”If you encounter any issues during setup:
- Check that all steps were completed in order
- Review the troubleshooting section above
- Contact Chartivo support with details about which step failed
Appendix: Finding Your Service Account Email
Section titled “Appendix: Finding Your Service Account Email”If you need to find your service account email address after downloading the JSON:
Option 1: From the JSON file
- Open the downloaded JSON file in a text editor
- Look for the
"client_email"field - The value will be in the format:
service-account-name@project-id.iam.gserviceaccount.com
Option 2: From Google Cloud Console
- Go to APIs & Services → Credentials
- Under Service Accounts, you’ll see the email address listed
Permissions
Section titled “Permissions”Chartivo requires the following Google Analytics permissions:
- Read access to GA4 property data
- Read access to user metrics
- Read access to event data
- Read access to conversion data
We never request write permissions to your Google Analytics account.
Q: How far back does the integration sync data?
A: We sync up to 1 month of historical data from your Stripe account.
Q: Can I connect multiple Stripe accounts?
A: No. We don’t support connecting multiple Stripe accounts currently.
Q: Does this work with Universal Analytics (UA)?
A: No, this integration is specifically for Google Analytics 4 (GA4). Universal Analytics was sunset in July 2023.
Q: Can I use the same service account for multiple Chartivo organizations?
A: Yes, but we recommend creating separate service accounts for better access control and easier revocation if needed.