Google Search Console
Google Search Console Integration Setup Guide
Section titled “Google Search Console Integration Setup Guide”This guide will walk you through connecting your Google Search Console property to Chartivo to enable search performance tracking including clicks, impressions, click-through rate (CTR), and average position metrics.
Prerequisites
Section titled “Prerequisites”Before you begin, ensure you have:
- A verified property in Google Search Console
- A Google Cloud Platform (GCP) project
- Administrator/Owner access to your Search Console property
Note: If you already set up Google Analytics integration, you can reuse the same GCP project and service account. Skip to Step 7 if you want to use an existing service account.
Part 1: Google Cloud Setup
Section titled “Part 1: Google Cloud Setup”Step 1: Access Google Cloud Console
Section titled “Step 1: Access Google Cloud Console”- Open your browser and navigate to https://console.cloud.google.com
- Log in with your Google account (use the same account that has access to your Search Console property)
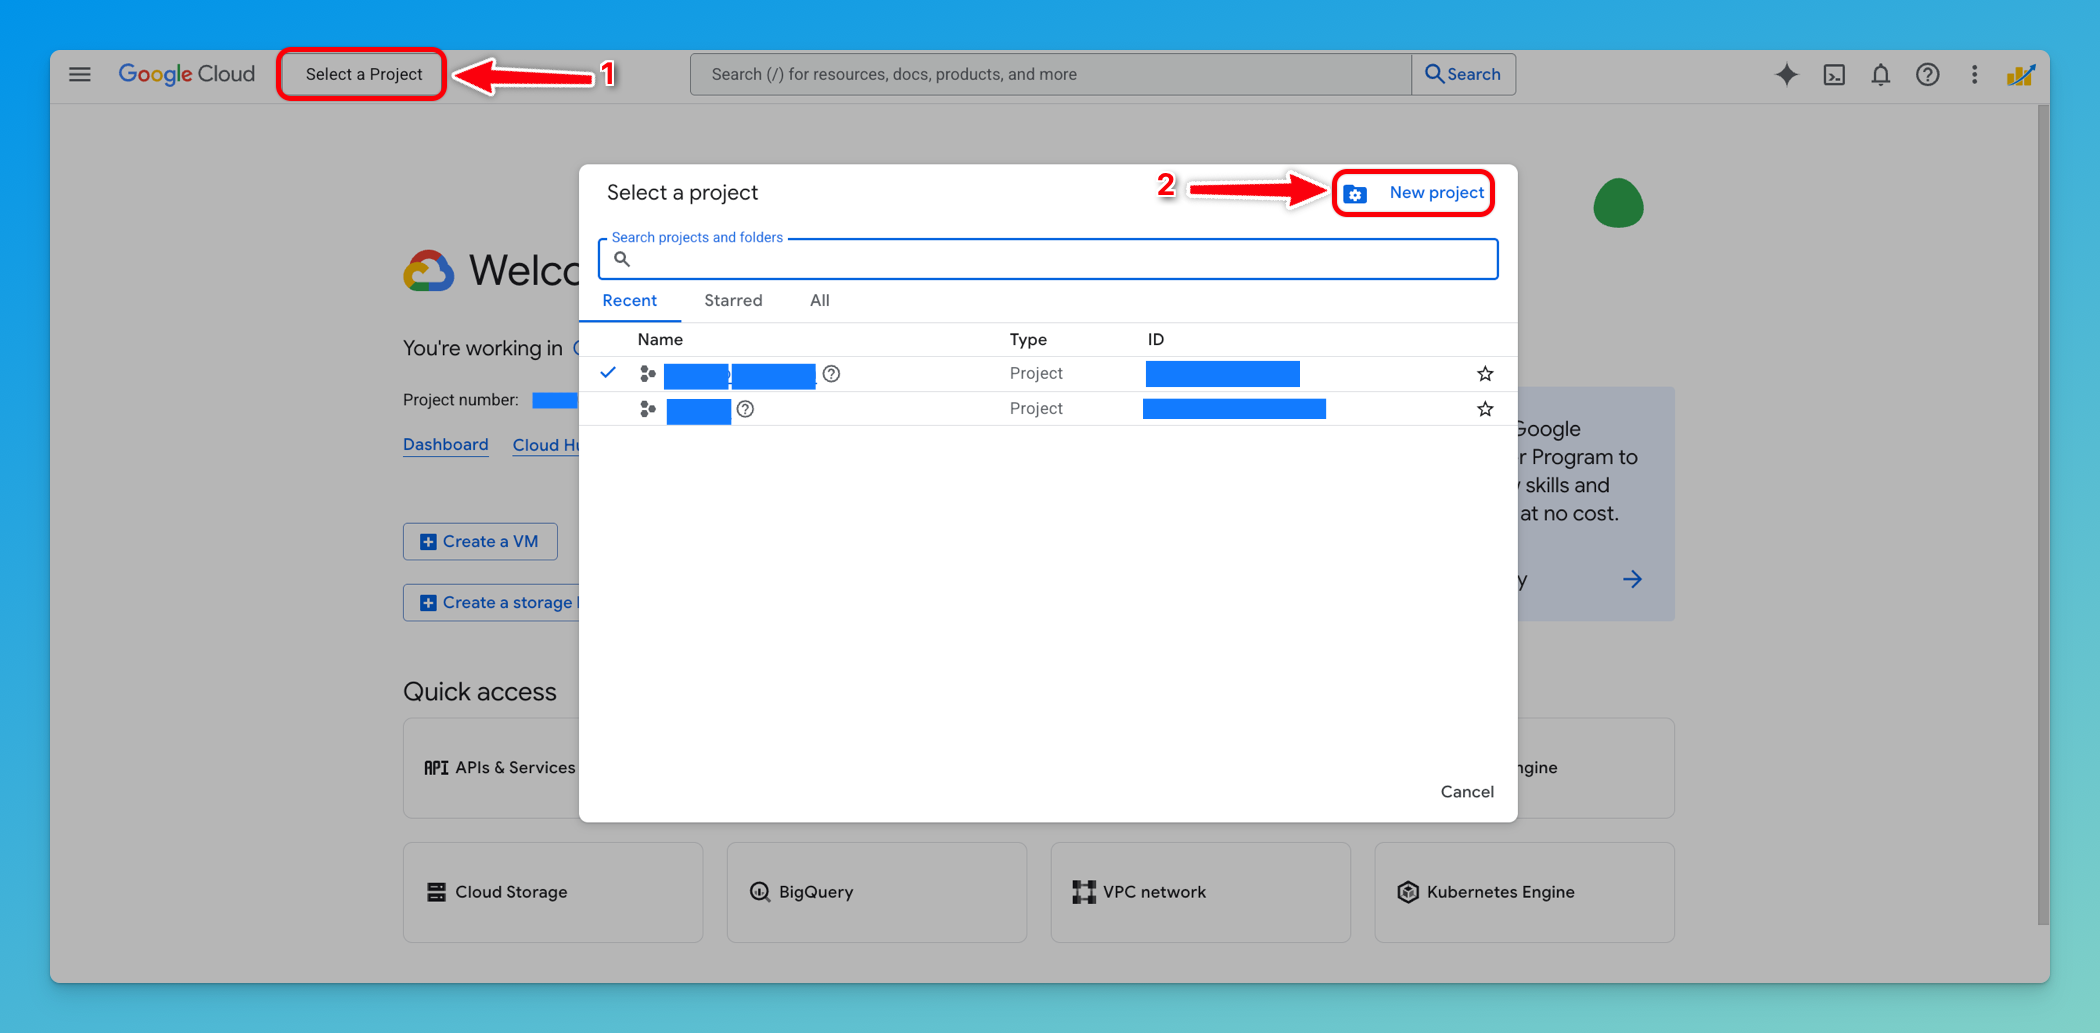
- If you don’t have a GCP project yet, create one by clicking Select a project → New Project
Step 2: Create or Select a Project
Section titled “Step 2: Create or Select a Project”-
In the project selector dropdown, either:
- Select an existing project that you want to use for this integration, OR
- Click New Project to create a new one
-
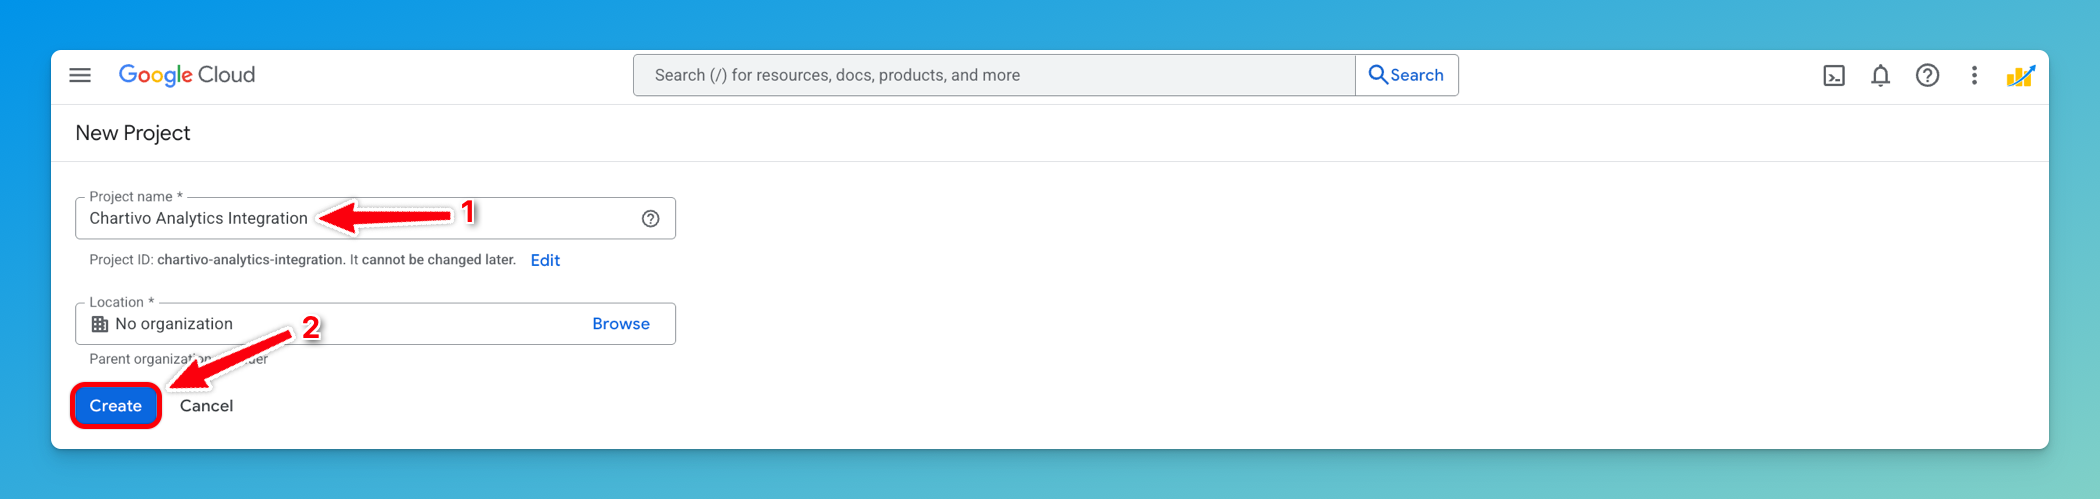
If creating a new project:
- Enter a project name (e.g., “Chartivo Search Integration”)
- Click Create
- Wait for the project to be created (usually takes 10-30 seconds)
Step 3: Enable Google Search Console API
Section titled “Step 3: Enable Google Search Console API”-
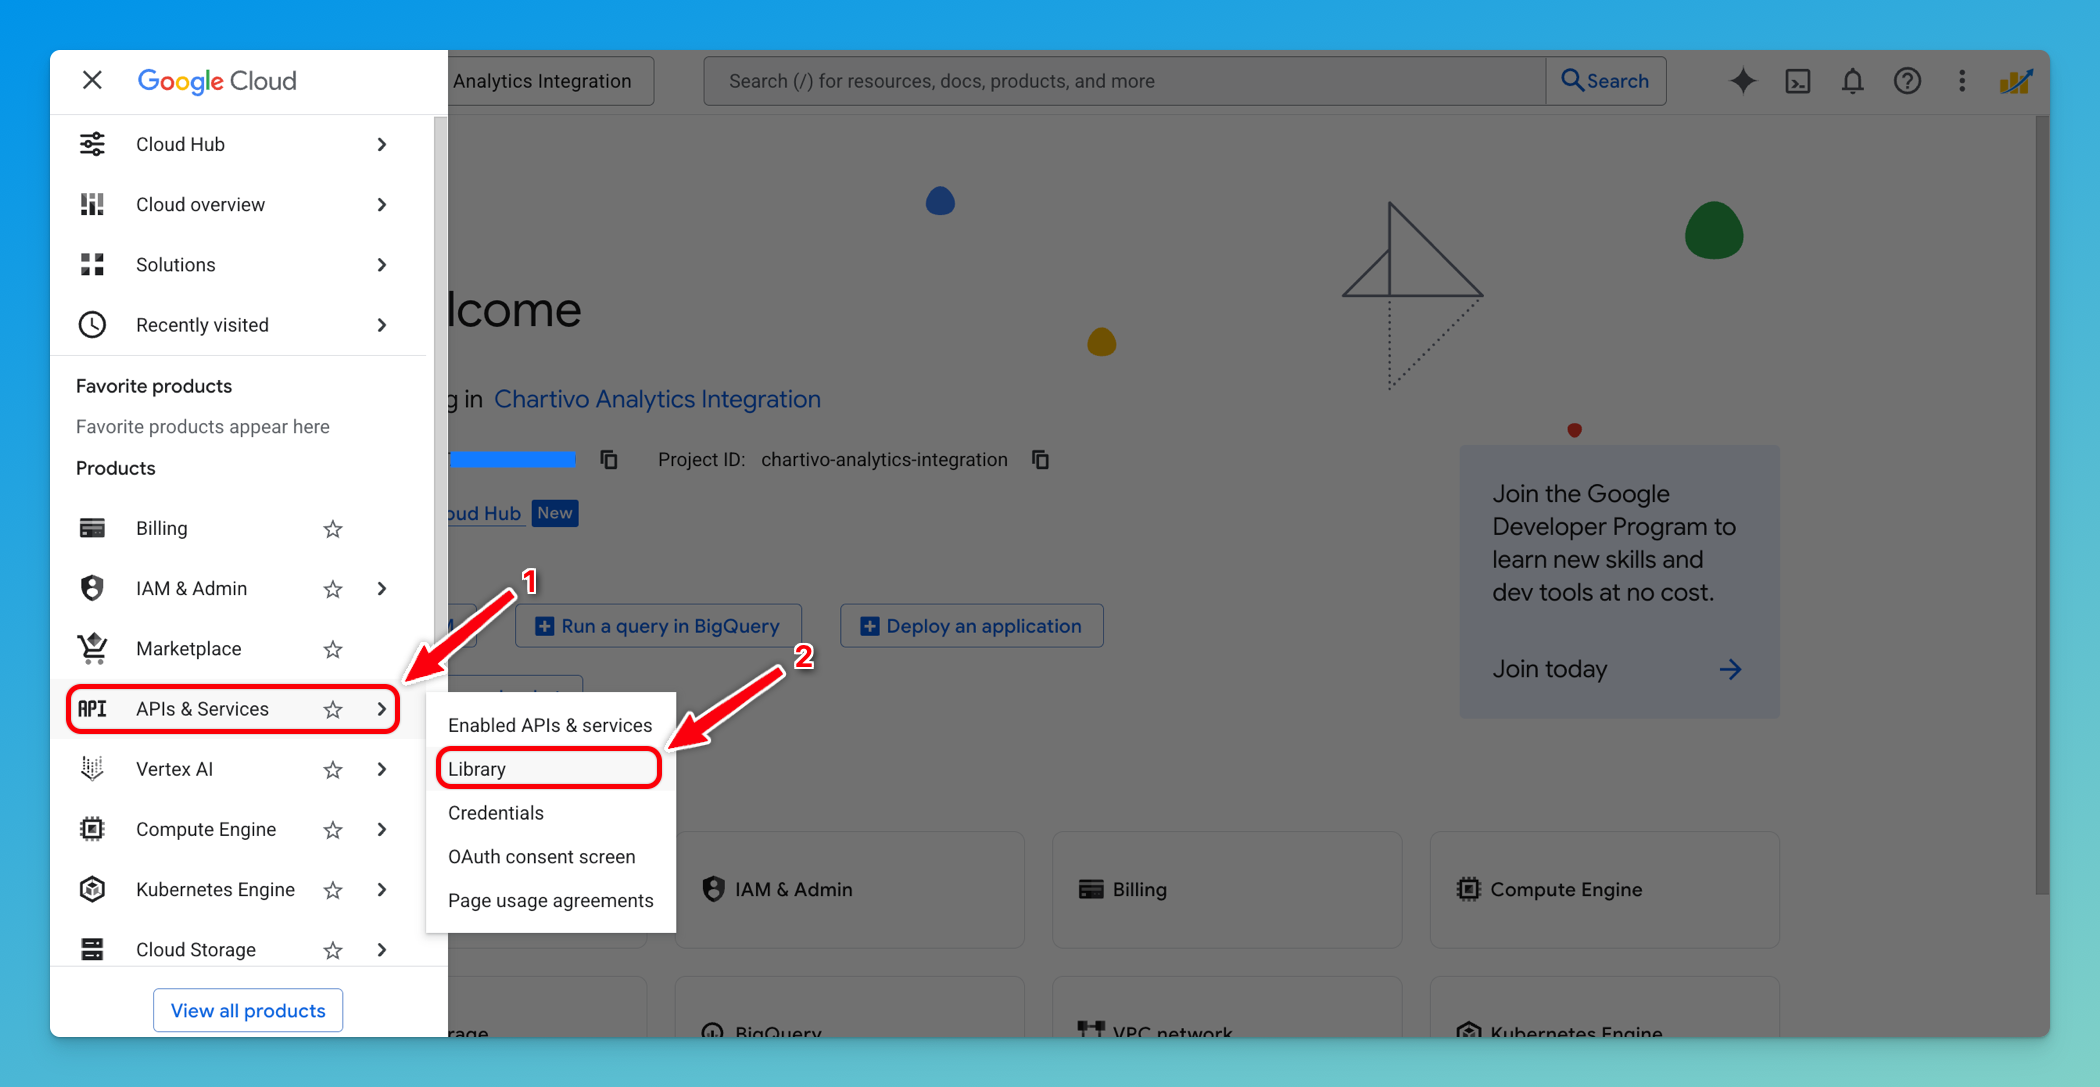
In the Google Cloud Console, open the navigation menu (☰ hamburger icon)
-
Navigate to APIs & Services → Library
-
In the API Library search bar, type: Search Console API
-
Click on Google Search Console API from the search results

-
Click the Enable button

⚠️ Important: Make sure you enable “Google Search Console API” (not “Search Ads 360 API” or other similar APIs).
Step 4: Create a Service Account
Section titled “Step 4: Create a Service Account”-
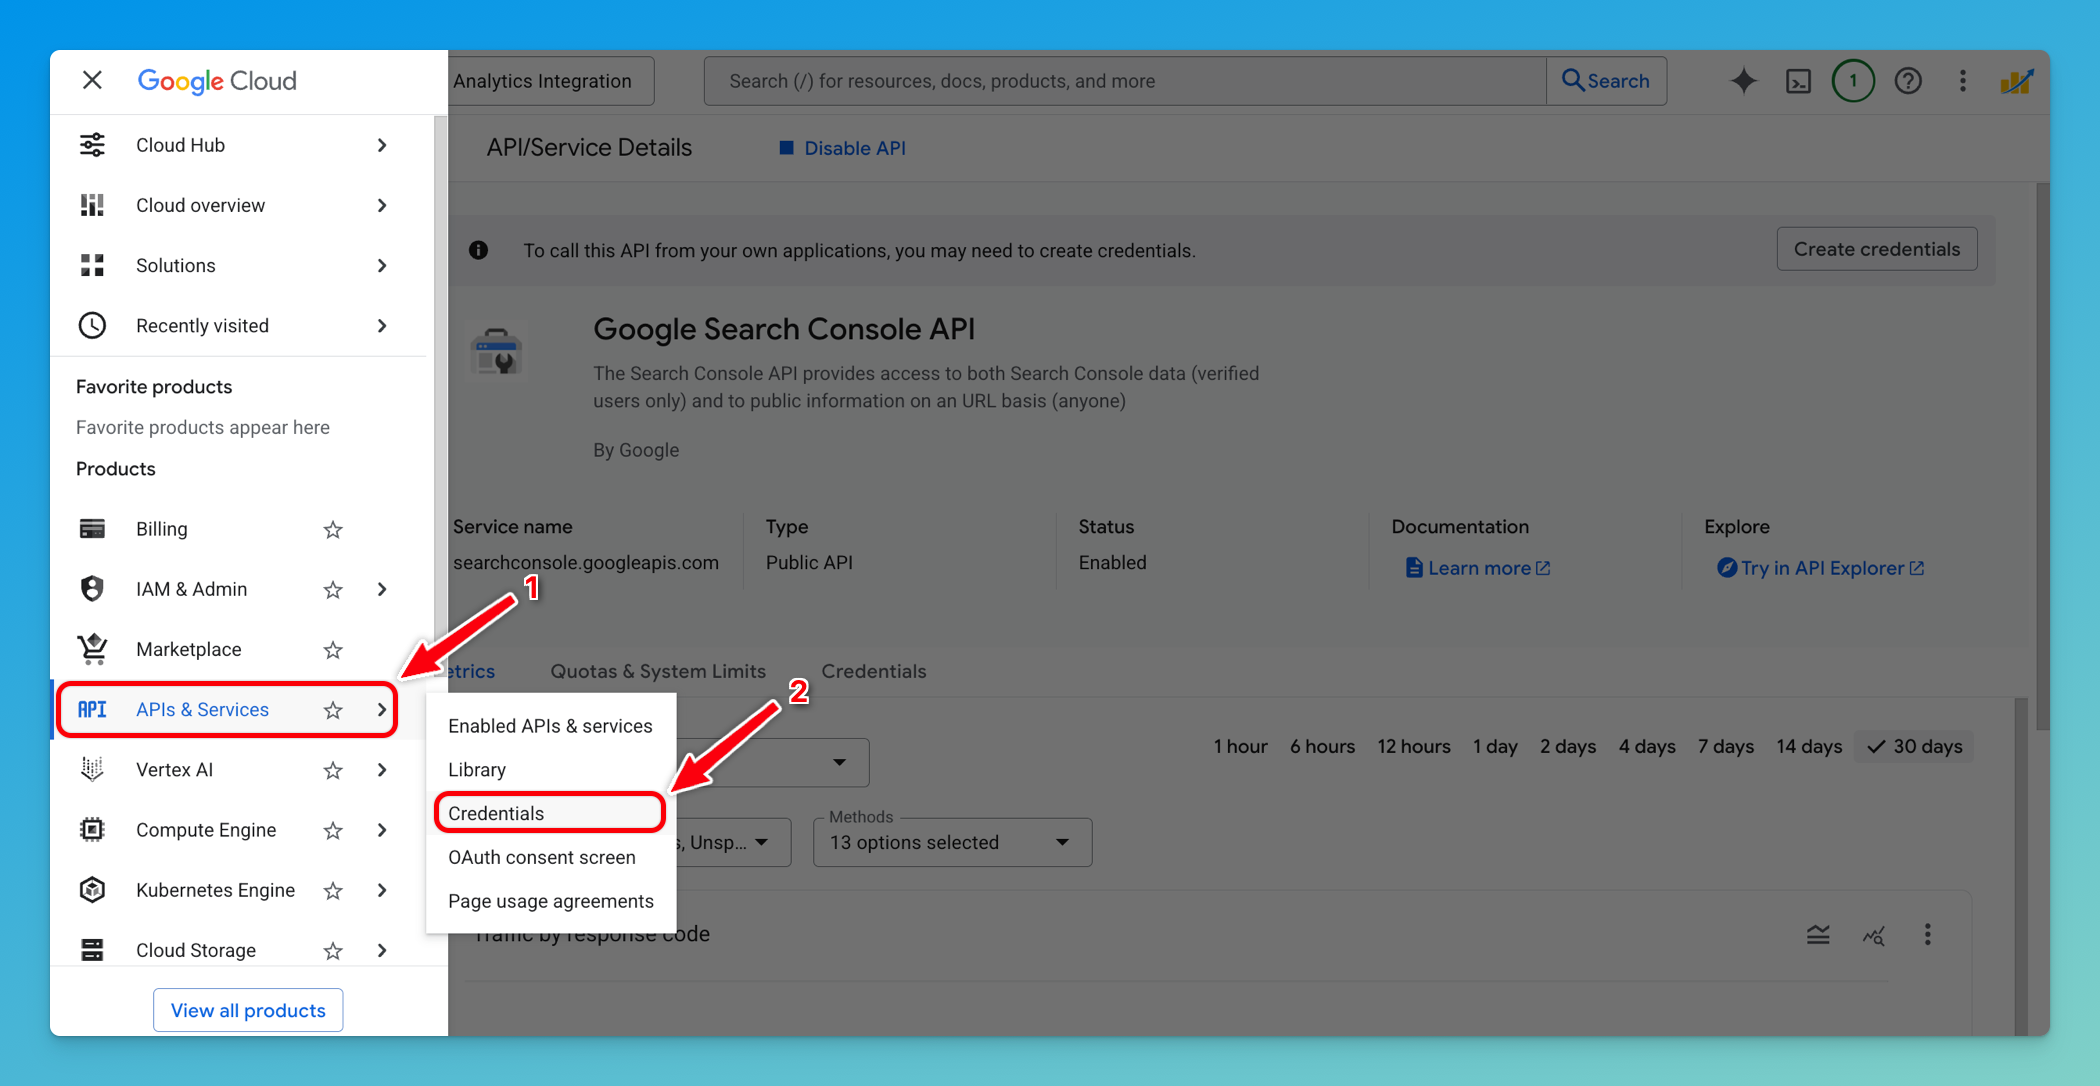
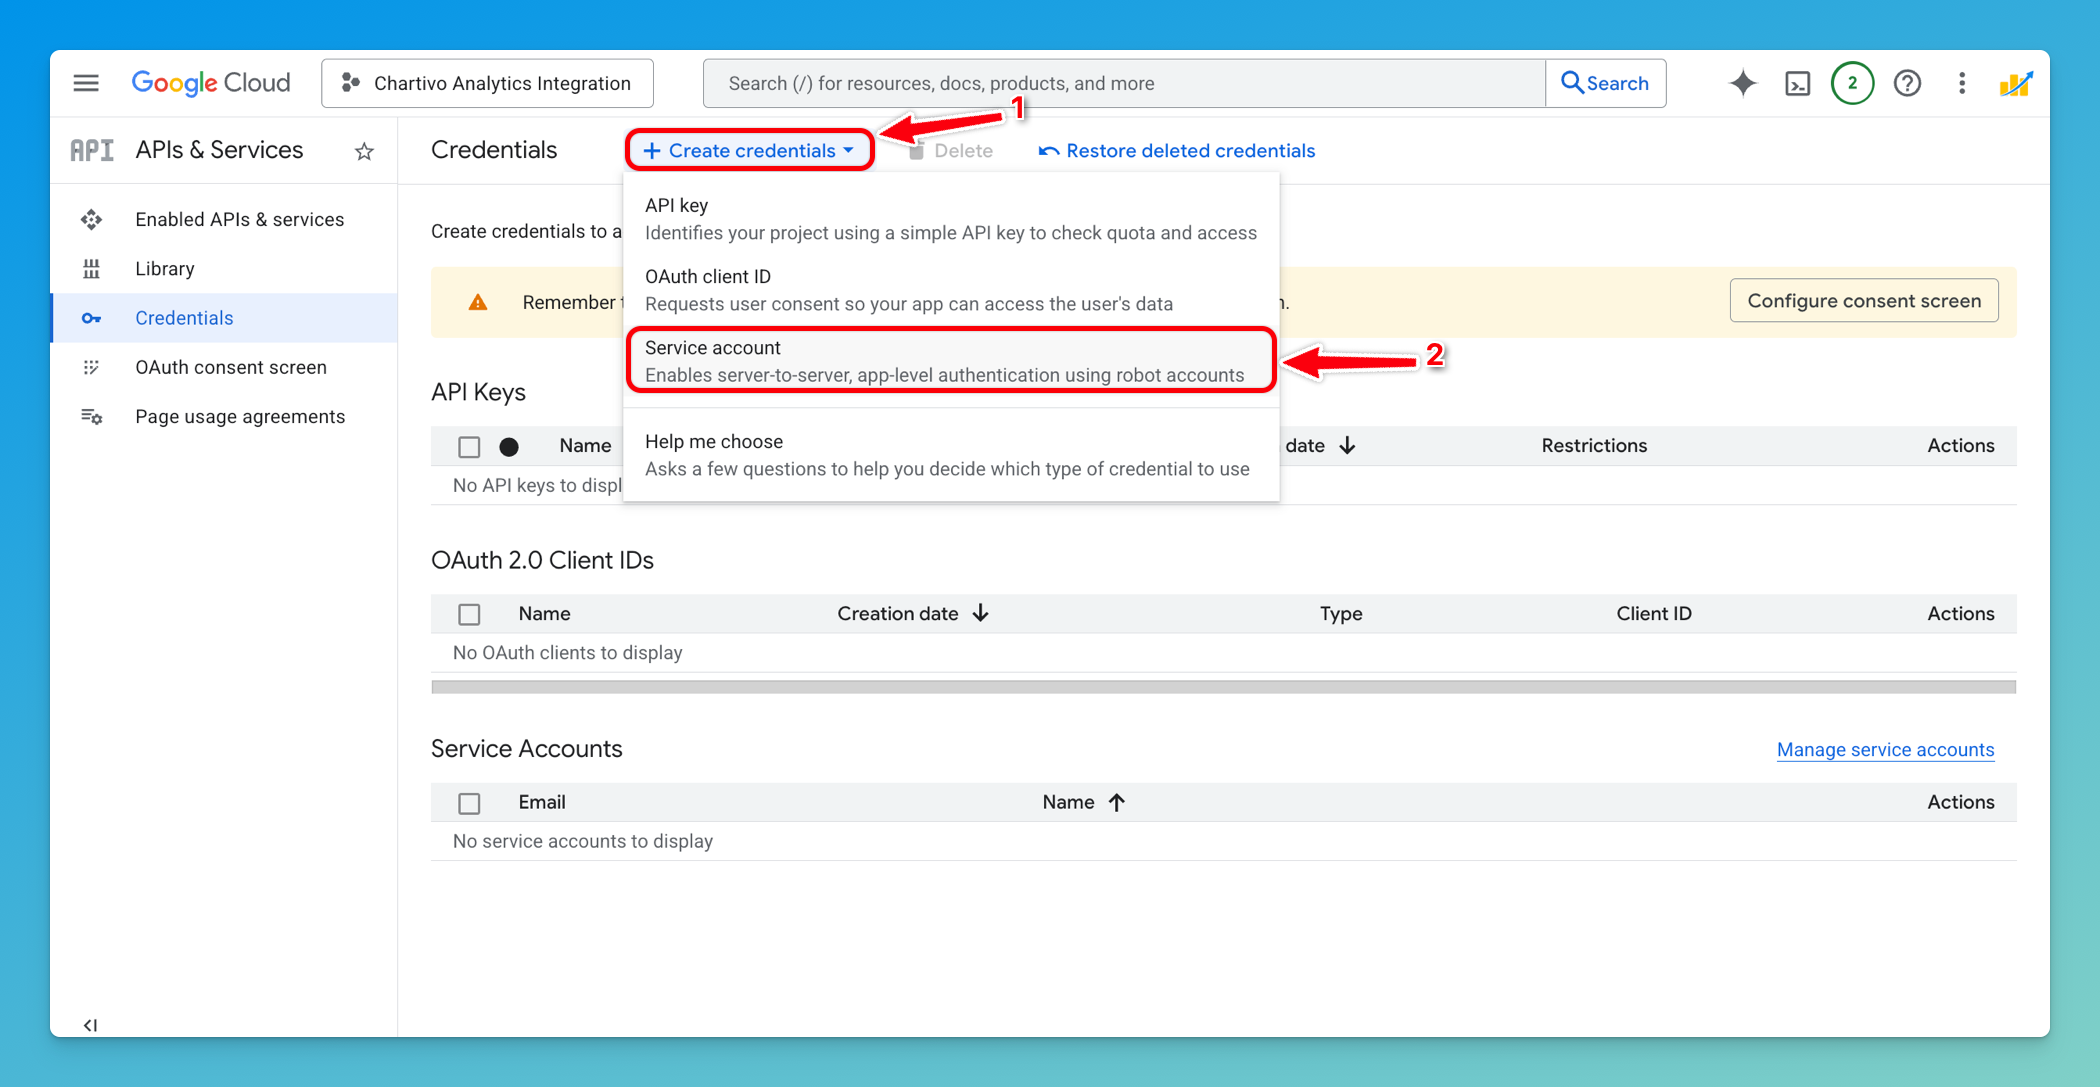
In the navigation menu, go to APIs & Services → Credentials
-
Click + Create Credentials at the top
-
Select Service Account from the dropdown menu
-
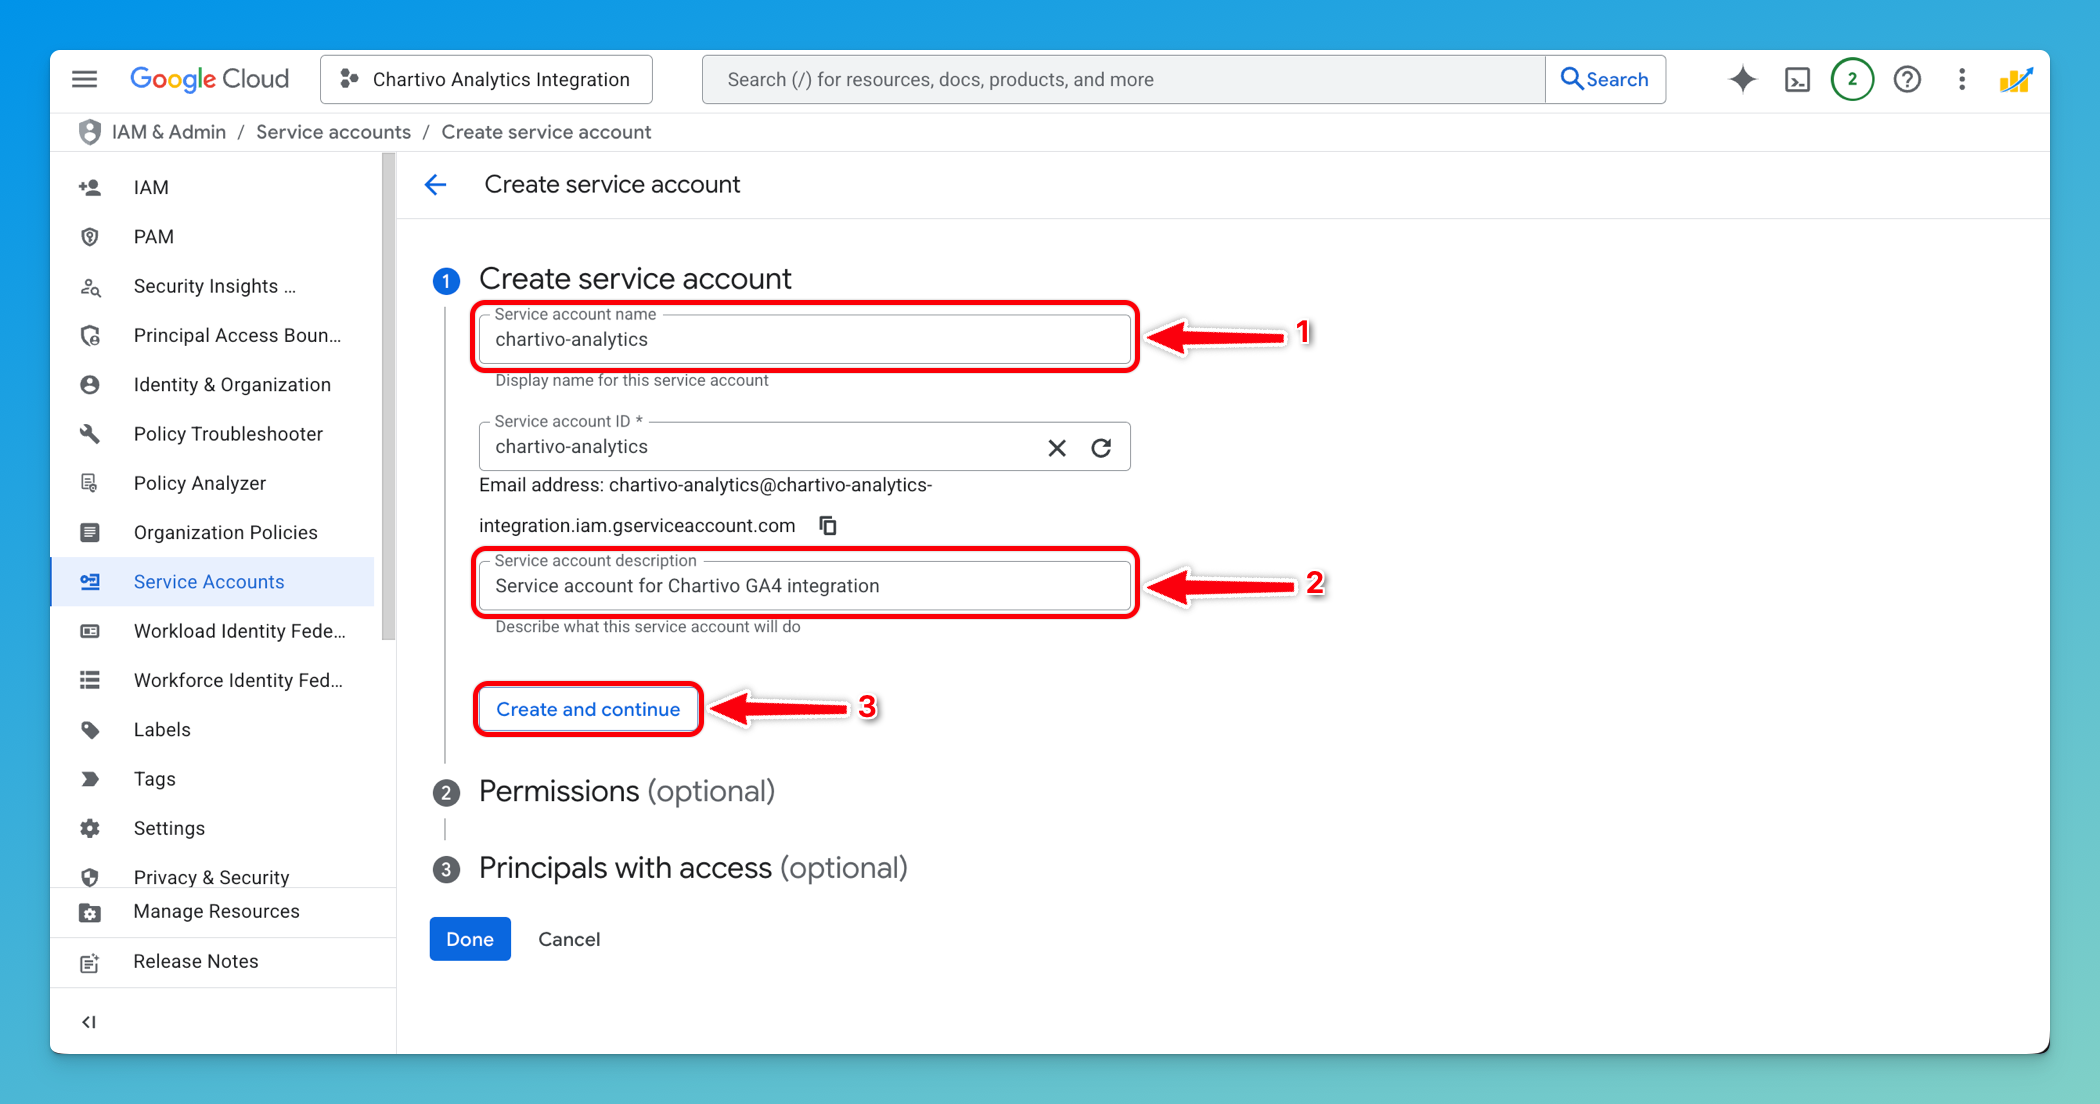
Fill in the service account details:
- Service account name:
chartivo-analytics(or your preferred name) - Service account ID: Will auto-populate based on the name
- Description:
Service account for Chartivo Search Console integration(optional)
- Service account name:
-
Click Create and Continue
Tip: If you already created a service account for Google Analytics you can reuse it. Skip to Step 7 and use the existing service account email.
Step 5: Grant Service Account Permissions (Optional)
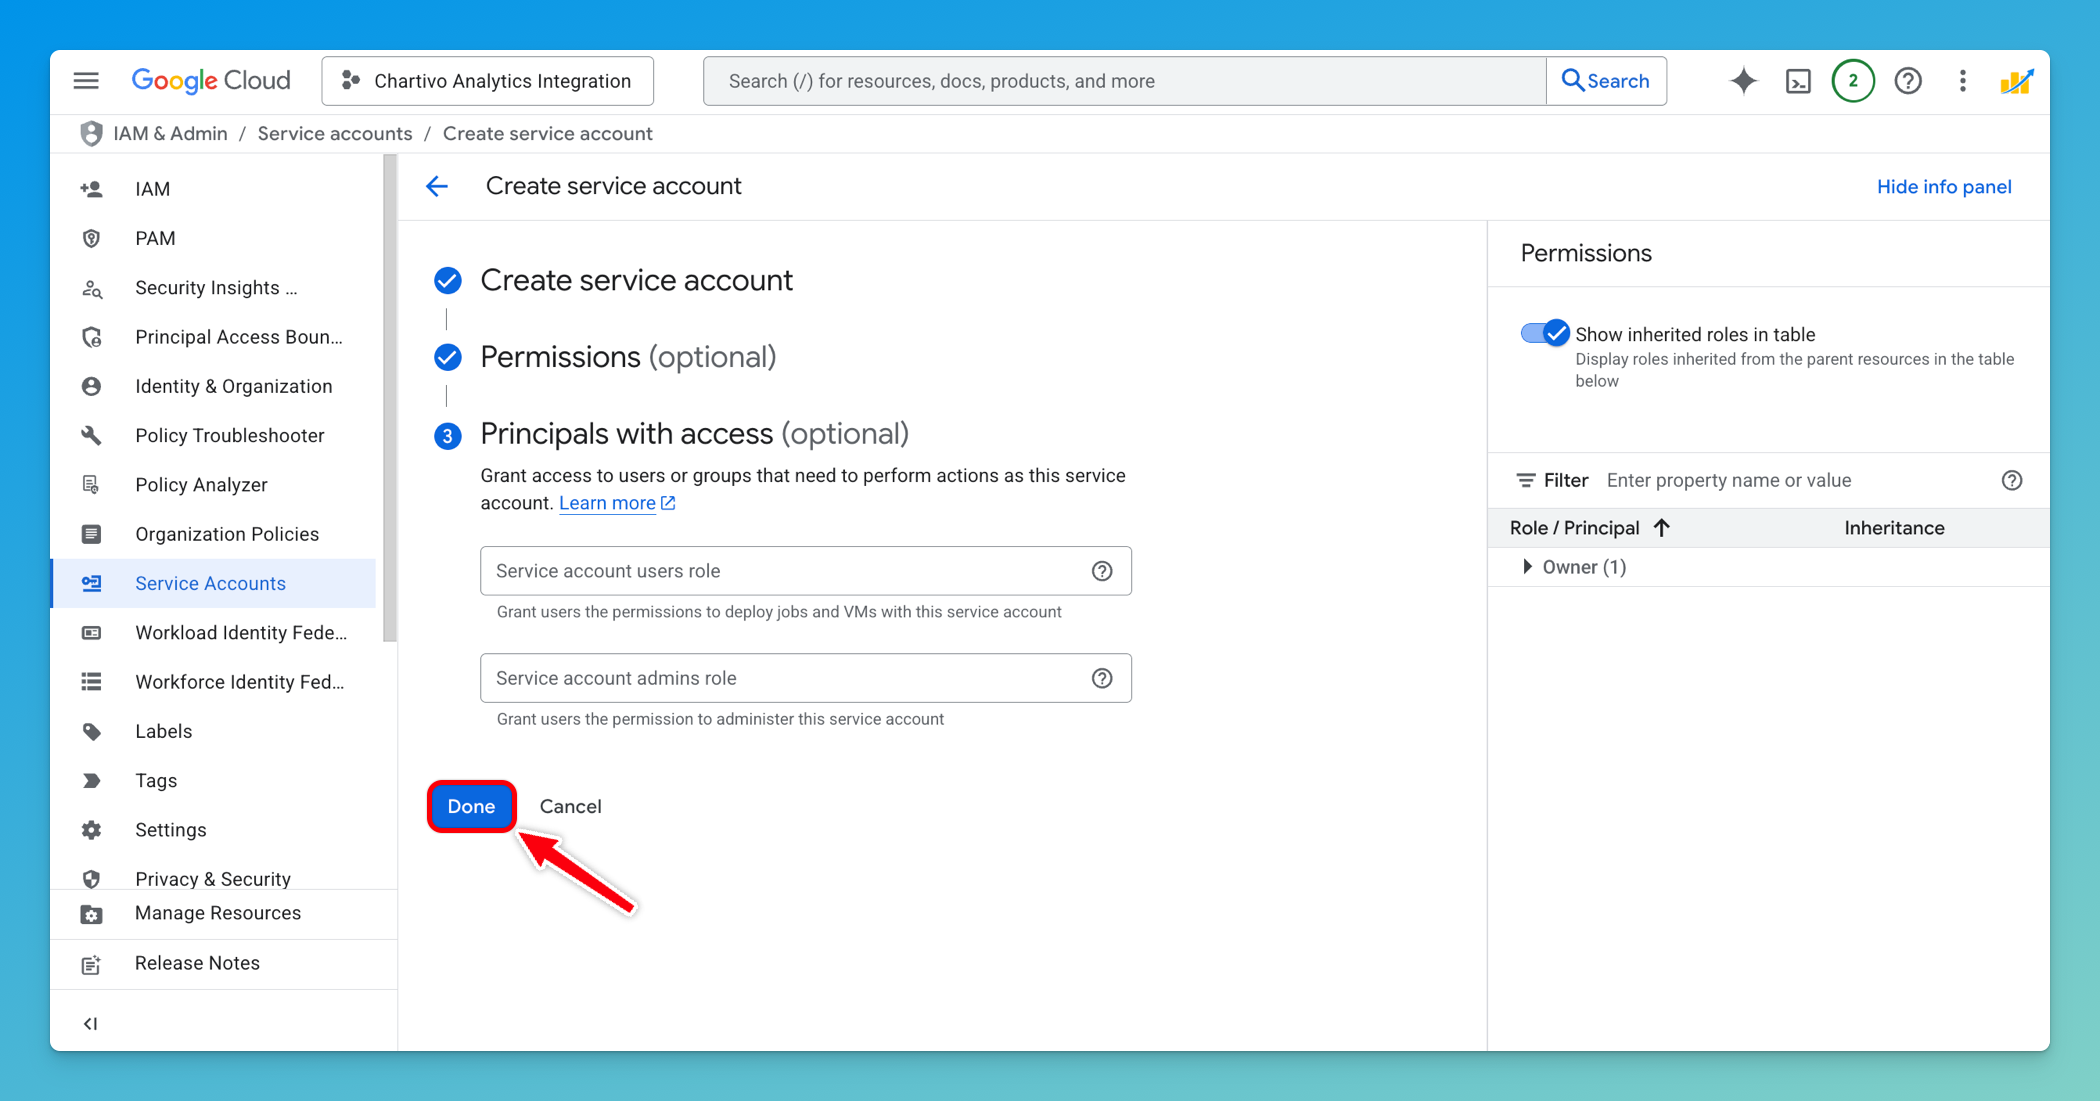
Section titled “Step 5: Grant Service Account Permissions (Optional)”- On the Grant this service account access to project screen:
- You can skip this step by clicking Continue (no project-level roles are required)
- On the Grant users access to this service account screen:
-
You can skip this step by clicking Done
-
Step 6: Create and Download Service Account Key
Section titled “Step 6: Create and Download Service Account Key”-
You’ll be returned to the Credentials page
-
Under Service Accounts, find the service account you just created
-
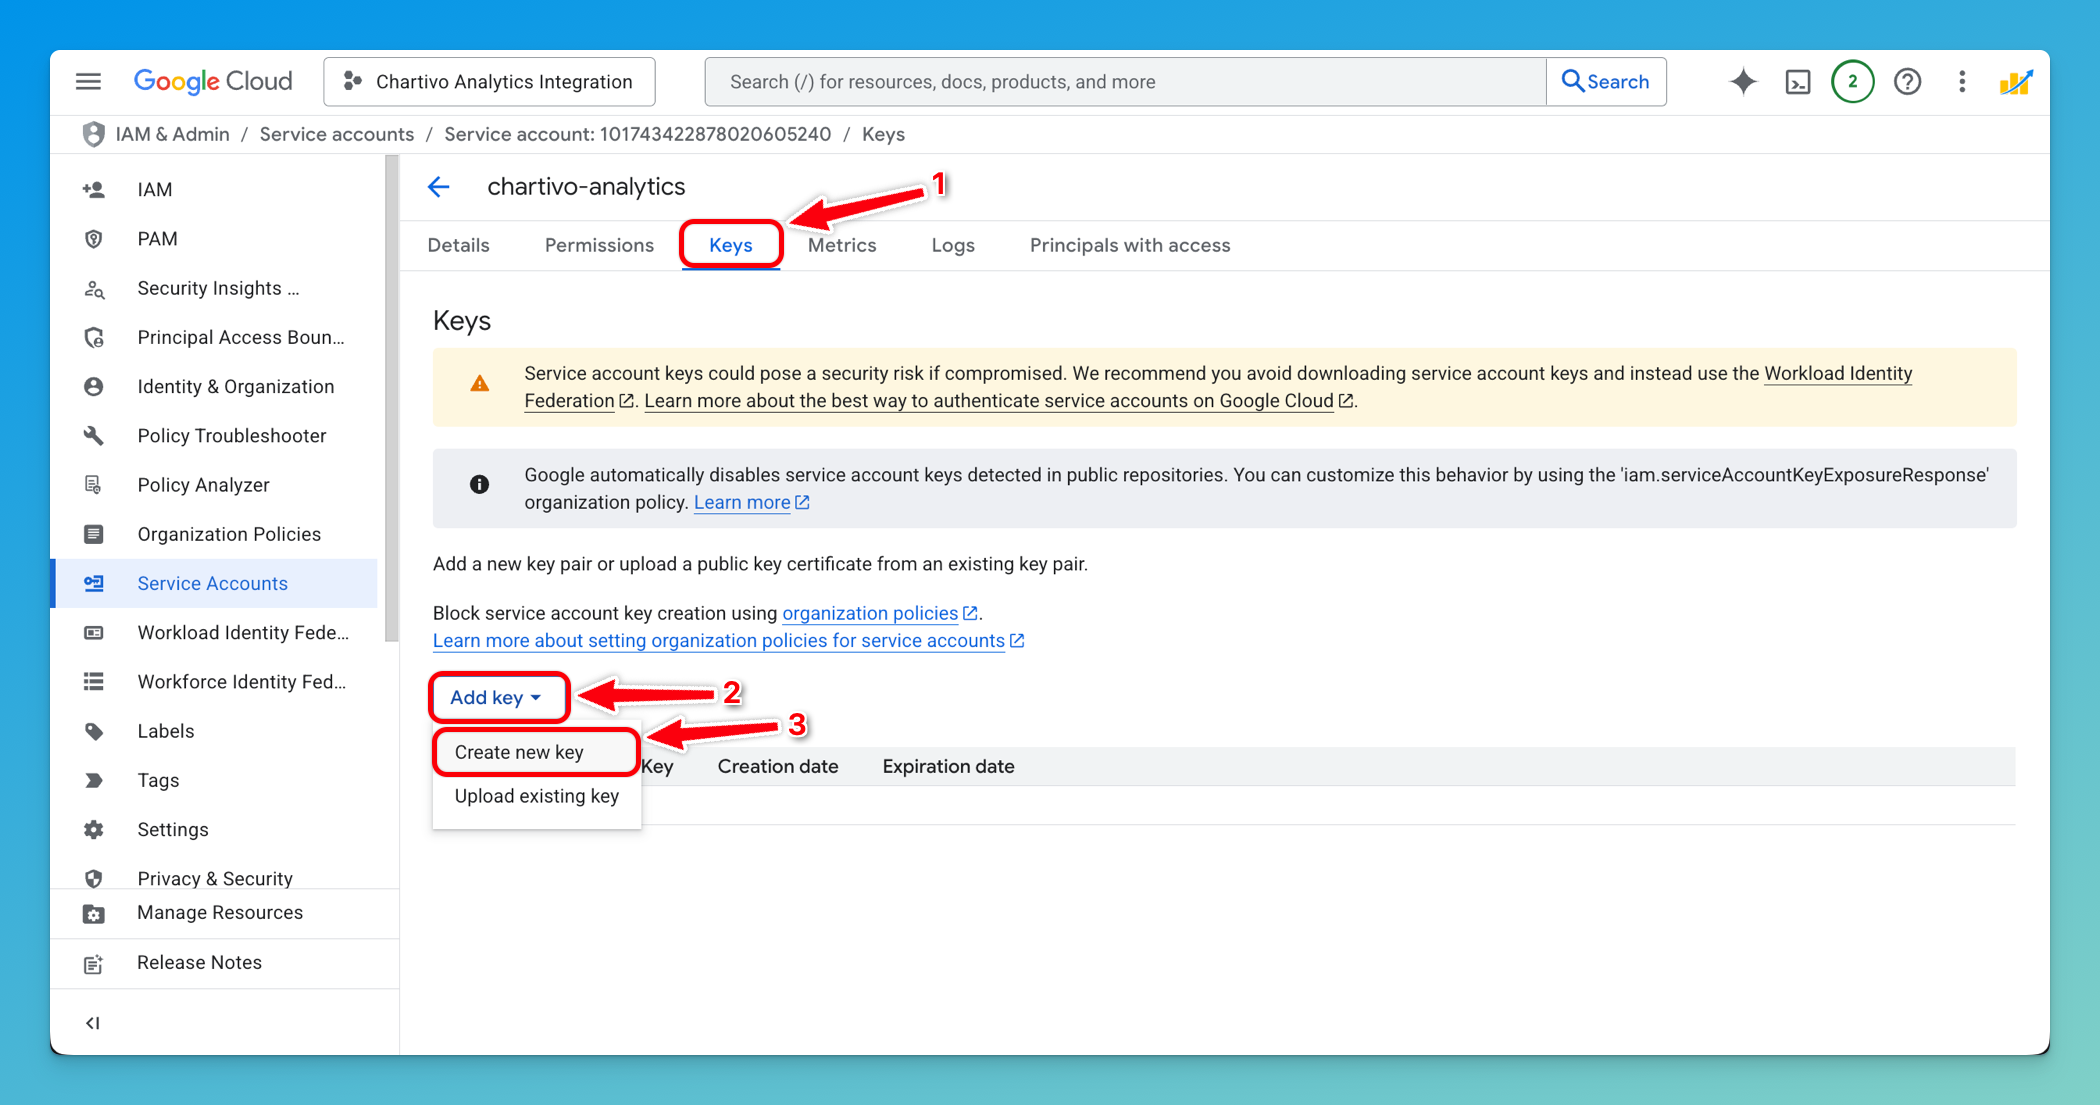
Click on the service account email address to open its details

-
Navigate to the Keys tab
-
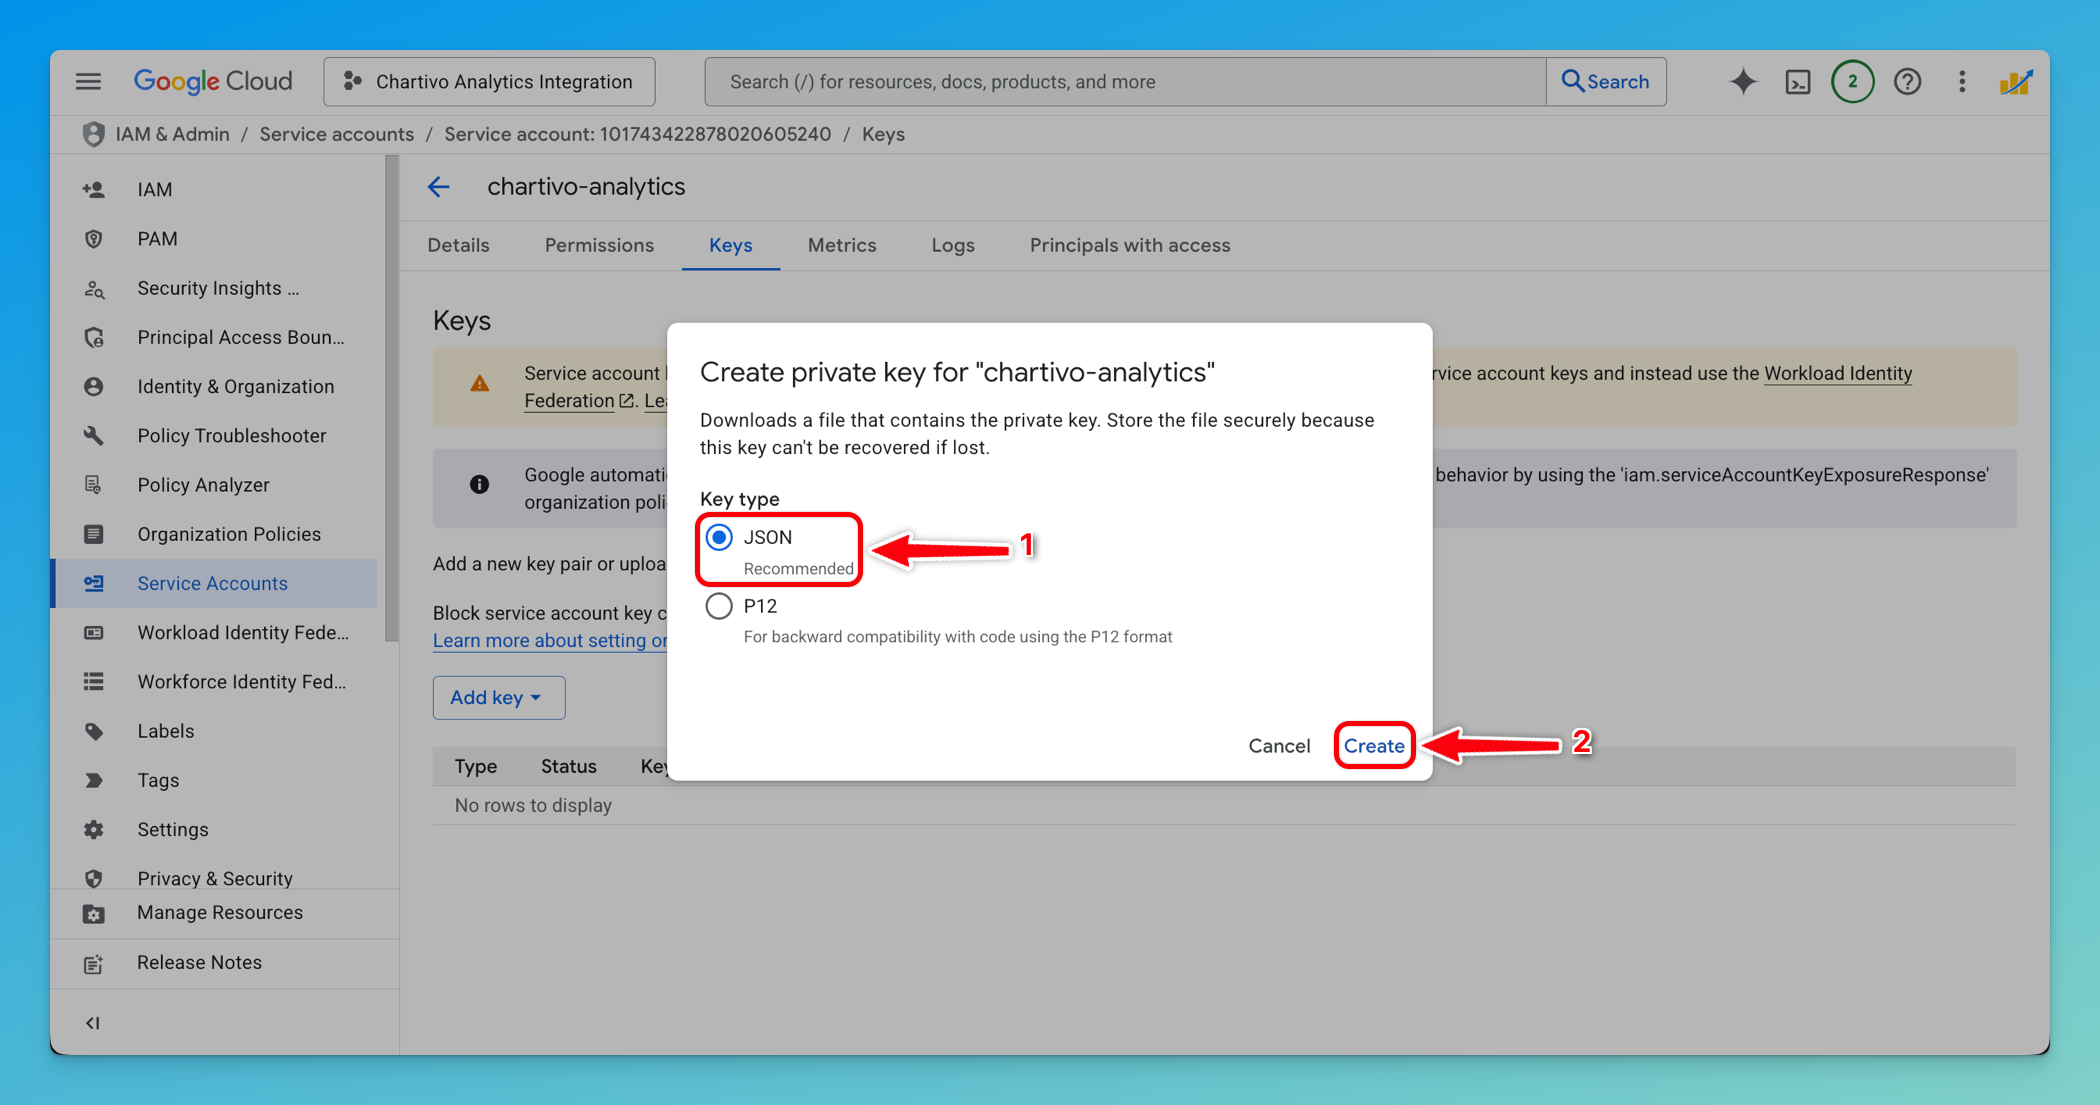
Click Add Key → Create new key
-
Select JSON as the key type
-
Click Create
-
The JSON key file will automatically download to your computer
-
Important: Save this file securely - you’ll need it for Chartivo configuration
⚠️ Security Warning: This JSON file contains private credentials. Never commit it to version control or share it publicly.
Part 2: Google Search Console Setup
Section titled “Part 2: Google Search Console Setup”Step 7: Verify Your Site in Search Console
Section titled “Step 7: Verify Your Site in Search Console”If your site is already verified, you can skip to Step 8.
If your site is NOT yet verified:
-
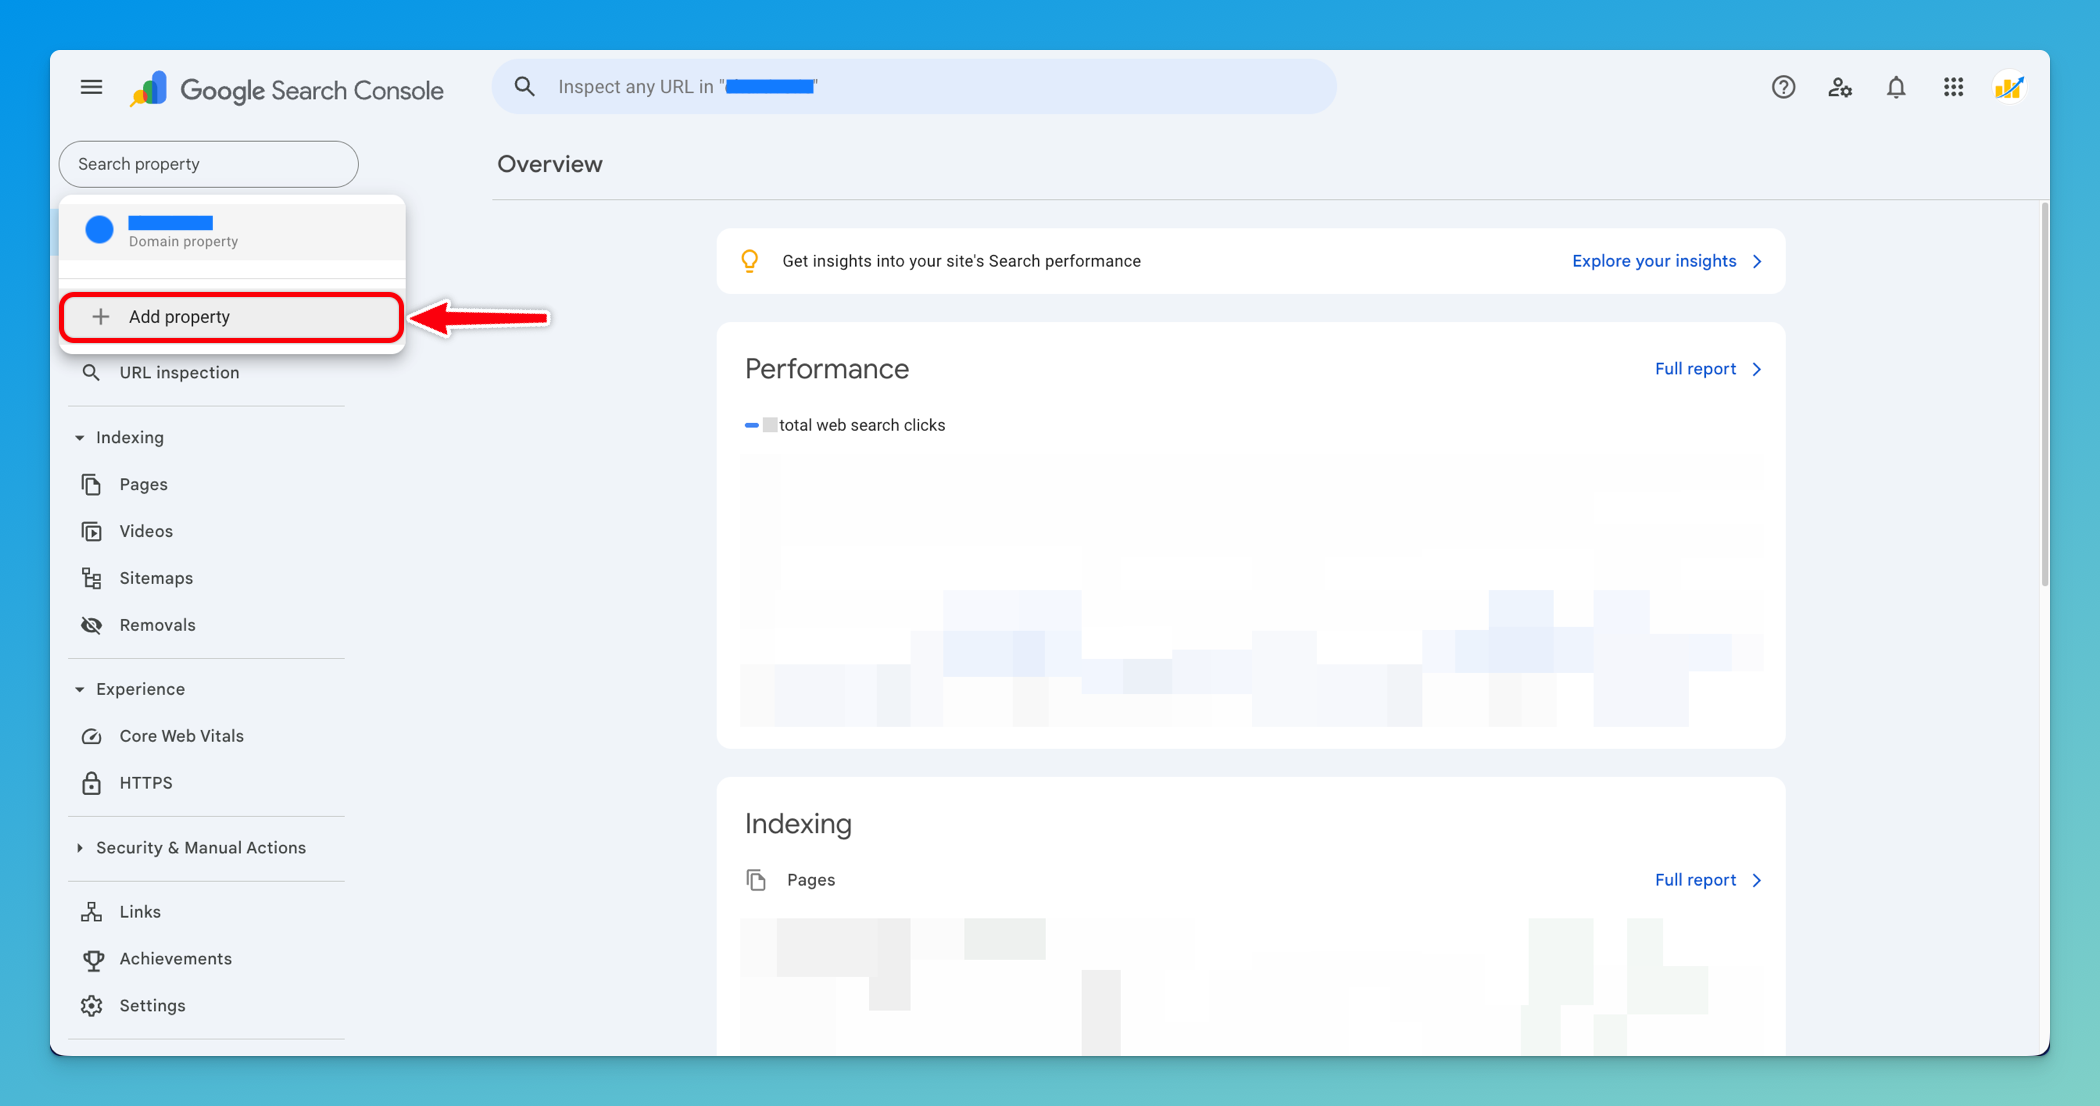
Navigate to https://search.google.com/search-console
-
Click Add Property
-
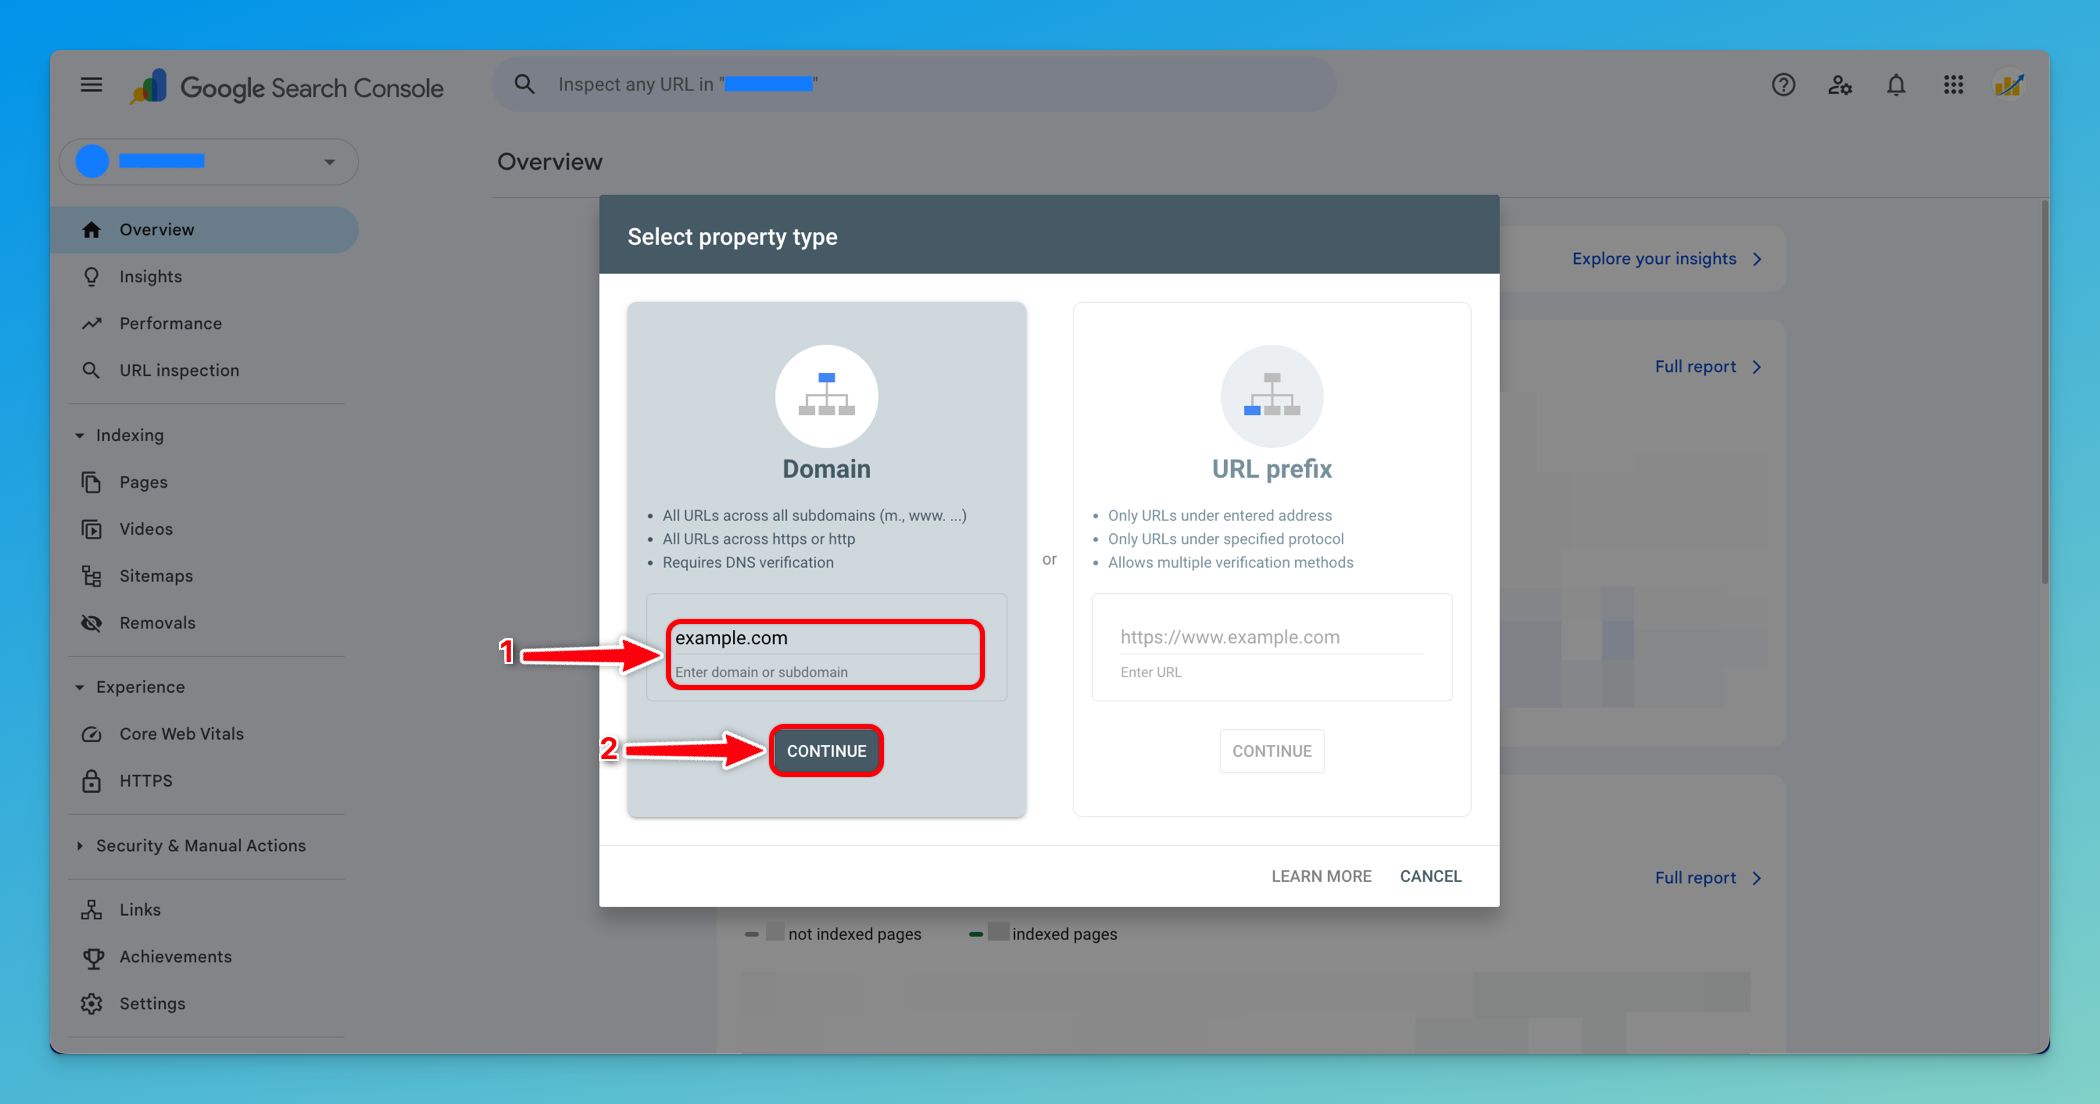
Choose your verification method:
- Domain property: Verify via DNS (recommended for tracking all subdomains)
- URL prefix: Verify via HTML file, meta tag, or Google Analytics
-
Follow the verification instructions provided by Google
-
Once verified, proceed to Step 8
💡 Note: This guide assumes you already have a verified property. Verification methods vary and are beyond the scope of this integration guide.
Step 8: Find Your Verified Site URL
Section titled “Step 8: Find Your Verified Site URL”- Open https://search.google.com/search-console
- Log in with your Google account
- In the property selector (top left), you’ll see your verified properties
- Select the property you want to connect to Chartivo
- Note the URL format:
- Domain property:
sc-domain:example.com(without https://) - URL prefix property:
https://example.com/(with https:// and trailing slash)
- Domain property:
- Copy this exact URL - you’ll need it for Chartivo
⚠️ Critical: You must use the EXACT format shown in Search Console. Include sc-domain: for domain properties or https:// with trailing slash for URL prefix properties.
Step 9: Grant Service Account Access to Search Console
Section titled “Step 9: Grant Service Account Access to Search Console”Now you need to give your service account permission to read data from your Search Console property.
-
In Google Search Console, with your property selected, click Settings (gear icon) in the left sidebar
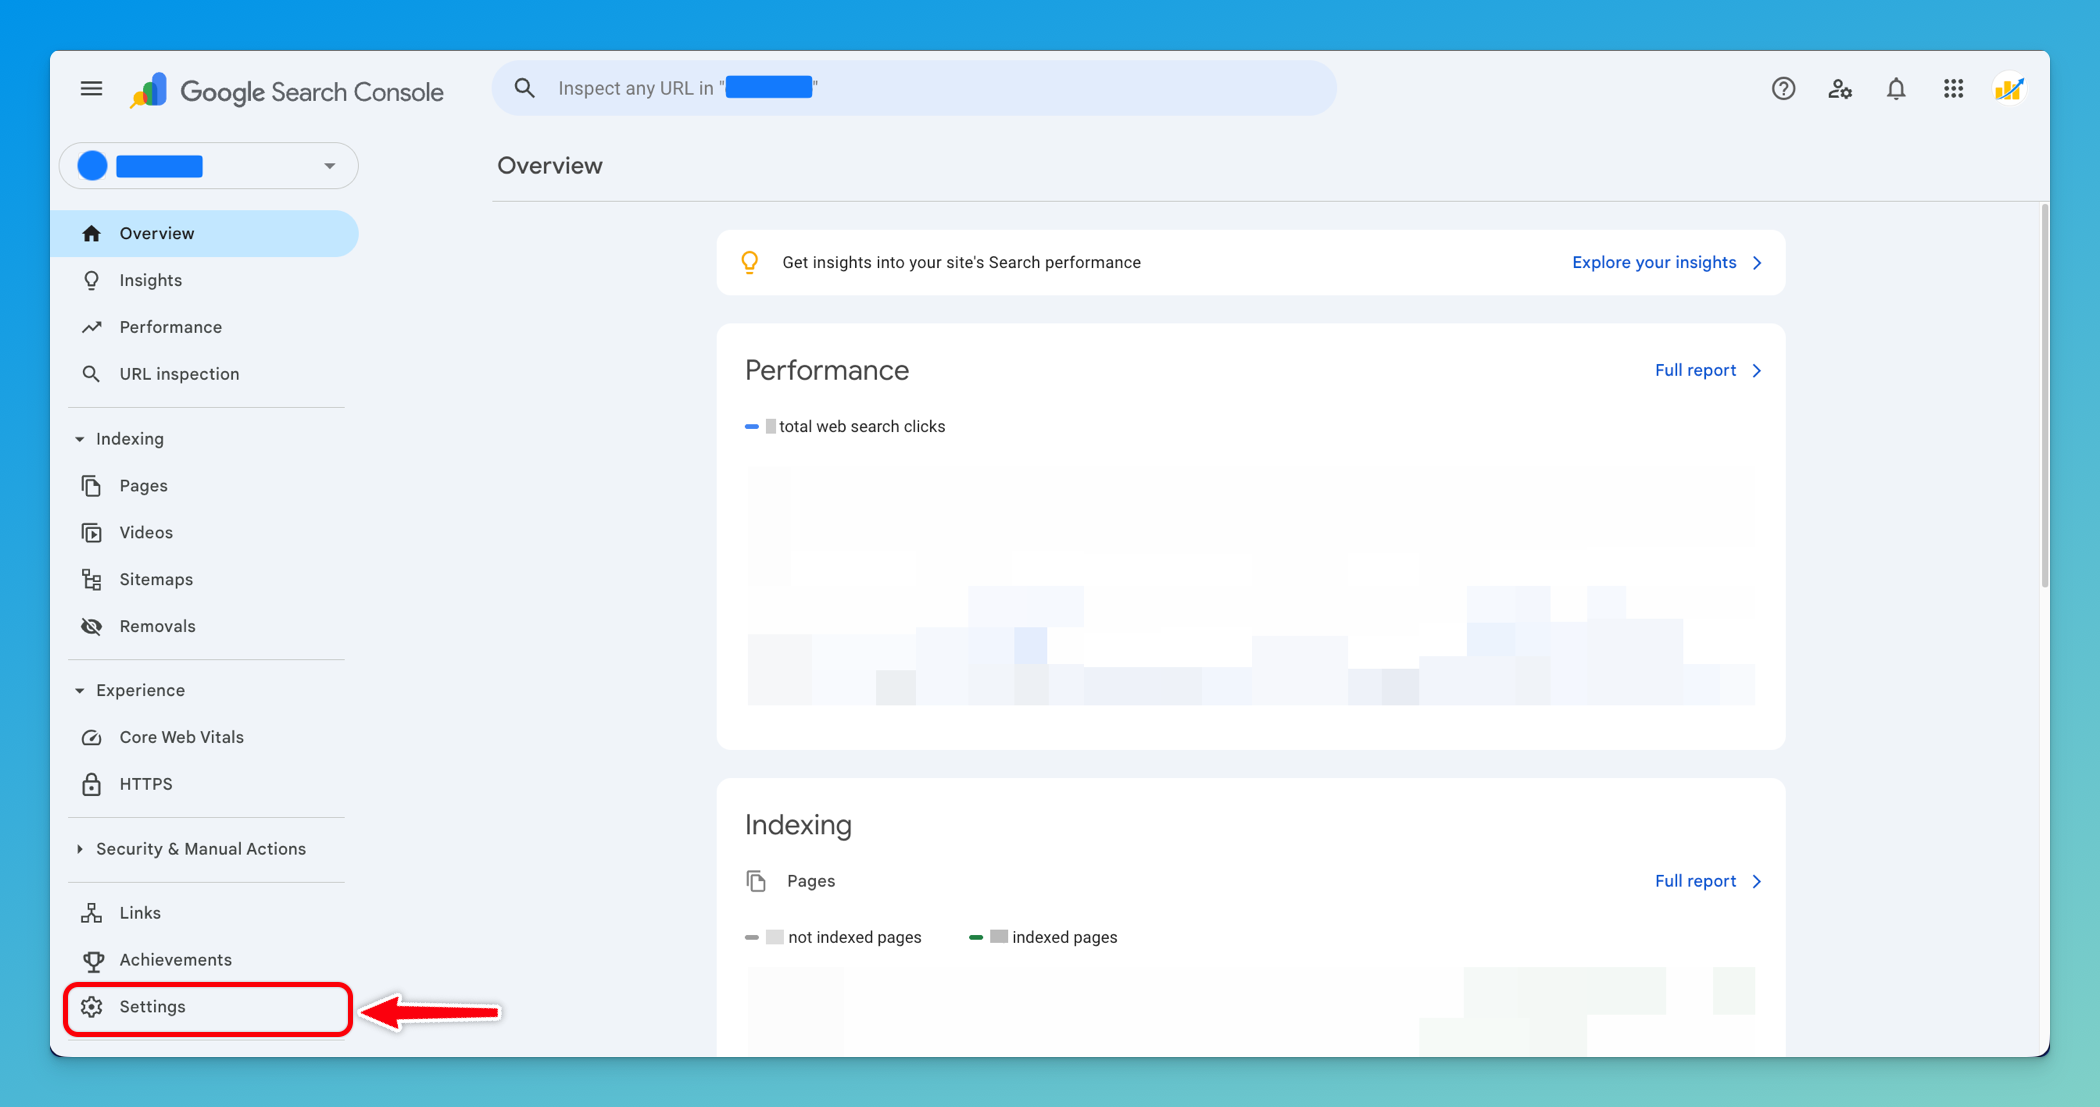
-
Click Users and permissions

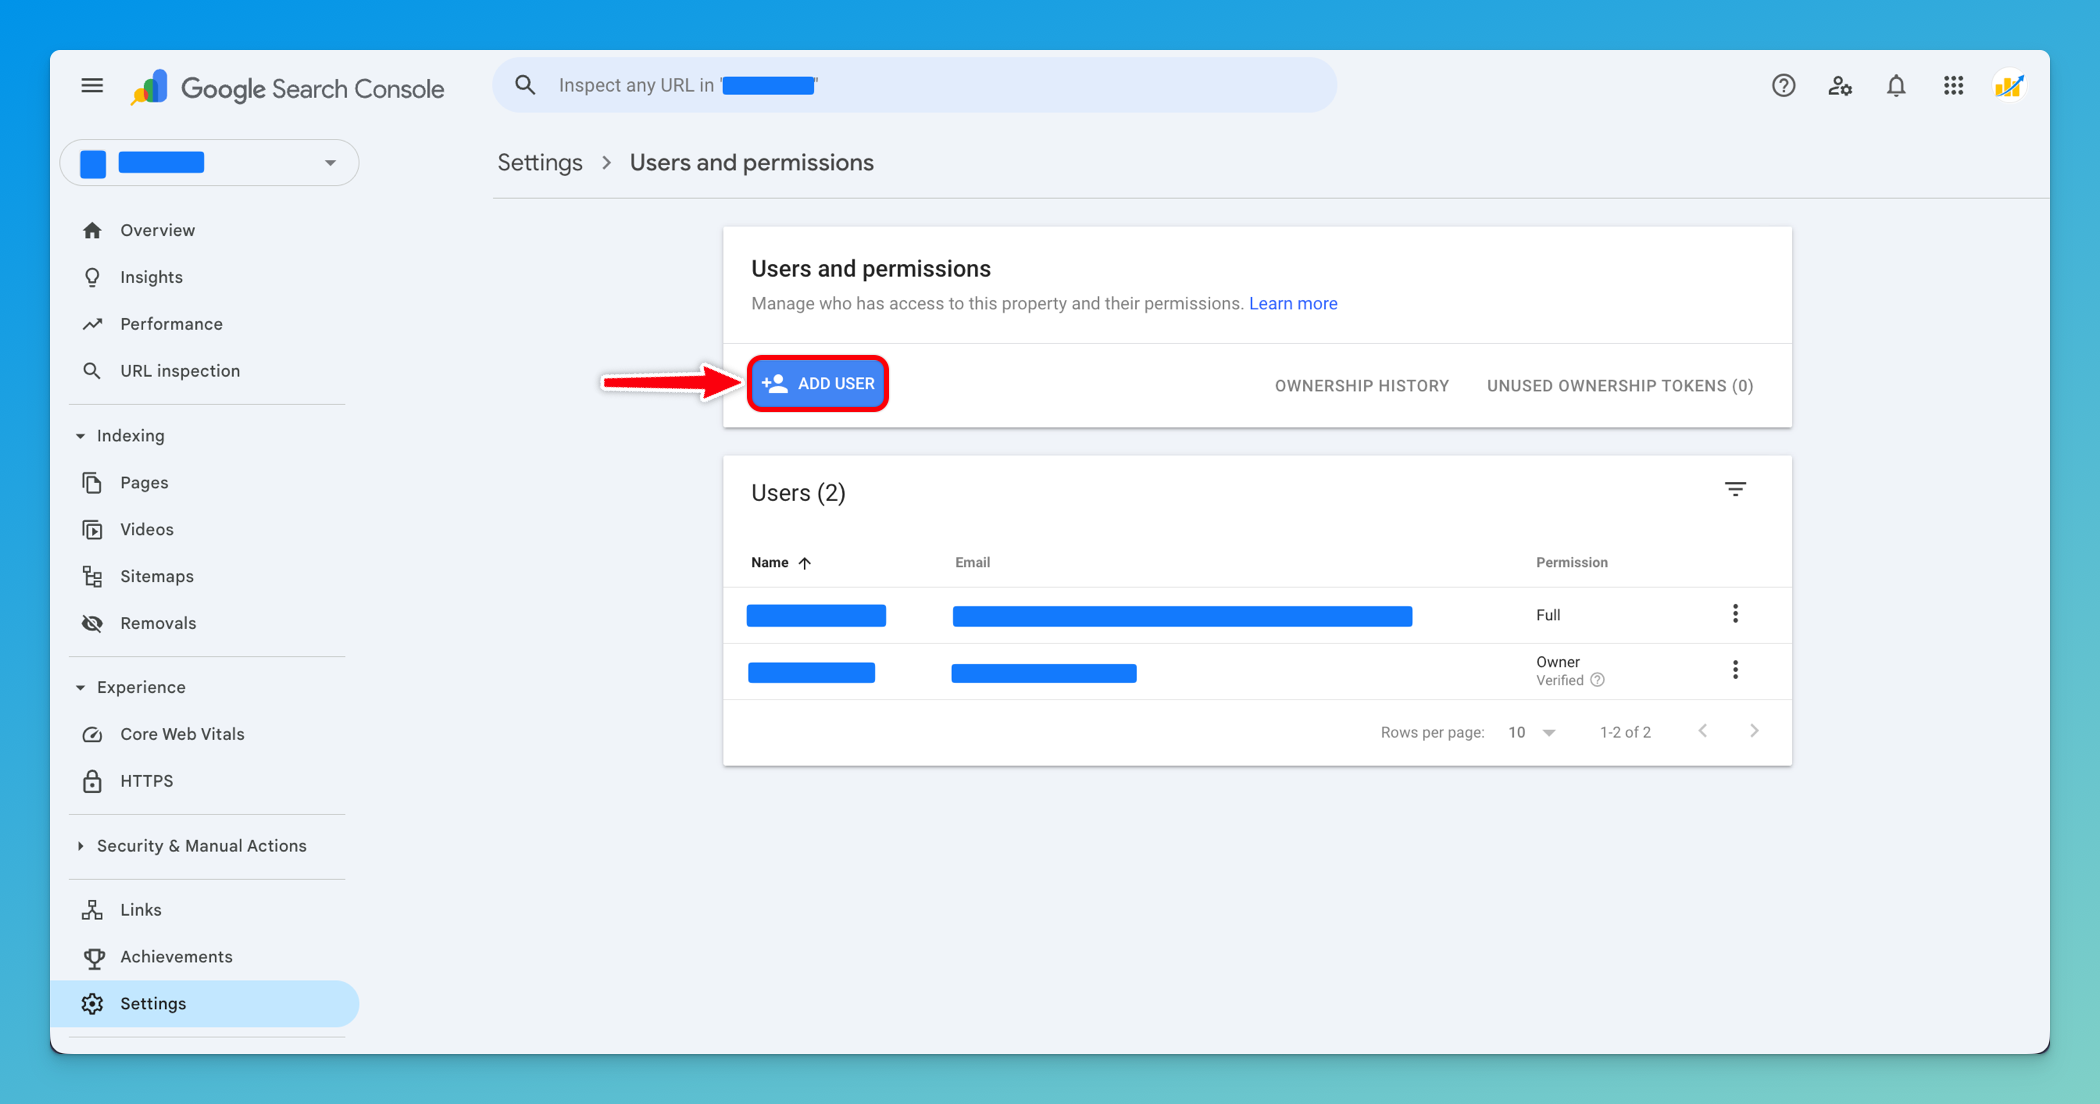
-
Click Add User button in the top right
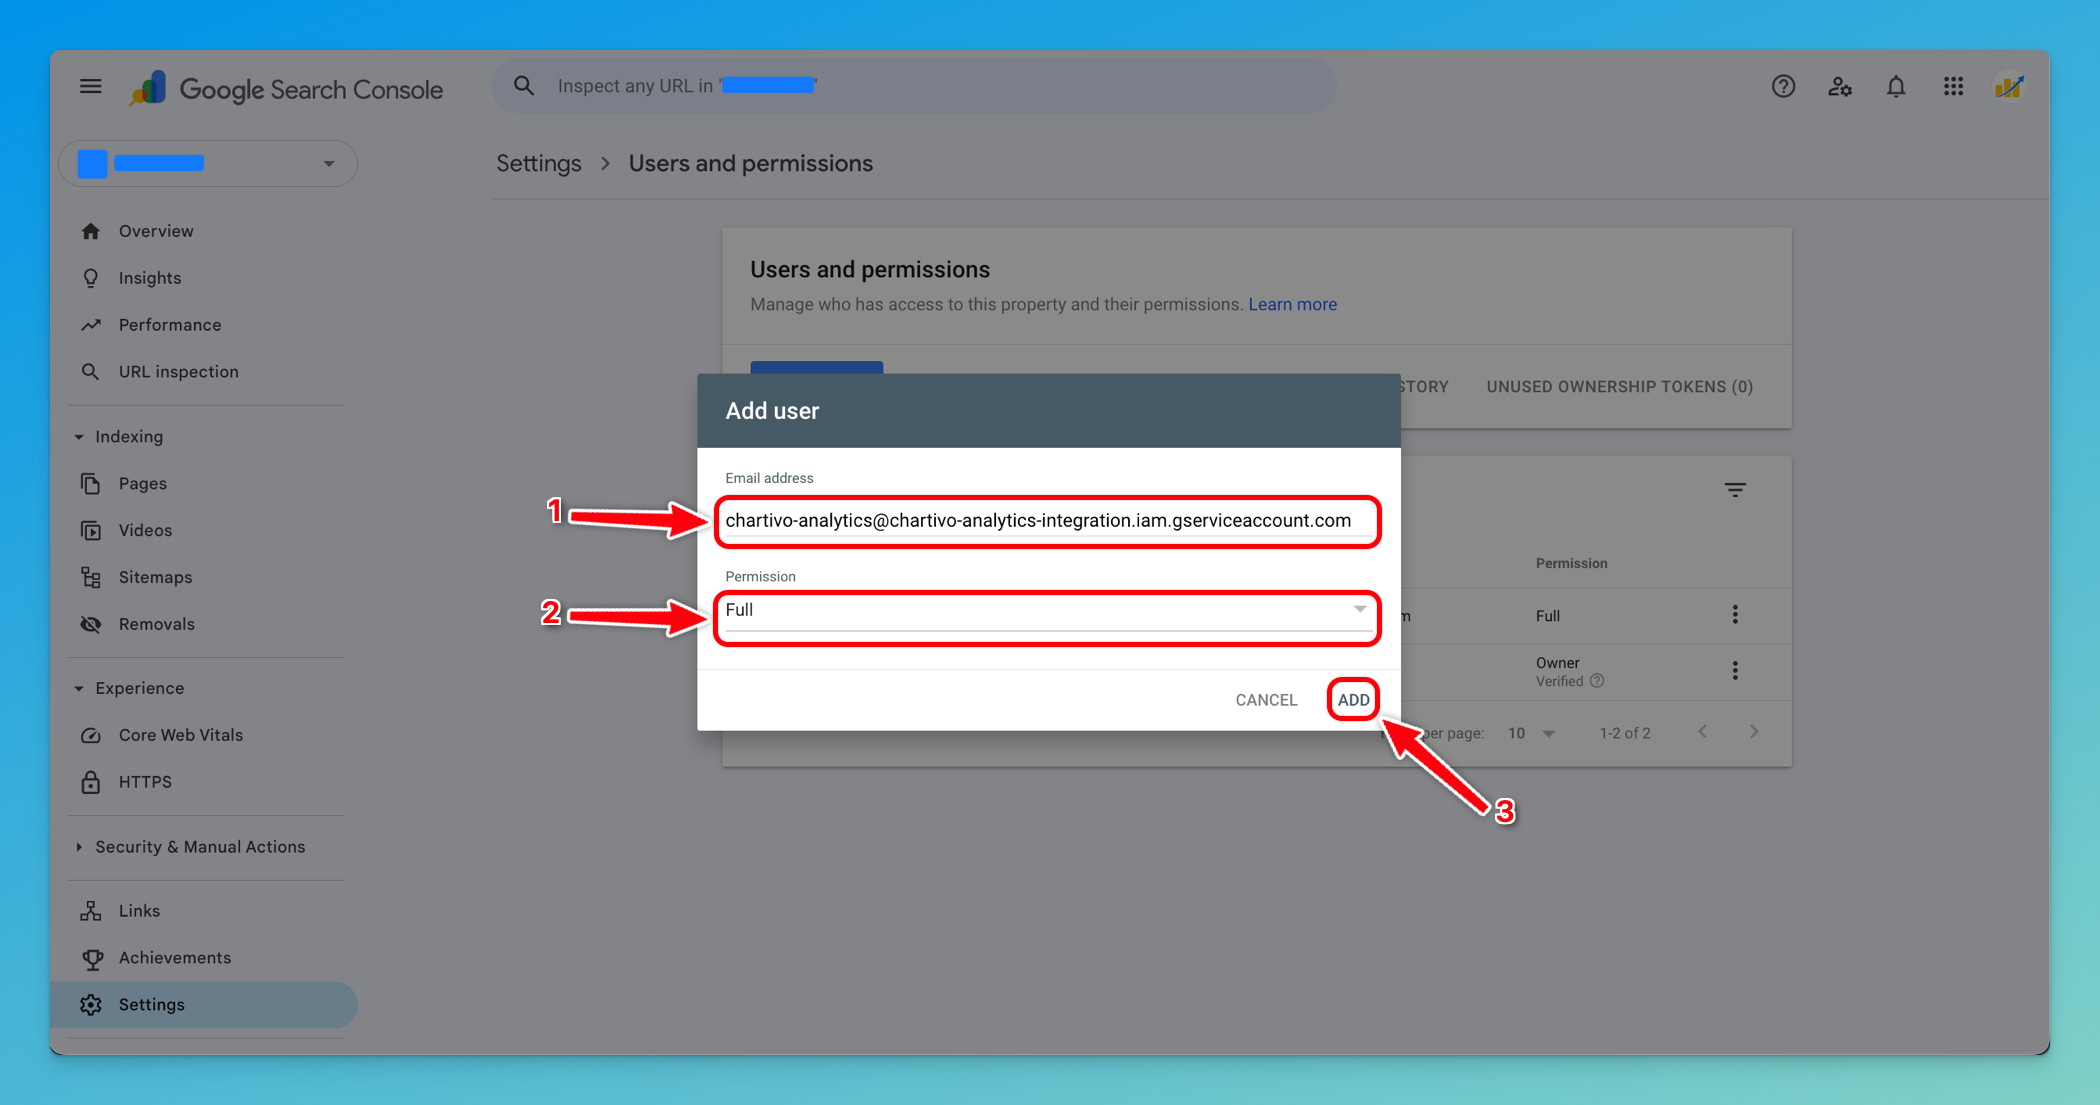
-
In the email address field, paste your service account email address
- This is found in the JSON file you downloaded (look for
"client_email") - Format:
chartivo-analytics@your-project.iam.gserviceaccount.com
- This is found in the JSON file you downloaded (look for
-
Under Permission, select Owner or Full
- Owner: Can view data and manage users (recommended)
- Full: Can view all data
- Restricted: Limited data access (NOT recommended - may cause issues)
-
Click Add
⚠️ Important: The service account needs Owner or Full permission. If you use Restricted, some metrics may not be available.
Part 3: Chartivo Configuration
Section titled “Part 3: Chartivo Configuration”Step 10: Access Chartivo Integrations Page
Section titled “Step 10: Access Chartivo Integrations Page”-
Log in to your Chartivo account
-
Navigate to the Integrations page from your dashboard
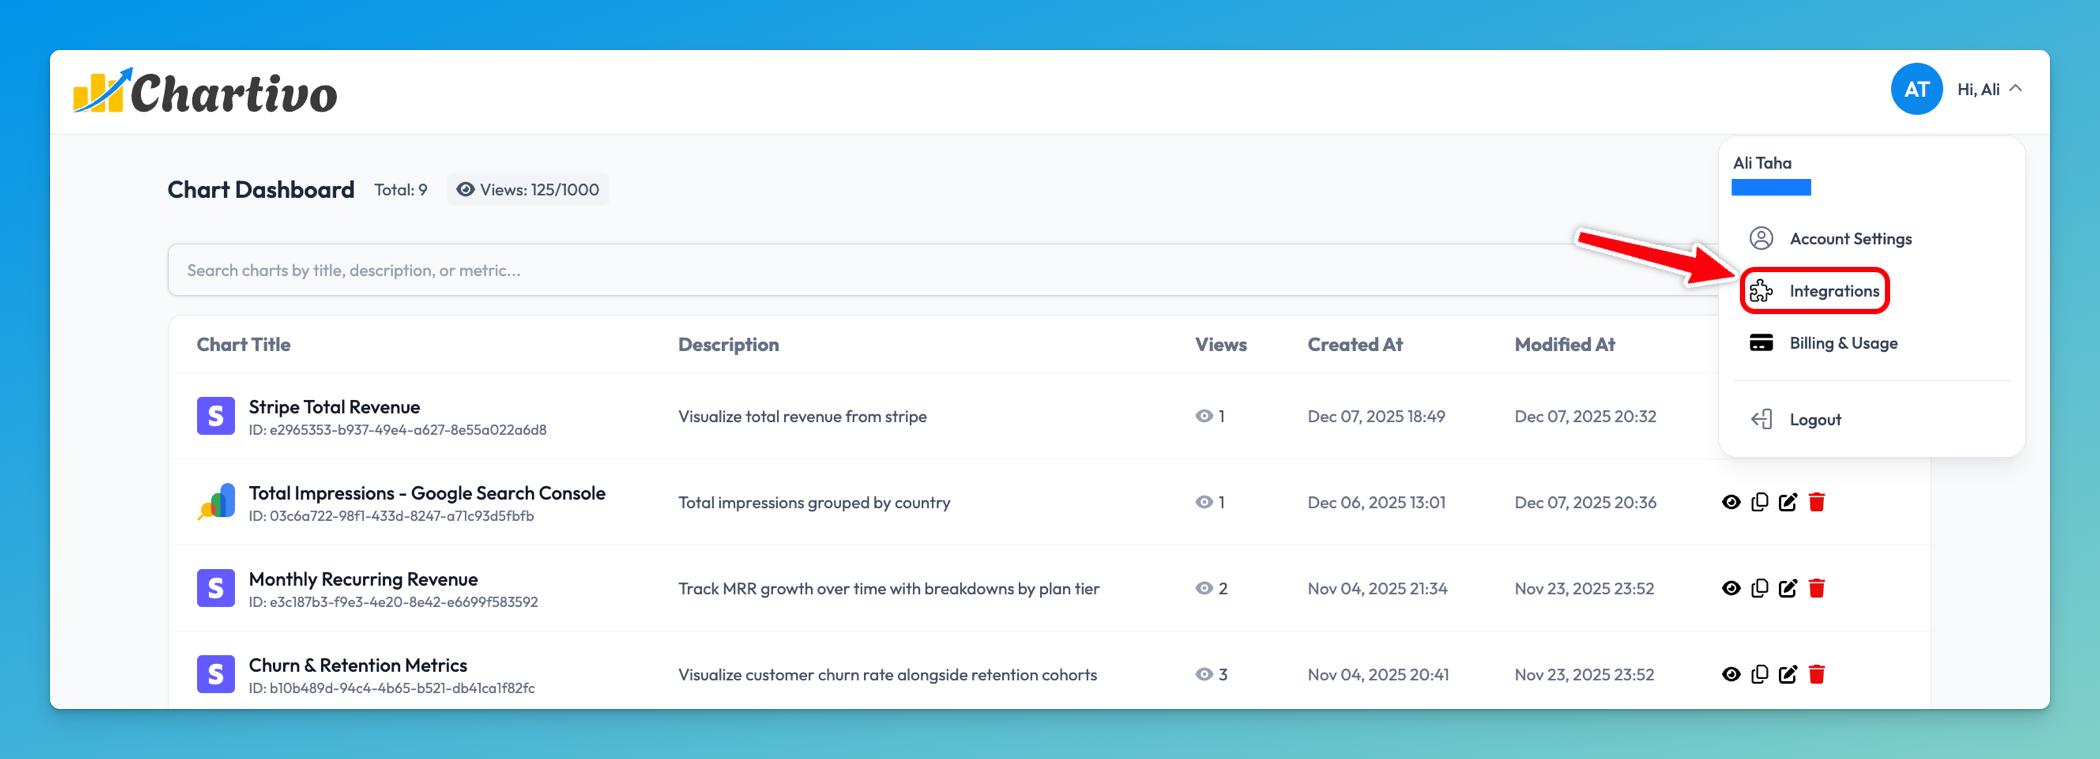
-
Locate the Google Search Console Configuration card
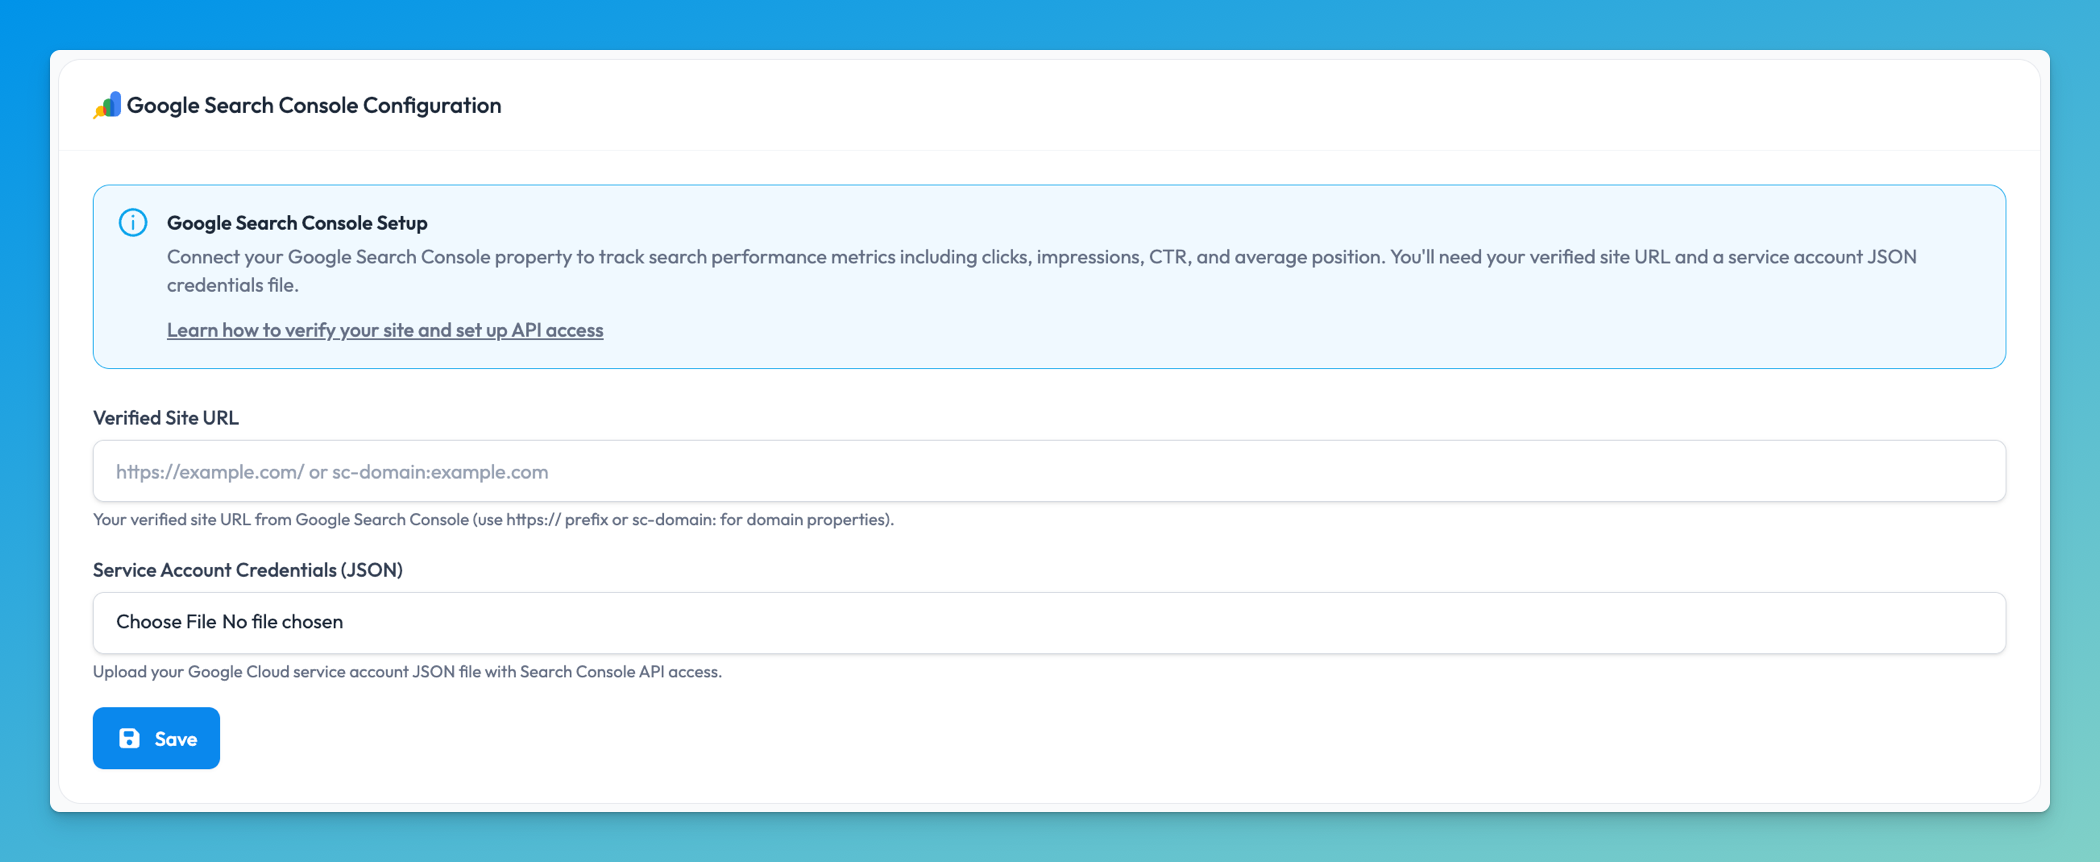
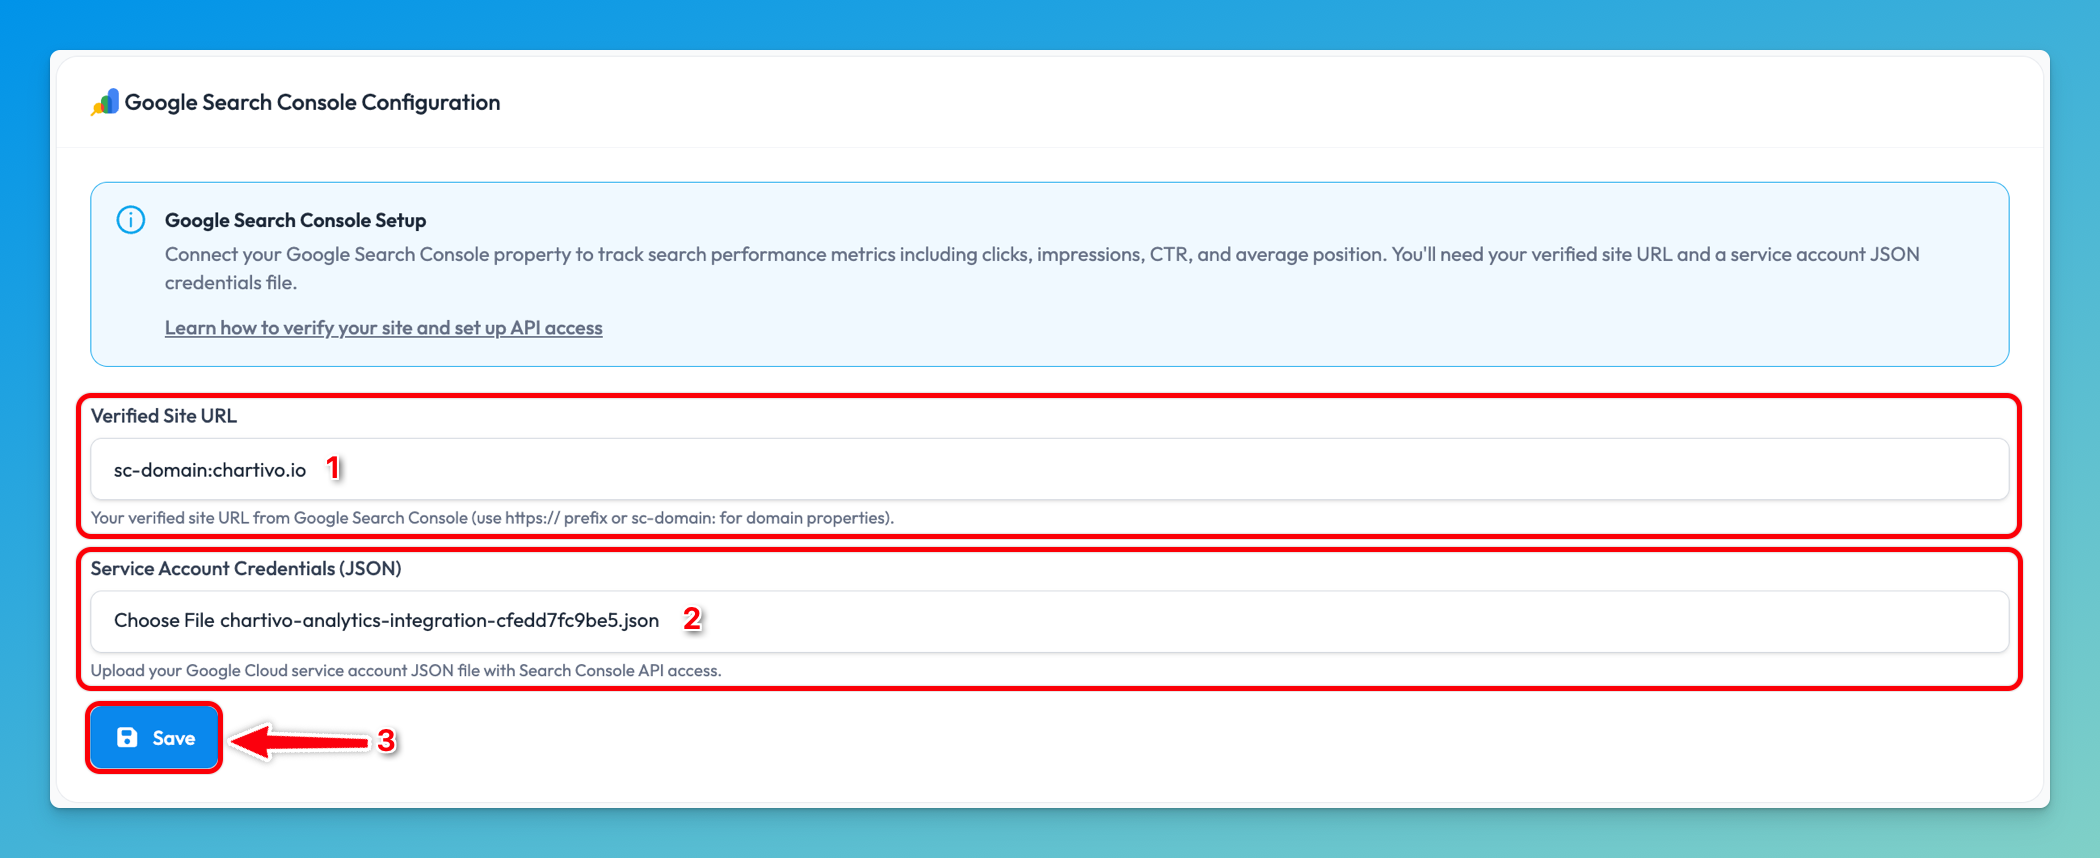
Step 11: Enter Your Verified Site URL
Section titled “Step 11: Enter Your Verified Site URL”- In the Google Search Console Configuration section, find the Verified Site URL field
- Paste the exact site URL you copied from Step 8
- For domain properties:
sc-domain:example.com - For URL prefix properties:
https://example.com/
- For domain properties:
- Double-check the format - it must match exactly what appears in Search Console
Common Mistakes:
- ❌
example.com(missing sc-domain: prefix for domain properties) - ❌
https://example.com(missing trailing slash for URL prefix) - ❌
http://example.com/(using http instead of https) - ✅
sc-domain:example.com(correct for domain property) - ✅
https://example.com/(correct for URL prefix property)
Step 12: Upload Service Account Credentials
Section titled “Step 12: Upload Service Account Credentials”- Click the Choose File button under Service Account Credentials (JSON)
- Navigate to where you saved the JSON key file from Step 6
- Select the JSON file (filename format:
your-project-xxxxx.json) - The filename should appear next to the button after selection
Step 13: Save Your Configuration
Section titled “Step 13: Save Your Configuration”- Review your entered information:
- Site URL is in the correct format
- JSON credentials file is selected
- Click the Save button at the bottom of the form
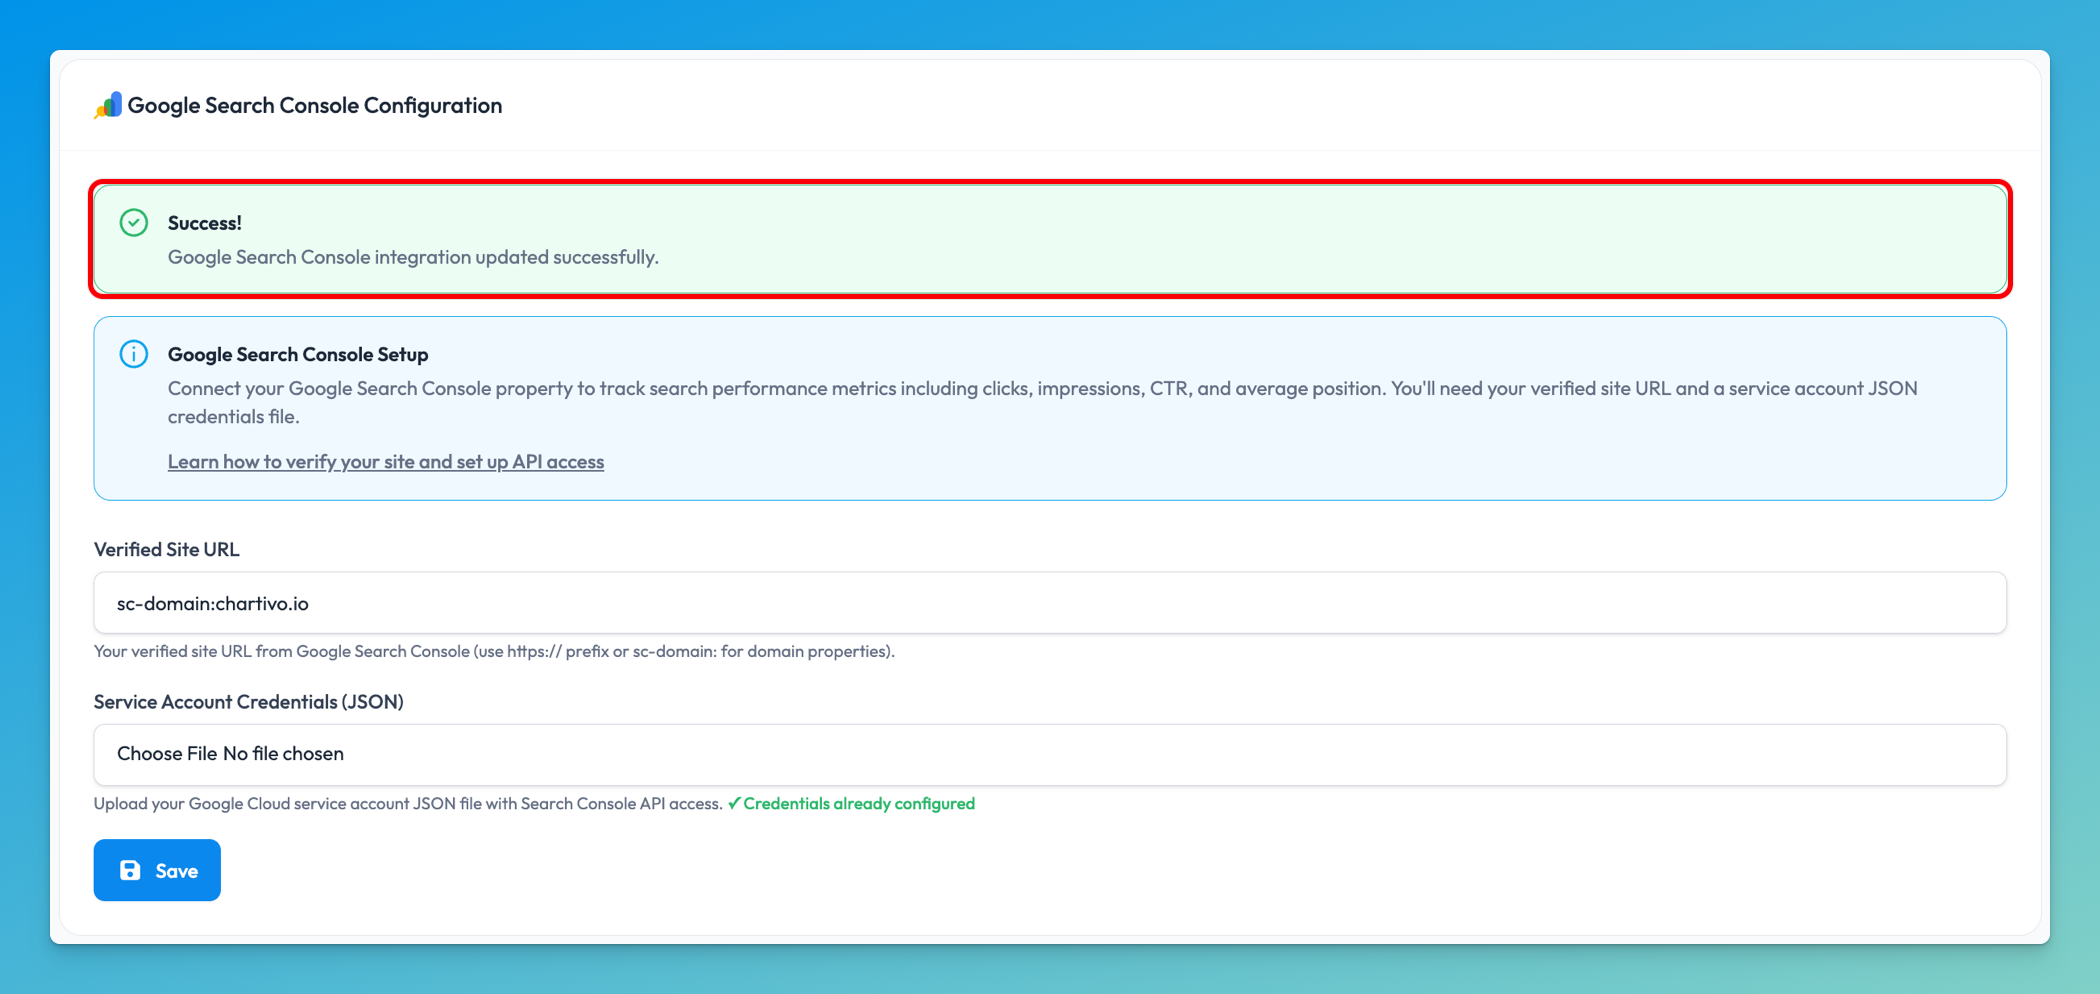
Step 14: Verify Successful Configuration
Section titled “Step 14: Verify Successful Configuration”After saving, you should see a success message displayed as a green banner.
The message will confirm: “Google Search Console integration created successfully” (for new integrations) or “Google Search Console integration updated successfully” (for updates).
If you already had a configuration, you’ll also see a green checkmark (✓) indicating “Credentials already configured” below the file upload field.
Step 15: Test Your Integration
Section titled “Step 15: Test Your Integration”-
Navigate to the Homepage in Chartivo
-
Click New Chart
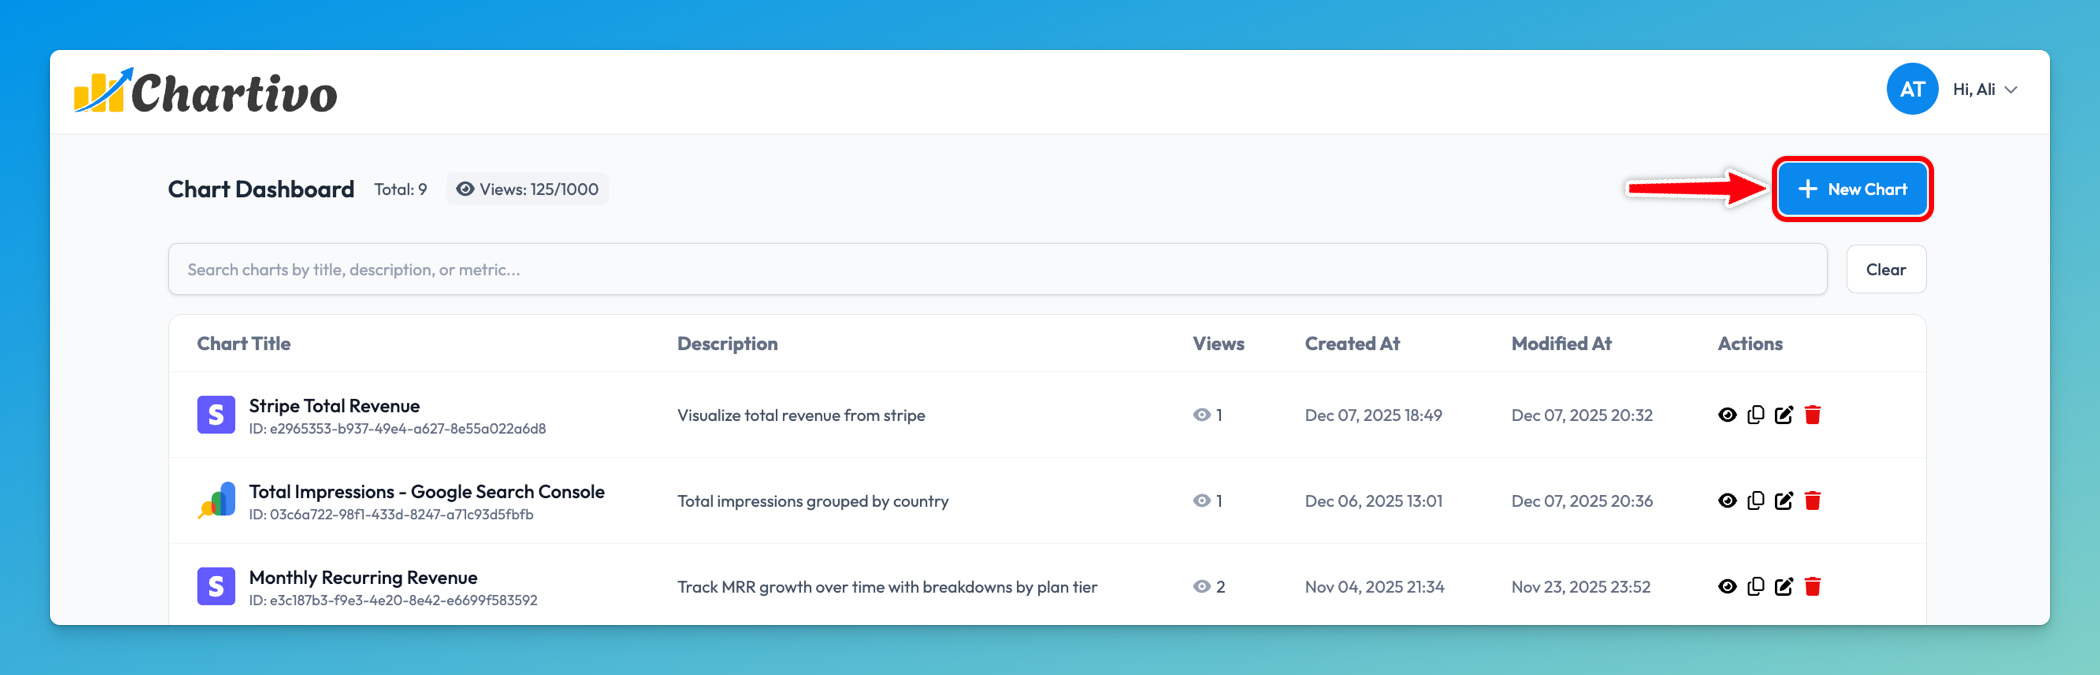
-
Select Google Search Console as your Data Source
-
You should now see available Search Console metrics such as:
- Clicks: Total number of clicks from search results
- Impressions: Number of times your site appeared in search results
- CTR (Click-Through Rate): Percentage of impressions that resulted in clicks
- Average Position: Average ranking position in search results
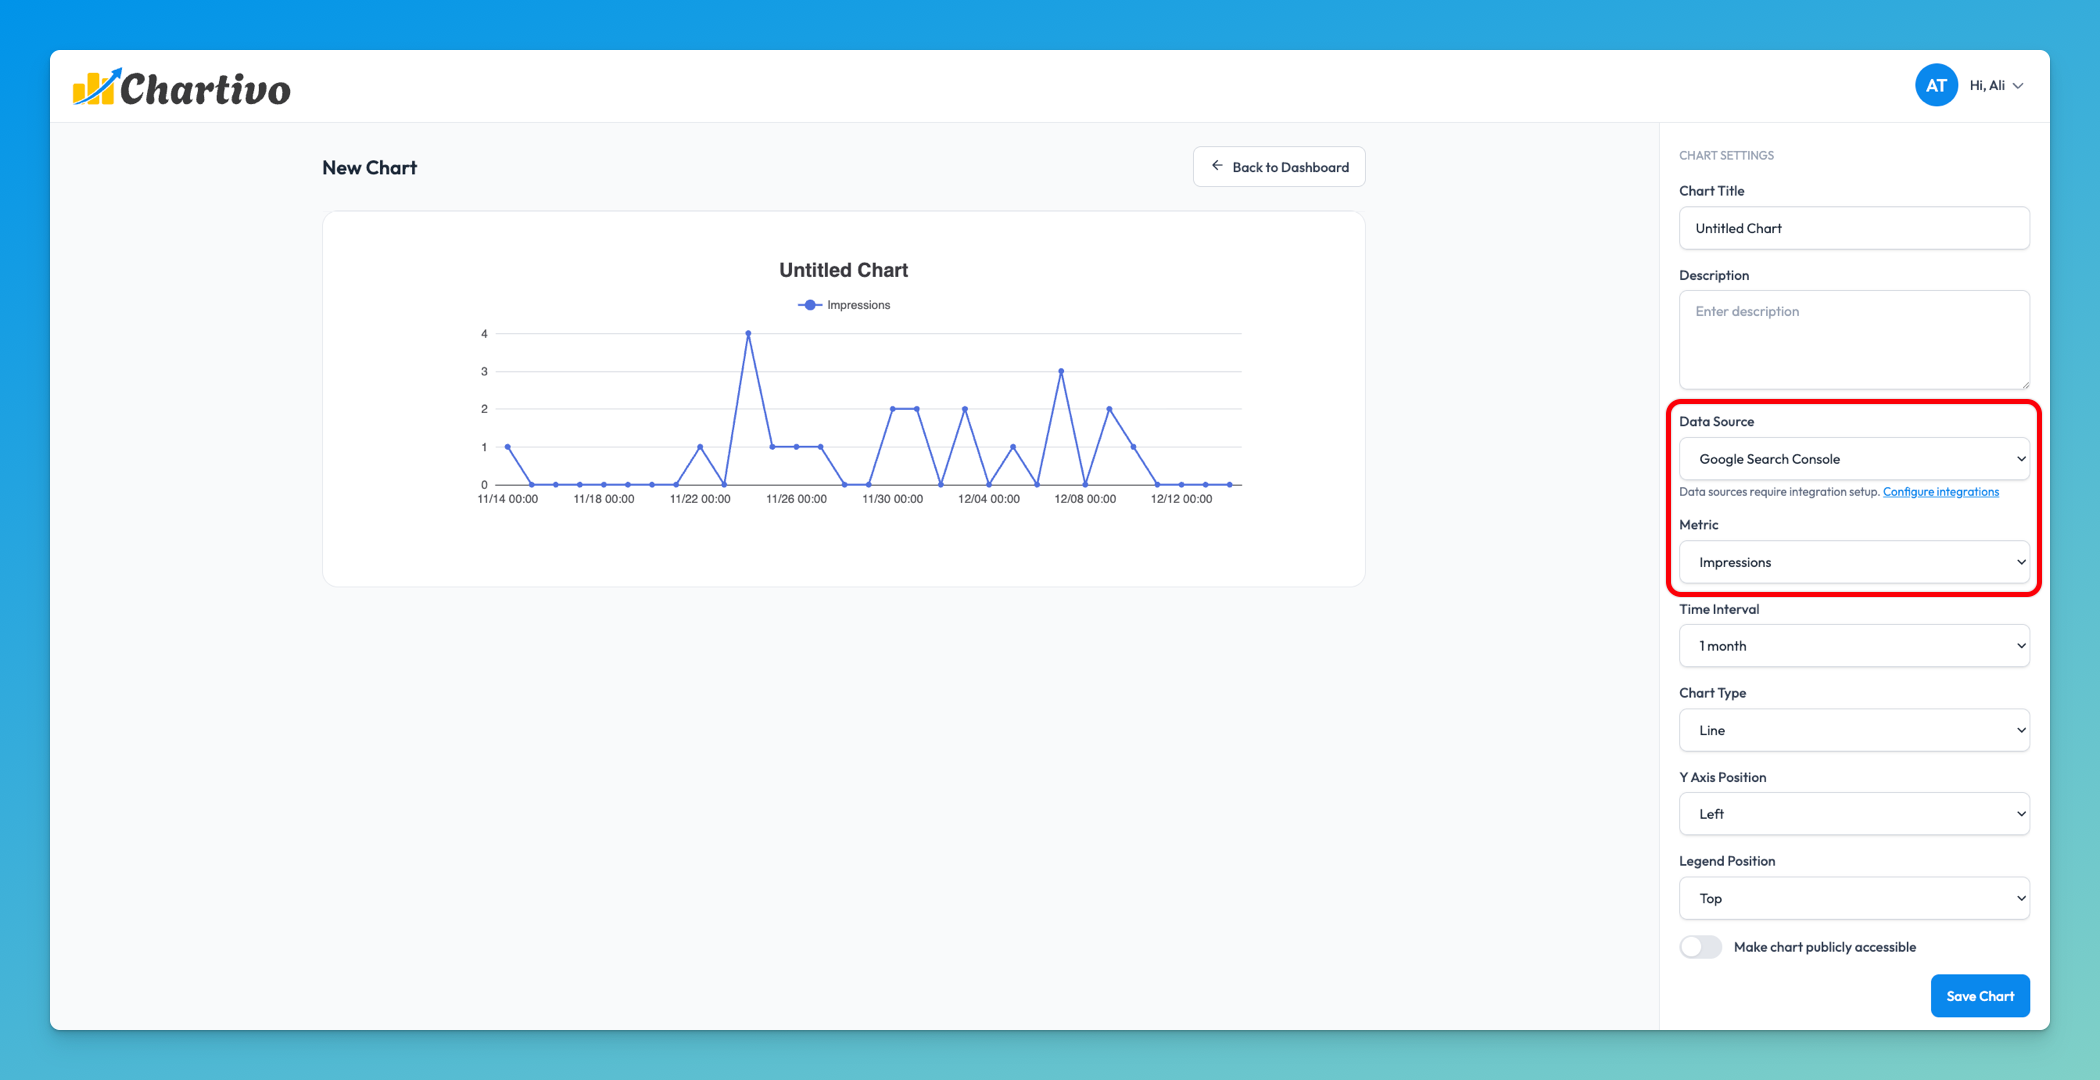
-
Select a metric and date range to verify data is loading correctly
Troubleshooting
Section titled “Troubleshooting”Error: “Site URL is required”
Section titled “Error: “Site URL is required””- Ensure you entered the site URL in the first field
- Verify the URL is not empty
Error: “Service account credentials file is required for new integration”
Section titled “Error: “Service account credentials file is required for new integration””- Make sure you selected the JSON file using the file picker
- Verify the file is actually a
.jsonfile (not.txtor other format) - Re-download the key file from Google Cloud Console if needed
Error: “Property not found” or “Invalid site URL”
Section titled “Error: “Property not found” or “Invalid site URL””- Verify the site URL format exactly matches what appears in Google Search Console
- For domain properties, ensure you include the
sc-domain:prefix - For URL prefix properties, ensure you include
https://and the trailing slash/ - Check for typos or extra spaces
No Data Appearing in Charts
Section titled “No Data Appearing in Charts”- Wait 48-72 hours after adding your site to Search Console (initial indexing period)
- Verify your site has search traffic (check in Google Search Console directly)
- Confirm the site URL matches exactly
- Check that your site is verified in Search Console
- Ensure the service account has Owner or Full permission
- Select a date range that includes data (try “Last month” or “Last 7 days”)
Error: “User permission level is insufficient”
Section titled “Error: “User permission level is insufficient””- The service account needs Owner or Full permission
- Go back to Search Console → Settings → Users and permissions
- Find the service account and change permission to Owner
- Wait a few minutes and try again
Understanding Domain vs URL Prefix Properties
Section titled “Understanding Domain vs URL Prefix Properties”Domain Property (sc-domain:example.com)
Section titled “Domain Property (sc-domain:example.com)”- Covers: All subdomains and protocols (http, https, www, non-www)
- Examples: example.com, www.example.com, blog.example.com, https://example.com
- Verification: Requires DNS record verification
- Use when: You want to track all variations of your site together
- Chartivo format:
sc-domain:example.com
URL Prefix Property (https://example.com/)
Section titled “URL Prefix Property (https://example.com/)”- Covers: Only the exact URL specified (including protocol and www/non-www)
- Examples: Only
https://example.com/(not http:// or www.) - Verification: Can use HTML file, meta tag, Google Analytics, or DNS
- Use when: You want to track a specific version of your site
- Chartivo format:
https://example.com/(must include https:// and trailing /)
Updating Your Configuration
Section titled “Updating Your Configuration”If you need to change your site URL or update credentials:
- Return to the Integrations page in Chartivo
- Modify the Verified Site URL field (if needed)
- Upload a new credentials file (if needed) - this is optional if updating only the site URL
- Click Save
- You’ll see a confirmation: “Google Search Console integration updated successfully”
💡 Note: If you change the site URL, ensure the service account has access to the new property in Search Console.
Reusing Service Account from Google Analytics
Section titled “Reusing Service Account from Google Analytics”If you already set up Google Analytics integration, you can reuse the same service account:
- Use the same JSON credentials file you downloaded for Google Analytics
- Grant that service account access to your Search Console property (Step 9)
- Upload the same JSON file in Chartivo’s Search Console configuration
- This simplifies management - one service account for both integrations
Security Information
Section titled “Security Information”Chartivo encrypts your service account credentials JSON before storing it in our database. Your credentials are only decrypted when making authorized API calls to Google Search Console on your behalf. We never expose your unencrypted credentials in logs, user interfaces, or error messages.
The service account follows the principle of least privilege - it only has read-only access to your Search Console data and cannot modify your site configuration, submit URLs for indexing, or change settings.
What Metrics Can You Track?
Section titled “What Metrics Can You Track?”Once configured, you can create charts with these Google Search Console metrics:
| Metric | Description |
|---|---|
| Clicks | Total clicks from Google Search to your site |
| Impressions | How many times your site appeared in search results |
| CTR | Click-through rate (clicks ÷ impressions × 100) |
| Average Position | Average ranking position in search results (lower is better) |
You can filter and segment these metrics by:
- Date range: Last 7 days, 14 days, 1 months, etc.
Data Refresh
Section titled “Data Refresh”Charts using Google Search Console data is refreshed manually when the page that has the chart is reloaded
Permissions
Section titled “Permissions”Chartivo requires the following Search Console permissions:
- Read access to search performance data
- Read access to URL inspection data
- Read access to site settings
We never request permissions to modify your site, submit URLs, or change Search Console settings.
Need Help?
Section titled “Need Help?”If you encounter any issues during setup:
- Review the troubleshooting section above
- Verify all steps were completed in the exact order
- Check that your site is verified in Google Search Console
- Contact Chartivo support with details about which step failed
Appendix A: Finding Your Service Account Email
Section titled “Appendix A: Finding Your Service Account Email”If you need to find your service account email address after downloading the JSON:
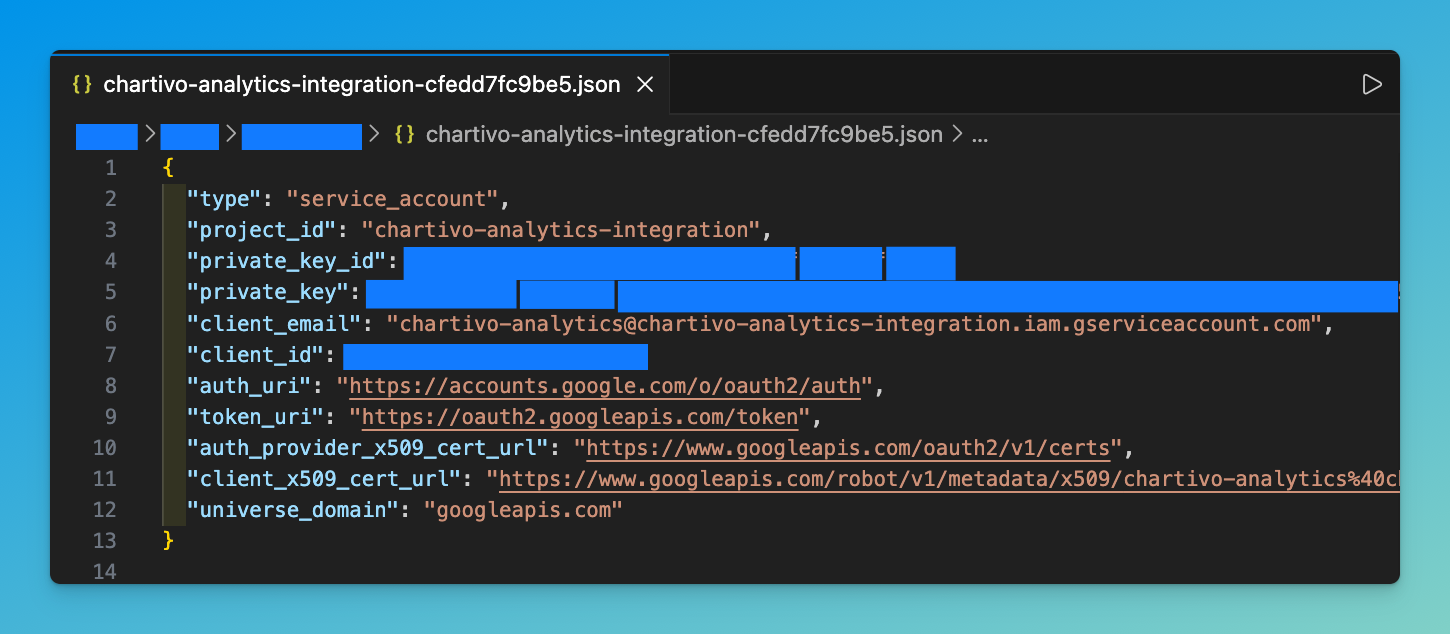
Method 1: Open the JSON file
Section titled “Method 1: Open the JSON file”- Locate the downloaded JSON file
- Open it in a text editor (Notepad, TextEdit, VS Code, etc.)
- Look for the
"client_email"field - The value will be in the format:
service-account-name@project-id.iam.gserviceaccount.com
Method 2: Google Cloud Console
Section titled “Method 2: Google Cloud Console”- Go to APIs & Services → Credentials
- Under Service Accounts, you’ll see the email address listed
- Copy the email address
Appendix B: Verifying Your Site in Search Console
Section titled “Appendix B: Verifying Your Site in Search Console”If you haven’t verified your site yet, here are the main verification methods:
For Domain Properties (Recommended)
Section titled “For Domain Properties (Recommended)”- Choose Domain property when adding a property
- Google will provide a TXT DNS record
- Add this TXT record to your domain’s DNS settings (through your domain registrar)
- Wait for DNS propagation (can take up to 24 hours)
- Click Verify in Search Console
Appendix C: Common Site URL Formats
Section titled “Appendix C: Common Site URL Formats”Here are examples of correct site URL formats for Chartivo:
| Property Type | Search Console Shows | Enter in Chartivo |
|---|---|---|
| Domain | sc-domain:example.com | sc-domain:example.com |
| Domain | sc-domain:blog.example.com | sc-domain:blog.example.com |
| URL Prefix (HTTPS) | https://example.com/ | https://example.com/ |
| URL Prefix (WWW) | https://www.example.com/ | https://www.example.com/ |
| URL Prefix (Subdomain) | https://blog.example.com/ | https://blog.example.com/ |
❌ Incorrect formats (will cause errors):
example.com(missing sc-domain: prefix)www.example.com(missing protocol and sc-domain:)https://example.com(missing trailing slash for URL prefix)http://example.com/(wrong protocol - use https if your site uses https)
Q: Can I use the same service account for both Google Analytics and Search Console? A: Yes! You can reuse the same service account JSON file for multiple Google integrations. Just make sure to grant the service account access in both GA4 and Search Console.
Q: What’s the difference between Owner and Full permission? A: Owner can manage users and view all data. Full can only view all data but cannot manage users. Both work for Chartivo.
Q: How far back does the integration sync data? A: We sync up to 1 month of historical Search Console data.
Q: Can I connect multiple Search Console properties? A: No, You cannot connect multiple properties (different sites or different property types for the same site). Please drop us a message at support@chartivo.io if you need to connect multiple properties support to be prioritized.